
A lot of maintenance managers meet contamination control the same way. The machine starts getting lazy. A ram hesitates, a valve sticks, oil runs hotter than it should, and everyone looks first at the pump, the solenoid, or the pressure setting.
Often, the problem is much smaller and much nastier. Fine particles, moisture, and air get into the oil, move through tight clearances, and start wearing the system from the inside out. It's like cholesterol in arteries. The flow path is still there, but it isn't clean, efficient, or reliable any more.
In a hydraulic system, contamination control isn't housekeeping. It's protection against downtime, repeat failures, and expensive troubleshooting that never quite gets to the root cause. If you run presses, mobile plant, power packs, agricultural equipment, or production machinery, clean oil is one of the few things that affects almost every component at once.
The Hidden Cost of Dirty Hydraulic Fluid
Monday morning in the workshop. A press is back online after a pump change, production restarts, and by lunchtime the machine is hunting on pressure and running hotter than it should. On paper, the repair is done. In practice, the new part has been dropped straight into a dirty circuit, and the clock to the next failure is already running.
A hydraulic system can look healthy from the outside and still be wearing itself out internally. The tank level is correct, there are no obvious external leaks, and the machine still starts on demand. Then the proportional valve begins to drift, a cylinder chatters under load, or a pump fitted only months ago starts putting metal back into the oil.
Dirty hydraulic fluid rarely creates one clean, obvious failure. It drives a sequence of smaller losses first. Clearances open up. Internal leakage increases. Heat rises. Fine debris keeps circulating through parts that were built to work with very little margin. By the time a machine stops, contamination has often spread far beyond the point where it first entered the system.
How dirty oil causes problems on the workshop floor
On site, contamination usually appears as a pattern of repeat trouble:
- Erratic behaviour: Spools stick, actuators respond late, pressure control becomes unstable, and machine movements lose consistency.
- Reduced component life: Pumps, motors, servo valves, and cartridge valves wear faster when hard particles keep passing through tight working clearances.
- Repeat failures after repair: The damaged component gets changed, but the replacement goes back into the same contaminated oil.
- Longer fault-finding time: Maintenance teams chase electrical, mechanical, and settings issues while the root cause sits in the reservoir, transfer container, filter practice, or breather.
One of the most expensive mistakes is assuming new oil, new parts, or a new filter element means a clean system. It does not. I have seen service calls where the contamination entered through a topping-up jug used on several machines, a dirty standpipe cap left on the bench, or tooling moved from a failed unit to a healthy one without being cleaned properly. That kind of cross-contamination is easy to miss and expensive to repeat.
Practical rule: If the same hydraulic fault returns after a component change, inspect the contamination path before condemning the replacement part.
Managers need a routine, not a rescue plan. Clean storage, sealed transfer containers, protected fittings, controlled top-ups, correct filter placement, representative sampling, and a clear post-event response after a hose burst or component failure all make a measurable difference to uptime. ISO cleanliness codes matter, but only if the workshop turns them into daily habits that technicians can follow.
The cost sits in labour hours, lost production, repeat parts spend, and machines that never quite return to stable operation. Dirty oil works like cholesterol in arteries. Flow is still possible for a while, but efficiency drops, heat builds, and the risk of a serious blockage or failure keeps rising.
What Is Hydraulic Contamination and Why It Matters
Hydraulic contamination is anything in the fluid that shouldn't be there, or anything in the wrong amount that stops the fluid doing its job properly. In practice, that usually falls into solid, liquid, and gaseous contamination.
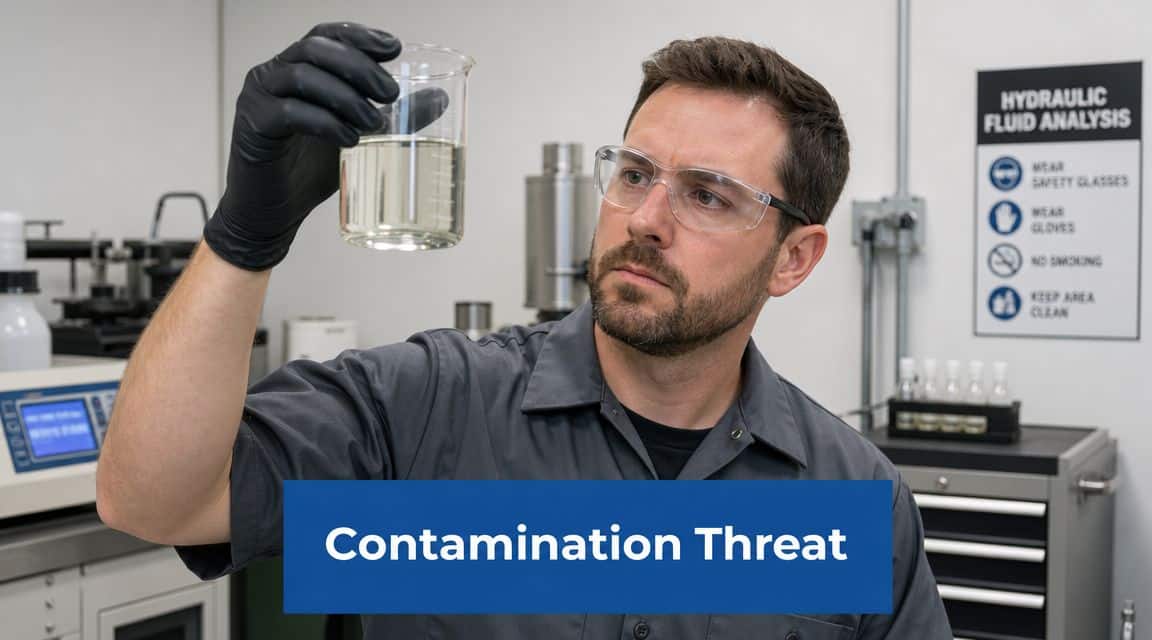
Dirt is a common first consideration. Fair enough, because solid particles do enormous damage. But water and entrained air can be just as disruptive, especially in systems with fine-tolerance components and variable duty cycles.
The three main types
Solid contamination includes dust, metal fines, seal fragments, paint flakes, fibres from wipes, rust, and wear debris. These particles move with the oil and pass through pumps, valves, and actuators. Some cut surfaces directly. Others wedge into clearances and start scoring precision parts.
Liquid contamination is usually water. It can enter through poor storage, tank breathing, failed coolers, pressure washing, or outdoor service work in bad weather. Water strips away lubricity, encourages corrosion, and accelerates fluid degradation.
Gaseous contamination is air in the oil. That may be aeration from a suction leak or foaming from return conditions in the tank. Air makes the system spongy, noisy, and less predictable. It also increases oxidation and heat.
Why tiny particles cause big trouble
Hydraulic clearances are small. Very small. That's why the cholesterol analogy works. A machine can have all the pressure it needs on paper, but if the oil path through precision components is loaded with contamination, performance falls away.
A valve spool doesn't need a handful of grit to jam. It only needs the wrong particle in the wrong place at the wrong time.
Here's what contamination tends to do:
- Abrasive wear: Hard particles scour metal surfaces and create yet more wear particles.
- Erosive damage: High-speed flow drives contaminants into edges and orifices.
- Blocking and sticking: Fine contamination interferes with servo and proportional components first.
- Chemical decline: Water and air push the fluid out of spec faster.
- Efficiency loss: Internal leakage and friction rise, so the machine works harder for less output.
Clean-looking oil tells you almost nothing. The particles that do the most damage are often too small to see with the naked eye.
Why it matters to cost and uptime
If you want reliability, contamination control sits near the top of the list because it affects the whole loop. Pumps generate flow. Valves control it. Cylinders and motors convert it into work. Dirty oil shortens the useful life of all of them together.
That's why experienced engineers usually treat fluid cleanliness as a first-line maintenance issue, not a finishing touch after the “real” repair. If you ignore contamination, you're effectively fitting new parts into an unhealthy circulatory system.
Understanding Fluid Cleanliness Standards and Codes
A maintenance manager gets a lab report back after a pump failure. The oil looks clear in the sample bottle, but the report shows 20/18/15. If the machine runs proportional valves or tight-clearance components, that code is a warning, not admin.
ISO 4406 gives the workshop a shared way to describe particle contamination. Without it, one engineer says the oil is acceptable, another says it is dirty, and nobody is working to the same limit. With it, you can set a target for each system, check whether the machine meets it, and decide what action is worth the downtime.
A code such as 18/16/13 records particle concentration bands at defined sizes. It is a control measure, not a random label.
What the three numbers mean
Under ISO 4406, the code usually refers to counts in three particle size bands:
- First number: particles larger than 4 µm
- Second number: particles larger than 6 µm
- Third number: particles larger than 14 µm
Higher numbers mean more particles per millilitre. The practical point is simple. Different components forgive different levels of dirt. A basic gear pump on a low-precision circuit may keep running with contamination levels that would cause sticking, wear, or nuisance faults in a servo valve, proportional valve, or pilot stage.
Decoding ISO 4406 Cleanliness Codes
| ISO Range Number | Particles per ml (More than) | Particles per ml (Up to and including) |
|---|---|---|
| 11 | 10 | 20 |
| 12 | 20 | 40 |
| 13 | 40 | 80 |
| 14 | 80 | 160 |
| 15 | 160 | 320 |
| 16 | 320 | 640 |
| 17 | 640 | 1,300 |
| 18 | 1,300 | 2,500 |
| 19 | 2,500 | 5,000 |
| 20 | 5,000 | 10,000 |
| 21 | 10,000 | 20,000 |
| 22 | 20,000 | 40,000 |
That table matters because each step up is not a small cosmetic change. It means a higher contamination band, which often changes the risk level for the whole circuit. If a report comes back at 20/18/15 for a machine with fine-clearance control hardware, the sensible response is to check the target code for that asset, review recent maintenance activity, and decide whether filtration, flushing, or a deeper fault investigation is needed.
For teams that want a measured baseline rather than guesswork, particle counting for hydraulic oil cleanliness gives a usable starting point. It turns “the oil seems all right” into evidence you can trend.
Why standards matter outside the lab
The useful part of ISO 4406 is what happens after the sample result lands on the desk. Good teams set cleanliness targets by asset class, write them into job sheets, and treat them as part of the maintenance standard. In practice, that means one target for a coarse mobile circuit, another for a proportional system, and tighter control again after a rebuild or major hose failure.
That same discipline shows up in other contamination-sensitive fields. Pharmaceutical production uses a formal contamination control strategy because a clean process depends on defined limits, controlled handling, and verification. The principle carries across to hydraulics well enough. Set the target. Control how oil, tools, and replacement parts enter the job. Check the result.
Tool control gets missed here. A filtered top-up put through a dirty hand pump, an open drum trolley used for several oil types, or test gear carried from one failed machine to another can shift particle counts fast. In UK workshops, I have seen more than one “mystery” cleanliness problem traced back to shared transfer kit rather than the machine itself.
Water risk also needs the same mindset. Moisture control in a hydraulic system is a different problem from building damp, but the management principle is similar: stop ingress, deal with the source, and verify that conditions are back under control. Restore Heroes' mold prevention advice makes the same point in another setting.
What works on the workshop floor
Standards only help if they are tied to routine tasks. For MRO and OEM teams, the practical habits are straightforward:
- Set target cleanliness codes by machine type. Do not use one blanket number for every asset.
- Record pre-service and post-service results. This matters after hose bursts, pump failures, cylinder rebuilds, and tank entry.
- Use dedicated, labelled transfer equipment. Cross-contamination between fluids and between dirty and clean jobs is common.
- Treat post-event recovery as a managed job. After a major failure, changing the oil and filter alone may leave debris in lines, actuators, and manifolds.
- Challenge visual judgement. Clear oil can still fail the target code by a wide margin.
A cleanliness code gives maintenance teams a practical pass or fail reference. It replaces opinion with a number that can be acted on.
Used properly, ISO 4406 helps justify filter upgrades, better storage practice, cleaner assembly methods, and tighter controls after contamination incidents. That is how standards stop being lab language and start preventing repeat failures.
Identifying and Eliminating Contamination Sources
You can't control contamination if you only think about the tank. Most hydraulic systems pick up dirt and moisture from several directions at once. One source may start the problem, but poor workshop practice often keeps feeding it.
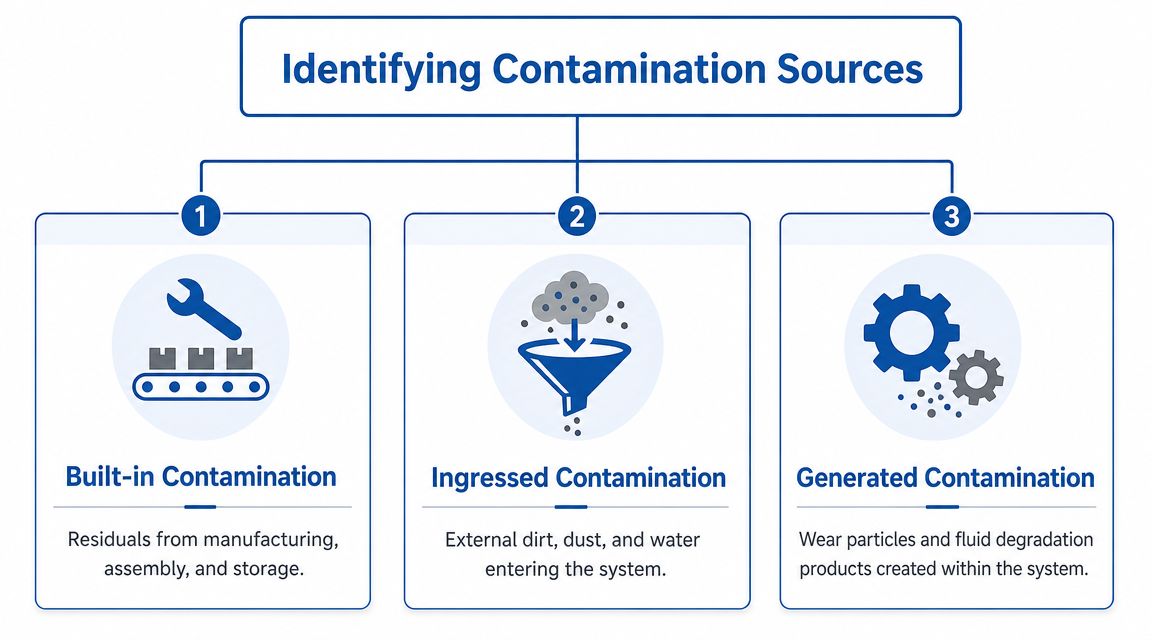
A practical way to hunt the source is to split contamination into built-in, ingressed, and generated pathways. When a team does that, fault-finding becomes much sharper.
Built-in contamination
This is the dirt that was there before the machine ever started work. It comes from manufacturing, assembly, transport, or poor storage.
Typical examples include:
- Weld and fabrication residue: spatter, swarf, and grinding dust left in pipework or tanks
- Assembly debris: fibres, thread fragments, seal offcuts, and packaging residue
- Stored components: ports left uncapped, cylinders stored outdoors, replacement hoses open to the workshop atmosphere
Built-in contamination catches people out because the machine is “new” or “recently rebuilt”. New doesn't mean clean. Rebuilt doesn't mean flushed.
Ingressed contamination
This is outside material entering a running system. In UK plant environments, it's one of the most common pathways.
Look first at these points:
- Breathers and fillers: open caps, poor seals, damaged breathers, and dirty top-up methods
- Rod seals and wipers: worn seals let dust and moisture travel into cylinders, then back to tank
- Service work: open lines during maintenance, dirty funnels, unsealed drums, and contaminated transfer containers
- Operating environment: agriculture, quarrying, waste handling, steel processing, and outdoor mobile equipment all raise exposure
Moisture is part of this as well. If your workshop already deals with damp environments, the logic behind Restore Heroes' mold prevention advice is surprisingly relevant. The setting is different, but the principle is the same. Control moisture entry, ventilation, and hidden build-up before it becomes a deeper contamination problem.
Generated contamination
This contamination is made by the machine itself. It usually appears after a component starts wearing or the fluid begins to break down.
Common sources are:
| Source inside the system | What it sheds | What you’ll notice |
|---|---|---|
| Wearing pump or motor | Metal particles | Noise, heat, reduced efficiency |
| Failing bearings | Fine metallic debris | Vibration, rising wear metals |
| Degrading seals | Elastomer fragments | Sticky valves, dark residue |
| Oxidised fluid | Sludge and varnish-like by-products | Slow response, deposits, overheating |
Generated contamination is dangerous because it feeds on itself. Wear creates particles, particles create more wear, and the filter eventually gets overwhelmed or bypassed.
The overlooked source of cross-contamination
A lot of workshops miss the contamination risk from reusable service tools and shared equipment. A transfer rig, flushing cart, quick-release coupling, funnel, or test hose can look clean and still carry contamination internally.
That's not just theory. Research on reusable hardware found that equipment such as handpiece motors can become internally contaminated during use and may later release contaminants, showing that visible cleanliness isn't enough and that contamination can remain hidden inside equipment, as reported in this PubMed record on internal contamination and cross-contamination risk.
The hydraulic lesson is straightforward. Don't judge service equipment by the outside surface alone.
If a flushing rig or transfer hose serves dirty and clean systems without control, it becomes a contamination delivery tool.
Practical Fluid Handling and Filtration Strategies
Most contamination problems aren't dramatic. They come from ordinary habits done badly. An open drum left in the corner. A top-up from a jug that also sees gearbox oil. A replacement filter chosen by thread size alone. Good contamination control earns its keep in these instances.
Start with handling, not just filtration
A filter can only remove contamination after someone has already let it in. That's why fluid handling deserves as much attention as the filter element.
Use these workshop rules:
- Keep new oil sealed: Store drums and containers indoors, capped, labelled, and away from welding dust or wash-down splash.
- Use dedicated transfer equipment: One clean transfer container or filter cart per fluid type is far better than “whatever's nearby”.
- Wipe the area before opening: Tank lids, filler points, and couplings should be cleaned before they're disturbed.
- Cap and plug everything: Hoses, manifolds, valves, and cylinders should never be left open longer than necessary.
Brand-new hydraulic oil is not automatically clean enough for the machine it's going into. It may be acceptable for bulk supply and still be too dirty for a fine-control circuit. Filtering oil during transfer into the tank is often the safer practice.
Choosing the right filtration layout
Hydraulic filtration works best when the filter location matches the job.
Pressure filters protect sensitive downstream components. These are useful where valves or actuators need immediate protection from pump-generated debris.
Return-line filters catch contamination before oil re-enters the reservoir. They're common and useful, but they don't stop all contamination from circulating through the pressure side first.
Offline filtration units (often called kidney-loop systems) clean the reservoir independently of machine operation. These are handy on larger tanks, older systems, or any circuit that needs regular polishing without interrupting production.
For practical component options, inline hydraulic oil filters for circuit protection are one route used in hydraulic systems where filtration is built into the line rather than treated as an afterthought.
Make sense of Beta ratio without overcomplicating it
Engineers sometimes switch off when filtration turns into formula talk. The useful part is simple. A filter's Beta ratio tells you how effectively it captures particles at a stated size.
Think of it as a separation test. If a filter has strong capture efficiency at the particle size you care about, it gives you a better chance of holding the system at its target cleanliness code. If the rating looks good only on paper and not at relevant particle sizes, the machine still sees dirty oil where it matters.
A few practical points help:
- Match the filter to the component sensitivity: Fine-tolerance circuits need finer control of contamination.
- Check collapse and bypass characteristics: A good element still has to survive the duty.
- Watch dirt-holding capacity: A small filter on a dirty system blocks quickly and may go into bypass.
- Review differential pressure trends: They tell you whether the element is loading normally or the system is producing excessive debris.
Review the evidence, not just the maintenance schedule
One of the stronger lessons from formal contamination control guidance is that controls shouldn't sit still. UK-relevant guidance says the strategy should be actively reviewed and driven by historical trending such as monitoring and process data, making data review part of governance rather than an optional exercise, as set out in the ECA contamination control strategy guideline.
That principle fits hydraulics perfectly. Don't just ask, “Did we change the filter?” Ask:
- Is the cleanliness result improving?
- Are repeat alarms coming from the same machine?
- Does one workshop shift introduce more contamination than another?
- Did the last repair reduce the problem?
Good handling and filtration don't rely on faith. They rely on repeatable practice and evidence.
Effective Fluid Sampling and Condition Monitoring
If you only check hydraulic oil after a failure, you're using analysis as a post-mortem tool. It's far more valuable as an early warning system. Sampling tells you what the machine is experiencing before the pump screams, before the spool sticks, and before production stops.
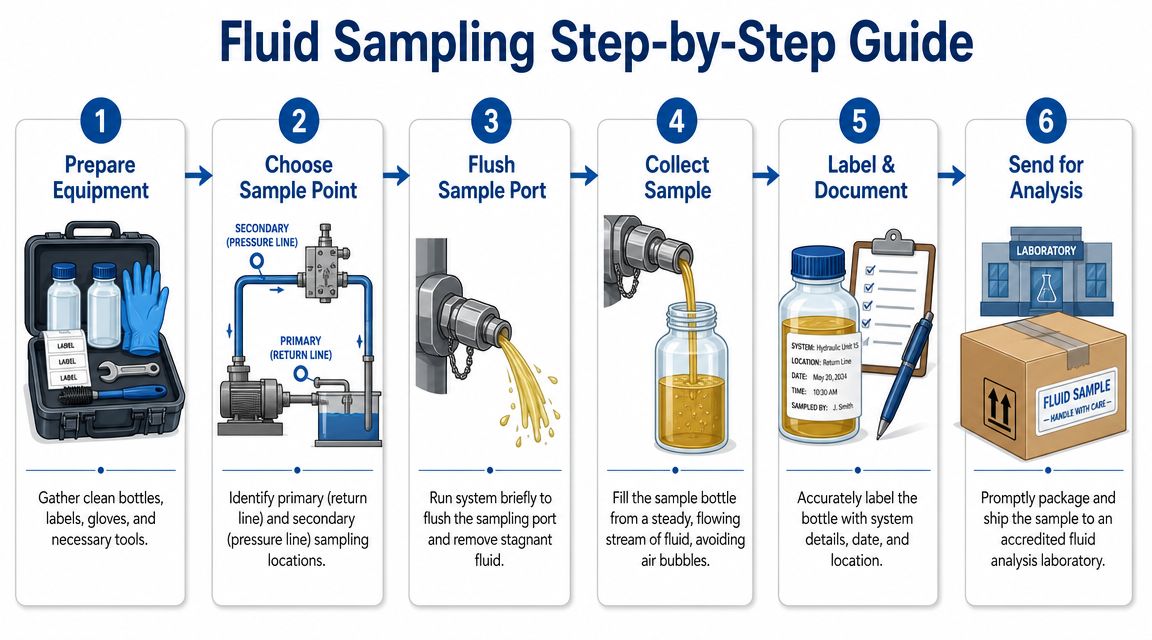
A lot of bad decisions come from bad samples. The lab can only analyse what you give it. If the bottle is dirty, the sample point is poor, or the machine is cold and idle, the result won't represent the system properly.
How to take a useful sample
The best sample is usually taken from a live, circulating system at a proper sample point. Not from the bottom of a dirty drain pan. Not from the top of the tank with a random bottle.
Use this method:
- Warm the machine to normal operating condition: Cold oil can mask the true condition.
- Choose a representative point: A return line or designated sampling port is generally better than the reservoir top.
- Clean around the port thoroughly: Don't push external dirt into the sample.
- Flush the point first: Let a small amount of oil pass before filling the bottle.
- Fill carefully: Avoid splashing, bubbling, and touching the bottle neck or cap interior.
- Label it properly: Machine ID, location, date, fluid type, and hours all matter.
Later in the process, video can help technicians standardise the method across shifts and sites.
Lab samples and live monitoring
Bottle samples sent to a lab are useful for particle count, water content, viscosity, and general condition assessment. They give depth. Online monitors and particle counters give speed.
That's the trade-off. A lab tells you more detail. Live condition monitoring tells you sooner that something has changed.
For maintenance teams moving away from reactive work, condition-based maintenance for hydraulic systems is the sensible framework. It links sampling, trend review, and intervention timing so you're not waiting for a breakdown to make a decision.
Why trending beats one-off testing
One sample is a snapshot. A trend is a story. If particle counts rise after every filter change, the process is wrong. If moisture spikes after outdoor servicing, the handling method needs attention. If a single machine starts generating more large particles than its peers, you may have early component wear developing.
Industry guidance on modern contamination control recommends a data-driven, near real-time approach using advanced analytics tools to gather data from multiple sources, identify root causes, and turn lagging data into earlier intervention, as discussed in this GMP Journal article on advanced data analysis for CCS evaluation.
The value of monitoring isn't the report. It's the decision you can make before the machine forces one on you.
Your Contamination Control Action Checklist
Most contamination control failures happen because the team hasn't agreed what “clean enough” means at each stage. Assembly standards are vague, maintenance routines drift, and nobody owns the response when a dirty event occurs. A written checklist fixes that.
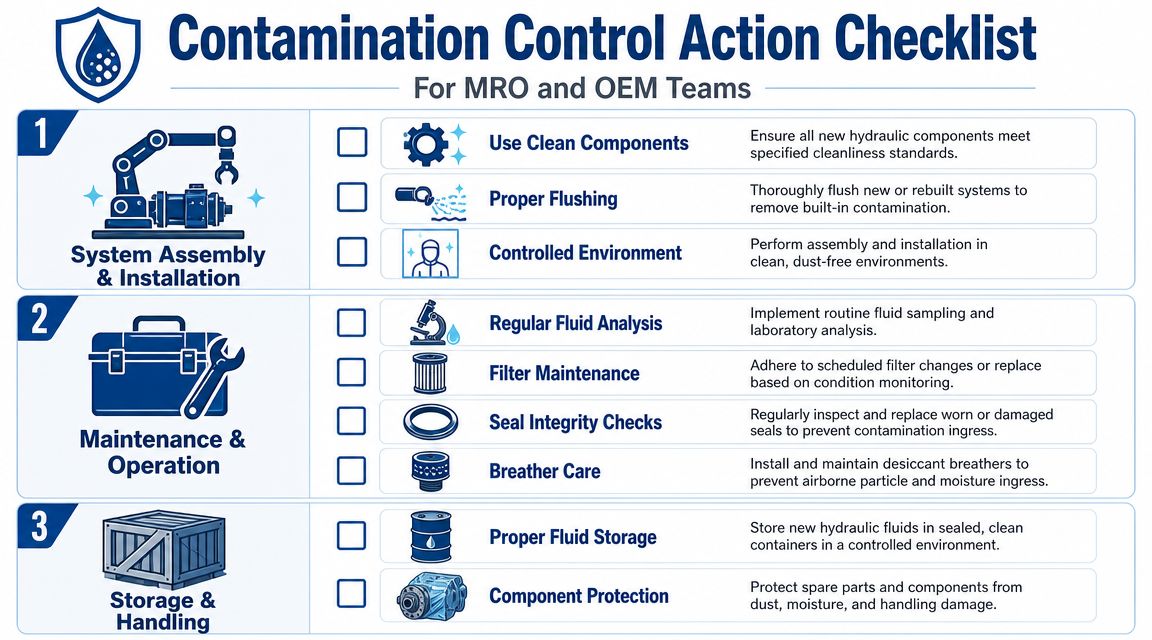
System assembly and installation
Use this when building, rebuilding, or commissioning hydraulic equipment:
- Protect open ports: Keep caps and plugs in place until final connection.
- Flush pipework and manifolds: Remove fabrication debris before introducing service fluid.
- Filter the initial fill: Don't assume fresh oil is clean enough for the target system.
- Assemble in a controlled area: Keep grinding, welding, and dusty stores away from final build work.
- Inspect replacement parts before fitting: New parts can still carry debris from packaging or storage.
Maintenance and operation
Routine control is what keeps a clean system clean:
- Check breathers and filler points: Damaged or neglected breathers are common entry points.
- Inspect seals and rod surfaces: Ingress often starts where the machine moves.
- Use dedicated top-up tools: Shared containers and hoses spread contamination between machines.
- Monitor filters by condition and behaviour: Don't rely only on a calendar interval.
- Sample regularly and review trends: The result matters, but the pattern matters more.
A broader view of mastering facility contamination control is also worth reading if your workshop struggles with wipe selection, handling discipline, or environmental cleanliness around sensitive maintenance tasks. The setting is broader than hydraulics, but the habits transfer well.
Incident response and proving the fix worked
Many teams falter at this stage. They clean up the visible mess, fit the failed part, and restart. That isn't contamination control. That's a reset without proof.
Recent cleanroom guidance makes a useful point that applies well beyond cleanrooms. Effective contamination control is not just prevention. It also requires source identification, response procedures, containment, and post-event trending to show the corrective action worked, as explained in this guidance on handling contamination events and verifying recovery.
Use that logic after any hydraulic contamination event:
| Event | Immediate action | Verification step |
|---|---|---|
| Pump or motor failure | Isolate, inspect, clean reservoir, replace filters, flush lines | Follow-up particle trend and filter inspection |
| High particle count result | Check sampling validity, inspect filtration, inspect wear sources | Repeat sample after corrective action |
| Water ingress | Identify entry route, remove contaminated fluid if required, restore seals or breathers | Re-sample and monitor condition over time |
| Dirty service intervention | Review tools, transfer method, open-port exposure | Audit practice and compare later sample results |
Don't close a contamination event because the machine is running again. Close it when the evidence shows the system is back under control.
A checklist like this should live on the workshop wall, in the service van, and in the rebuild area. If the team uses the same method every time, reliability improves and troubleshooting gets faster.
For practical help with hydraulic contamination control, component selection, filters, power packs, and fault-finding support, contact MA Hydraulics Ltd. Phone 01724 279508 today, or send us a message.
