The call usually comes when the machine has already stopped. A bale wrapper won't complete its cycle. A press ram hesitates halfway through stroke. A forklift attachment drifts when it should hold. Someone has already decided the valve is at fault, and a replacement is being discussed before anyone has checked the plug, the coil, or the oil.
That's where time and money disappear.
Most hydraulic valve problems don't start with a dramatic mechanical break. They show up as small warnings first. Sluggish movement, a valve that shifts sometimes but not every time, heat building where it didn't before, chatter from a solenoid, or an actuator that won't stay put. If you read those signs properly, you can usually narrow the fault quickly and avoid stripping out a healthy component.
On agricultural and industrial machinery across the UK, the same mistake turns up again and again. A technician swaps the valve first because it's the visible control point. Then the replacement behaves exactly the same because the actual fault was low voltage at the coil, dirty oil, or internal leakage elsewhere in the circuit. A systematic approach beats guesswork every time.
Your First Clue Hydraulic Trouble Is Brewing
A machine rarely goes from healthy to failed with no warning. It usually gives you a sequence of clues. The operator notices a boom dropping slightly when parked. The maintenance fitter hears the valve click but sees no cylinder movement. The line runs hotter by the end of shift. Then one morning the system stops doing its job.
That pattern matters because hydraulic valve problems are often symptoms as much as root causes. A CETOP directional valve might be the point where the problem becomes obvious, but the fault may sit in the wiring, the pilot supply, the fluid, or the load-holding side of the circuit. If you start with assumptions, you can lose half a day and still be no nearer a fix.
On site, the first useful question isn't “Which valve has failed?” It's “What changed?” Was the fault sudden or gradual? Does it happen hot, cold, or all the time? Did anyone replace a coil, connector, hose, filter, or pump recently? Has the machine been pressure washed, stood outside, or run with low oil? Those details are often more valuable than the first pressure reading.
Practical rule: If the machine worked yesterday and now a valve won't shift, check the electrical side before you touch the hydraulics.
That approach saves a lot of unnecessary parts changing. A corroded DIN plug, a damaged wire near a hinge point, or poor supply voltage can look exactly like a failed valve from the operator's seat. On mobile kit, especially farm and plant equipment exposed to weather, vibration and dirt, that's common.
The essential task is to separate what the machine is doing from what you think is wrong. Once you do that, the diagnosis becomes much quicker, safer, and cheaper.
Decoding Common Hydraulic Valve Failure Symptoms
Before you put gauges on the system or remove a coil, listen to what the machine is telling you. The sound, speed, stability, and repeatability of movement all point you in a direction. Good fault-finding starts with triage.
One fact should shape how you think about the job. Air and water contamination represent the root cause of 80-90% of all hydraulic system failures across UK industrial operations, which is why fluid condition has to stay high on your suspect list from the start, not as an afterthought (York PMH on common hydraulic system problems).
What the symptoms usually mean
A valve that won't shift at all isn't the same problem as a valve that shifts late, or one that shifts but won't hold position. Those are different failure patterns. Treating them as one generic “valve issue” is how misdiagnosis starts.
Sharp chatter from a solenoid often points you towards unstable electrical supply or a sticking internal element. Slow, lazy actuator movement pushes you towards fluid condition, restriction, wear, or pressure loss. Drift after stopping usually means leakage somewhere in the holding side of the circuit, which may be inside the valve, at the actuator, or across another component.
For a quick refresher on circuit layouts and valve functions, it helps to keep a reference for different types of hydraulic valves close to hand. Faults make more sense when you know exactly what the valve is meant to do in that part of the system.
Common hydraulic valve symptoms and likely causes
| Symptom | Possible Electrical Cause(s) | Possible Mechanical/Hydraulic Cause(s) |
|---|---|---|
| Valve won’t shift | No power to solenoid, low supply voltage, damaged connector, open-circuit coil | Spool jammed by contamination, pilot pressure absent, internal blockage |
| Valve shifts intermittently | Loose wiring, poor terminal contact, voltage drop under load | Sticky spool, dirt in valve body, unstable fluid condition |
| Solenoid clicks but actuator doesn’t move | Coil energised but insufficient force, weak control signal on proportional valve | No system pressure, blocked flow path, seized actuator, internal valve wear |
| Slow actuator response | Intermittent signal, weak voltage supply | Dirty oil, clogged strainer, restricted line, worn spool or spring, viscosity issue |
| Erratic actuator movement | Unstable electrical signal, connector fault | Air in oil, water contamination, pressure instability, spool stiction |
| Valve chatters or hums excessively | Wrong voltage type, unstable supply, poor connection | Mechanical sticking, contamination, pressure fluctuation |
| Cylinder or motor drifts when stationary | Control signal not holding correctly on controlled valve | Internal leakage across valve or actuator, worn seals, scored surfaces |
| System runs hot around valve function | Coil held energised incorrectly, electrical issue causing incomplete shift | Internal leakage, restriction, contaminated fluid, pressure overrun |
If the fault changes with temperature, don't ignore that. Plenty of valves behave acceptably when cold and become sticky once the oil warms and clearances matter more.
What works in practice
The useful habit is to write down exactly what you see before testing starts. Not “ram faulty”. Write “ram extends slowly when hot, retracts normally, drift present with load held”. That level of detail narrows the fault tree fast.
What doesn't work is stripping the valve because it's nearest the symptom. On a busy site that feels decisive, but it often creates more variables than it removes.
The 7-Step Diagnostic Method That Saves Time and Money
Random checks waste hours. A proper sequence cuts through that. Expert technicians employ a structured troubleshooting protocol that prioritises electrical diagnostics first, as most apparent 'valve failures' are electrical problems that are significantly easier and more cost-effective to rectify (Gowin on directional control valve troubleshooting).
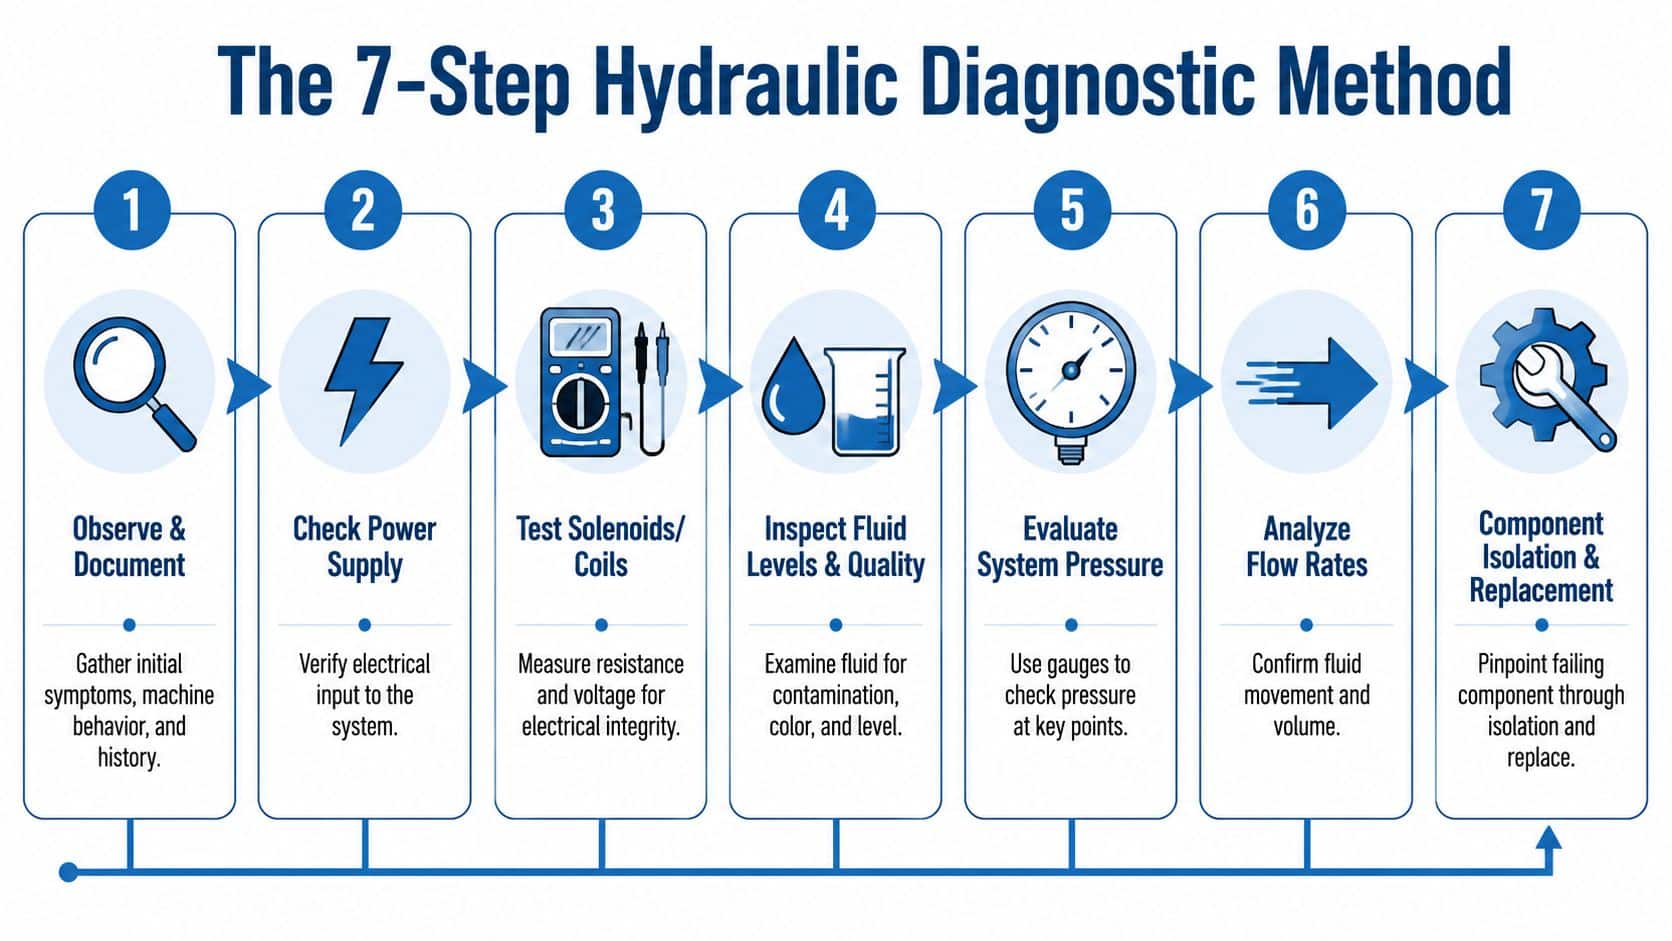
Step 1 Observe and document
Start with the machine as found. Look for loose plugs, damaged cable insulation, wet connectors, cracked coils, oil leaks, burnt smells, and signs of overheating. Listen for the solenoid click, pump note, relief noise, and any change in sound when the control is operated.
If you manage repeat faults across shifts or sites, it's worth documenting workflow processes so the same checks happen in the same order. That prevents one technician skipping the electrical checks while another goes straight to dismantling.
Step 2 Check power at the source
Go upstream before blaming the valve. Check fuses, relays, PLC output, switches, harness plugs, and supply voltage at the source. If the machine uses a nominal valve supply such as 24V DC or 110V AC, compare what you measure with what the coil is rated for.
A valve coil can't do its job on hope and a glowing indicator lamp. It needs proper supply under operating conditions.
Step 3 Test the solenoid and coil
Measure voltage at the coil while the valve is commanded. Then isolate power and check coil continuity and resistance. If the coil is open circuit, shorted, physically cracked, or heat damaged, you've likely found the fault. If it measures reasonably and the voltage supply collapses during actuation, the problem is in the wiring or control side.
Step 4 Inspect fluid level and fluid quality
Don't leave the oil check until last. Low fluid, aeration, dark oil, water ingress, or a blocked breather can all create symptoms that look like valve failure. Pull the filter if needed. Cut it open if contamination is suspected and the site procedure allows it.
Step 5 Evaluate pressure at the valve
A proper gauge set earns its keep in this situation. Measure pressure at the inlet and outlet sides of the suspect valve, not just at the pump line. A pressure reading taken in the wrong place can send you in circles. For this stage, a hydraulic pressure tester kit is one practical option for checking what the circuit is doing at the valve rather than guessing from upstream readings.
Workshop habit: Always note where the gauge was connected. “System pressure low” is useless if nobody knows which test point you used.
Step 6 Analyse flow behaviour
Pressure alone doesn't confirm movement. A circuit can build pressure and still not deliver useful flow. Watch cycle speed, compare extension and retraction behaviour, and check whether flow changes under load or as the oil warms. If pressure is present but movement is weak or delayed, restriction or internal leakage moves up the list.
Step 7 Isolate the component before replacement
Only after the earlier checks should you condemn the valve. Swap coils side to side if the manifold allows it. Compare with a known good section. Isolate pilot supply. Blank off or separate the load if safe and practical. Prove the fault before ordering parts.
That order is what saves money. It stops you replacing a valve body when the machine really had a broken conductor inside a flexing cable, or changing a pump because a contaminated spool was bleeding pressure away.
Solving Electrical Faults in Solenoid and Proportional Valves
Electrical faults are some of the quickest to prove and some of the most commonly missed. Insufficient voltage supply to the valve solenoid is one of the three most prevalent electrical issues in hydraulic valve systems (HydParts on common hydraulic valve electrical issues). That's why a proper meter check under load matters more than a quick glance at an LED.

Checking a solenoid the right way
Start safely. Lock out the machine if required by site procedure. Make sure no suspended or stored load can move when the valve is energised or disconnected. Then work through the basics.
Use a multimeter to confirm supply at the connector while the control is operated. Don't just test with the coil unplugged and call it done. A weak connection can show acceptable voltage unloaded and then collapse as soon as the coil demands current.
After that, isolate power and test the coil itself. You're looking for obvious faults first:
- Open circuit reading means the winding has failed.
- Very low resistance can indicate a shorted coil.
- Signs of overheating such as discolouration, melted potting, or a burnt smell usually justify replacement.
- Connector damage matters as much as coil condition. Green corrosion, loose pins, and damaged seals cause intermittent faults that mimic bad valves.
On agricultural machines, DIN plugs often suffer from water ingress and vibration. In factories, cable damage near trunking entries and machine guards is more common. Different environment, same symptom.
Voltage type and control signal checks
Wrong voltage type causes trouble fast. AC and DC coils are not interchangeable. If the coil is stamped for one and the machine supplies the other, don't keep energising it and hoping for the best.
Proportional valves add another layer. In that case, you're not only checking that power is present. You're checking that the command signal is present and stable. If the application uses an electronic controller, verify the output signal from the controller before blaming the valve hardware. A dedicated hydraulic valve controller can be part of that control chain, so the diagnosis needs to include both the valve and the signal source.
A useful visual walkthrough sits below if you're training junior staff or want a quick practical refresher before testing on site.
What tends to fix the fault
The successful fixes are usually simple and disciplined:
- Clean and remake terminals rather than poking at them and hoping contact improves.
- Replace damaged connectors if the strain relief or seal has failed.
- Verify supply during actuation instead of relying on static readings.
- Match coil rating to machine supply every time.
A valve that “sometimes works” often has an electrical fault until proven otherwise.
What doesn't work is changing the coil without checking the harness. If the old coil burnt out because the wrong voltage was applied, the new one won't last either.
Tackling Mechanical Wear and Fluid Contamination
If the electrical side is sound, turn your attention to the oil and the moving parts inside the valve. Many stubborn hydraulic valve problems finally show themselves within these components. The spool sticks, the spring doesn't return cleanly, the body scores, or internal leakage robs the function of control even though the coil and signal are fine.
Fluid contamination is responsible for approximately 70% of all hydraulic system failures in manufacturing environments, which is why contamination control isn't optional for UK operators running presses, conveyors, power packs, agricultural kit, and mobile plant (Oxmaint on hydraulic system failures).

What contamination actually does inside a valve
Contamination doesn't need to be dramatic to cause trouble. Fine particles can score spool lands and bores. Water attacks lubrication quality and promotes corrosion. Air introduces compressibility and erratic behaviour. Degraded oil changes viscosity and makes response inconsistent, especially on cold starts or after long running.
The mechanical symptoms often look like this:
- Spool stiction where the valve hesitates before moving or fails to centre properly
- Internal leakage where the actuator drifts or won't hold pressure
- Noisy or sluggish operation tied to blocked strainers, restricted inlet conditions, or unstable oil condition
- Seal wear that starts as minor leakage and ends as poor control and heat generation
What to inspect before you strip the valve
Don't dismantle the valve body first unless the evidence points clearly there. Check the wider circuit.
Start with the filter elements and strainers. A dirty strainer or blocked inlet line can produce slow response and noisy operation. Then inspect the reservoir condition, breather, return line filtration, and any signs of water ingress around filler caps or damaged seals.
If you remove the valve, inspect with a purpose. Look for scoring, varnish, debris in the spool area, damaged springs, and seal deterioration. If the valve is badly contaminated but the rest of the system hasn't been cleaned, replacing the valve won't solve much. The new part will be working in the same dirty circuit.
Clean the system to the level the fault demands. Changing one component in contaminated oil is often just fitting the next failed part.
When a flush and oil change make more sense
There are times when local cleaning isn't enough. If pressure valves won't close because dirt is present, if the fluid is clearly outside usable condition, or if repeated sticking points to widespread contamination, a broader clean-out is the sensible repair. That may mean replacing filter elements, cleaning lines and tank, changing oil, and checking seal integrity throughout the circuit.
Technicians sometimes lose the trade-off in these situations. A quick patch gets the machine moving for the shift. A proper contamination response protects the pump, actuators, and replacement valve from becoming the next fault.
From Reactive Repair to Proactive Hydraulic Maintenance
Most maintenance teams are good at reacting once the fault is obvious. Fewer are set up to catch the change before the stoppage. That's the gap. Existing content often focuses on reactive troubleshooting rather than predictive maintenance frameworks, while industry data suggests predictive maintenance can reduce unplanned downtime by 45% (FM PTE on avoiding hydraulic failures).
Build a baseline while the machine is healthy
The simplest proactive step is also one of the most overlooked. Record what “normal” looks like after commissioning, service, or overhaul. Note operating pressure, temperature behaviour, cycle speed, and any normal sound characteristics. When the machine changes later, you're comparing it to something real rather than memory.
That matters on both factory equipment and farm machinery. A power pack in a clean indoor environment and a trailer-mounted unit working outdoors won't age in the same way. Their inspection routine shouldn't be identical either.
Practical habits that prevent repeat valve faults
A workable maintenance routine usually includes a few basic disciplines:
- Check connectors and loom support: Vibration and water attack electrical faults long before the coil fully fails.
- Inspect filters and breathers: Restriction and contamination build slowly, then show up suddenly.
- Sample and assess oil condition: Don't wait until the fluid looks visibly poor.
- Watch for drift and heat changes: They often show up before a full failure.
- Match the valve to the job: A simple on-off directional valve is fine where the duty suits it. If the machine needs controlled speed or force variation, a proportional setup may be the better long-term fit.
The goal isn't to turn every machine into a data project. It's to stop treating every failure as a surprise.
Good proactive maintenance also improves parts decisions. If a valve has been suffering from contaminated oil, replacing it without correcting the fluid condition is reactive. If a coil keeps failing because the supply is wrong, replacing coils is reactive. Significant savings come from fixing the condition that creates the repeat fault.
If you're dealing with hydraulic valve problems on agricultural, industrial, or mobile equipment and want practical advice on fault-finding, component matching, or replacement parts, contact MA Hydraulics Ltd. Phone 01724 279508 today, or send us a message.
