

The clutch pedal was firm yesterday, but today it sinks further than usual and first gear baulks at a standstill. You attach a hose, crack open the bleed nipple and see bubbles, yet the reservoir level barely moves. After another round of pumping, the pedal improves briefly, then goes soft again.
That situation doesn't automatically mean the hydraulic clutch bleeder is faulty. It may mean the method doesn't suit the circuit, the bleed nipple isn't positioned to release trapped air, or a master-cylinder seal is bypassing internally. The right approach starts with the vehicle's hydraulic layout, not with the assumption that every pressure, vacuum or one-man kit works the same way.
Why Your Hydraulic Clutch Needs Proper Bleeding
A hydraulic clutch transfers pedal movement through fluid from the master cylinder to the slave cylinder. Air behaves differently from hydraulic fluid because it compresses, so part of the pedal stroke can disappear inside the circuit instead of moving the release mechanism. The usual results are a spongy pedal, incomplete clutch disengagement, difficult gear selection and a bite point that changes between applications.
Air can enter after a hose, master cylinder, slave cylinder or concentric slave cylinder has been replaced. It can also enter through a disturbed connection or a poor seal at the bleed nipple. In mobile plant and industrial equipment, awkward pipe routing, vibration and limited access can make the problem harder to identify than on a passenger car.
Bleeding removes compressible air and contaminated fluid. It won't repair an internal seal bypass, a damaged slave cylinder, a restricted hose or a mechanical fault in the release system. If the pedal becomes firm only while it's being pumped, then fades again, treat that as a diagnostic clue rather than proof that another bleed will solve it.
Hydraulic clutches are still relevant in older vehicles
Modern UK passenger cars have largely moved towards cable-operated clutches. The GOV.UK end-of-life vehicle depollution guidance states that virtually all modern cars use cable clutches and therefore don't contain hydraulic clutch fluid. It also recognises that some older vehicles have hydraulic clutches and describes extraction equipment using pressure and suction on reservoirs, pipes and cylinders.
That distinction matters in the workshop. Hydraulic clutch bleeding remains routine on older cars, commercial vehicles, motorcycles, specialist machinery and equipment where a cable would be unsuitable. Before choosing a hydraulic clutch bleeder, identify the master-cylinder reservoir, line routing, slave-cylinder position and bleed-nipple orientation.
Practical rule: Bleeding is both a repair procedure and a test. If a controlled bleed produces a clear, bubble-free stream but the pedal still won't return or the clutch won't release, investigate the circuit and mechanical components.
Tools Fluids and Safety Checks Before You Start
Prepare the system before opening the bleed nipple. A clean setup prevents you from confusing newly introduced air or contamination with an existing fault.
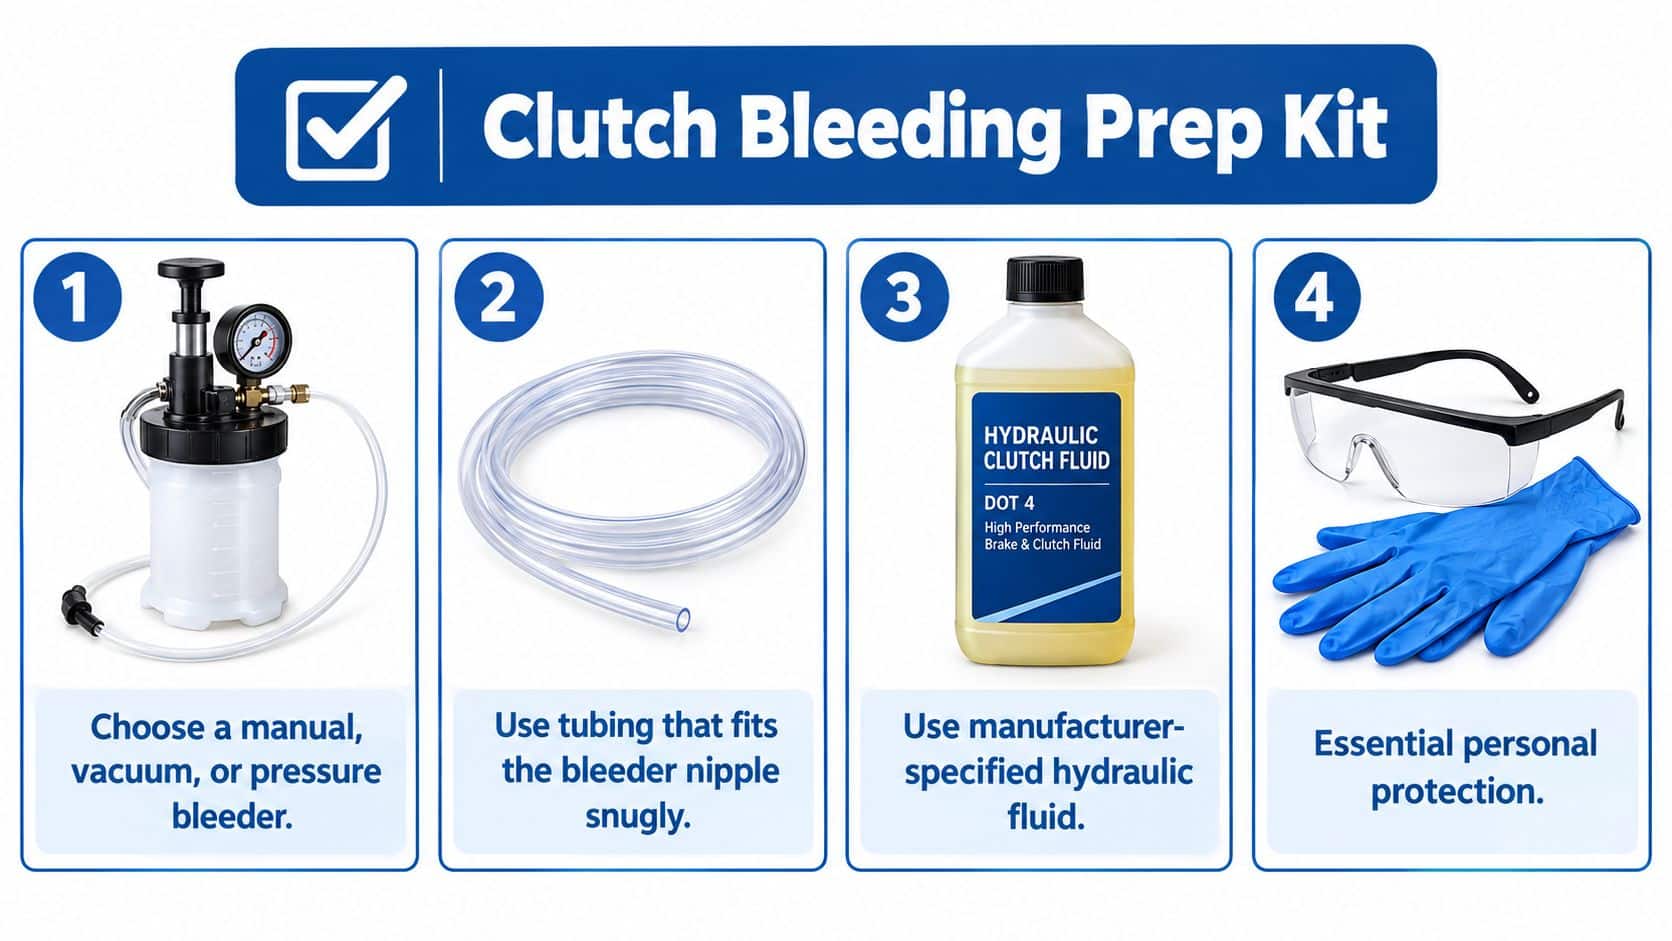
Build a clean working kit
You may need a manual two-person arrangement, a vacuum pump, a pressure bleeder, or equipment capable of reverse bleeding. Add clear tubing that grips the slave-cylinder nipple tightly, a stable waste bottle, the correct spanner, clean rags, safety glasses and chemical-resistant gloves. A small torque wrench is useful because the final bleed-valve torque must come from the vehicle service manual, not from a generic tool leaflet.
Keep the reservoir cap and surrounding area clean before removal. Dirt entering a small clutch master cylinder can damage seals or obstruct the reservoir port. Use fresh fluid from a sealed container and don't return drained fluid to the system.
For workshop and mobile maintenance teams, hydraulic fluid cleanliness standards provide useful background on controlling contamination. Brake and clutch fluid needs the same disciplined handling, even when the circuit is small.
Confirm fluid compatibility
Use the specification stated by the vehicle, machinery or OEM manual. UK technical and retail literature commonly presents DOT 4 and DOT 5.1 products for hydraulic brake and clutch systems, but the label on a bottle isn't a substitute for the manufacturer's specification. A UK-listed DOT 4 technical sheet references FMVSS 116 DOT 3 and DOT 4 performance levels, while a UK listing for DOT 5.1 gives a boiling point of at least 260 °C and a wet boiling point of at least 180 °C. These figures and compatibility classes are set out in the UK DOT 4 technical data.
Don't mix fluids merely because the cap looks similar. Check whether the system uses a glycol-based brake fluid or another specified hydraulic medium, then confirm the bleeder's seals and reservoir adapter are suitable.
Make the safety checks first
Support the vehicle or machine securely, isolate movement and keep the clutch disengagement area clear. Protect painted surfaces from spilled fluid and collect waste in a labelled container. Never leave the reservoir unattended while fluid is being drawn or pushed through it. The reservoir must stay above its safe minimum, otherwise the master cylinder can draw air and undo the work you've just completed.
Choosing Between Manual Vacuum and Pressure Bleeding
The traditional two-person method remains useful because it gives direct feedback from the pedal. One person operates the pedal while the other opens and closes the nipple. It works well on a straightforward circuit with a low-mounted slave cylinder and a correctly positioned bleed screw, provided the nipple is closed before the pedal is released.
A vacuum bleeder allows one operator to draw fluid from the slave cylinder. It can be tidy and convenient, but air may be pulled past the nipple threads, creating a stream of bubbles that looks like trapped air inside the circuit. A pressure bleeder pushes fluid from the reservoir towards the slave cylinder, maintaining a more consistent flow when the reservoir and adapter seal properly.
Reverse bleeding pushes fluid from the slave-cylinder end towards the reservoir. That direction can help on systems where air is trapped at a high point or where the slave cylinder sits in a position that doesn't purge effectively through normal pedal operation. It isn't automatically the answer, though. The reservoir must accept the displaced fluid, the tool connection must be secure and the system must tolerate the method specified by the manufacturer.
Match the method to the circuit
| System Type | Best Method | Why It Works |
|---|---|---|
| Low-mounted slave cylinder with accessible nipple | Manual two-person bleeding | Pedal movement and fluid discharge are easy to observe |
| High-mounted slave cylinder or high point in the line | Controlled pressure or reverse bleeding | A deliberate flow direction can move air towards the reservoir |
| Concentric slave cylinder | Service-manual-led pressure or reverse method | Packaging can make pedal-only purging slow and difficult |
| Low-flow reservoir or restricted master-cylinder port | Slow manual bleeding, then controlled pressure | Avoids outrunning the reservoir’s ability to feed the circuit |
| Nipple that draws air around its threads under vacuum | Pressure or manual bleeding | The circuit is filled without relying on a vacuum at the nipple |
| Mobile plant with poor access and repeated service work | Portable pressure or reverse equipment | It reduces dependence on a second operator and improves repeatability |
The table is a decision aid, not a universal rule. The Sealey pneumatic brake and clutch bleeder is marketed around tyre-air pressure operation and broad vehicle compatibility, but the vehicle's service procedure still controls the acceptable connection, pressure and sequence.
Use the embedded demonstration as a visual reference for tool arrangement and hose routing. Check the video frame on the finished page, because embedded videos can render at the wrong size if their responsive styling isn't preserved.
A one-man kit wins on convenience when the circuit is cooperative. A controlled pressure or reverse setup earns its place when access is poor, air repeatedly returns or the system geometry defeats ordinary pedal pumping. The cheapest tool isn't necessarily the fastest tool if it makes you repeat the job.
How to Bleed a Hydraulic Clutch Without Trapping Air
Start with the vehicle service manual. It may specify the bleed sequence, the correct fluid, the position of the slave cylinder and the final bleed-valve torque. UK brake-and-clutch bleeder instructions also direct technicians to use the vehicle manual for sequence and torque rather than relying on a generic setting, as shown in the Sealey bleeding instructions.
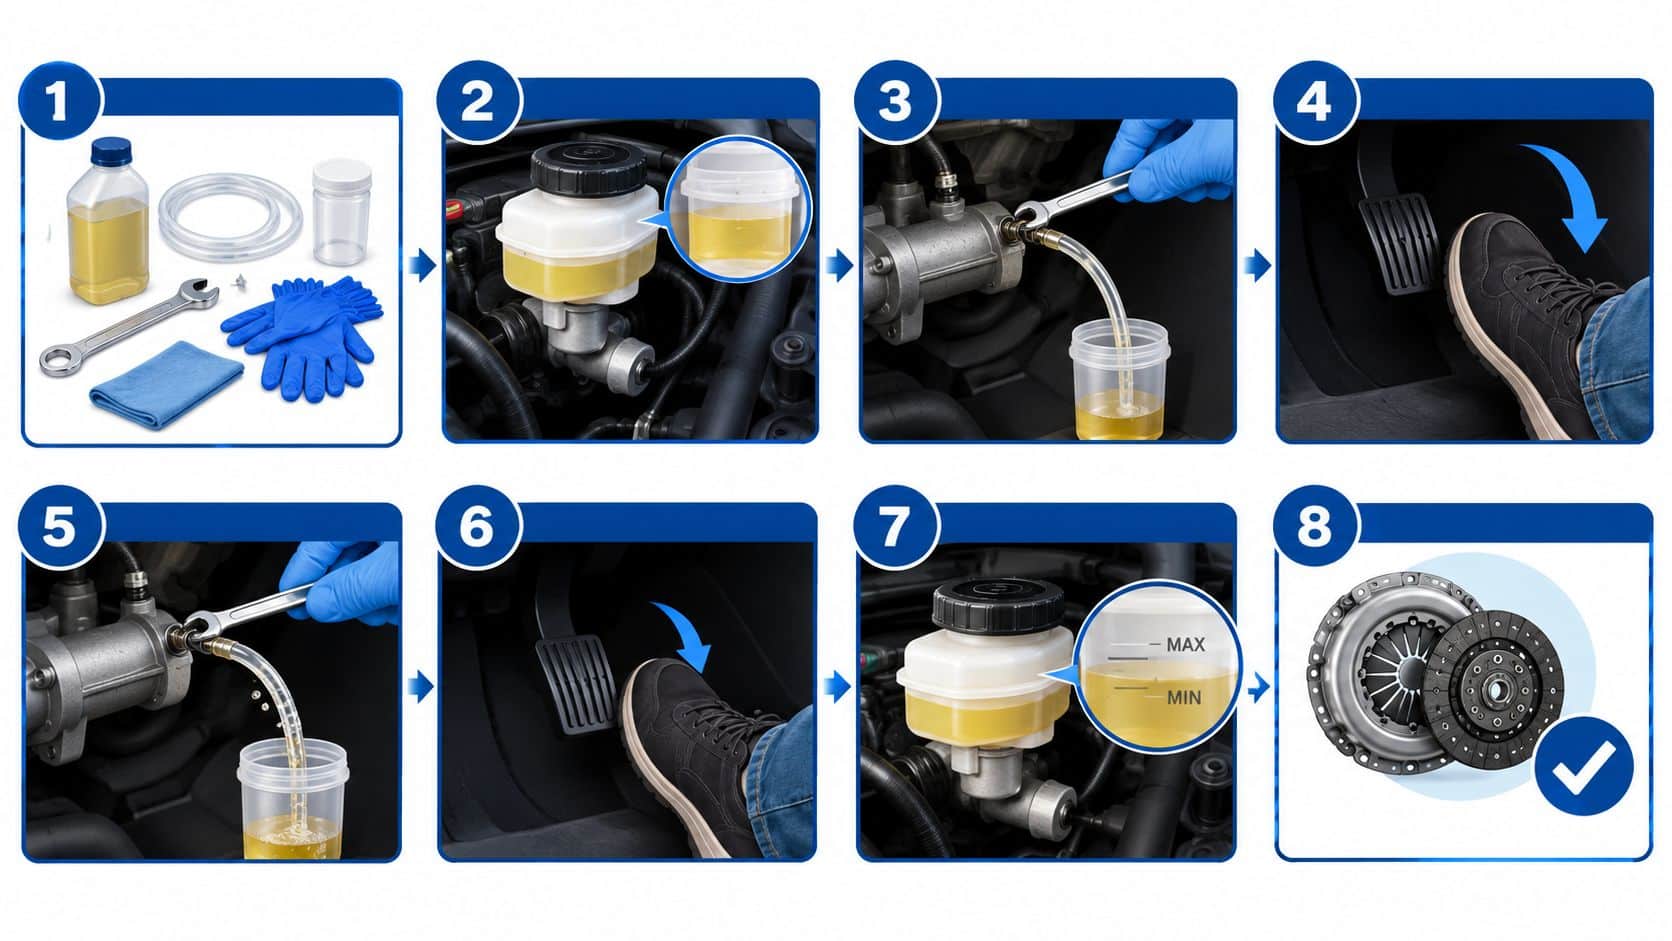
Set up the circuit
Clean the reservoir cap and fill the reservoir with the specified fresh fluid. Keep the level safely above the minimum mark throughout the procedure. If you're using a pressure bleeder, fit its reservoir adapter squarely and pressurise only as the equipment and service information allow.
Fit a clear tube tightly over the slave-cylinder bleed nipple and place the other end in a catch bottle. For a conventional manual bleed, a bottle placed higher can help keep the hose flooded. One UK manual specifies positioning the bottle at least 20 cm above the bleed screw, with the final bleed screw tightening torque specified as 14 Nm in that procedure. Follow the applicable manual for your vehicle, rather than transferring that torque automatically.
Move fluid in controlled cycles
Open the nipple and operate the pedal slowly. With the two-person method, the assistant should depress the clutch pedal fully and hold it down while fluid and air leave through the tube. Close the nipple before the assistant releases the pedal. Releasing it while the nipple is open can draw air back into the circuit.
With a pressure bleeder, watch the outlet rather than pumping the pedal unnecessarily. With reverse bleeding, introduce clean fluid at the slave-cylinder end only if the vehicle and tool instructions permit it, then monitor the reservoir so it doesn't overflow.
Do not chase speed. A slow, controlled stream gives you a better view of bubbles, protects the reservoir level and makes it easier to identify an air leak at the connection.
Continue until the fluid runs clear and bubble-free. UK guidance also uses the absence of hissing and visible bubbles as a practical confirmation that air has left the circuit, as described in the Viamoto clutch bleeding booklet.
Verify before returning the machine
Close the nipple, remove the tube without spilling fluid and set the reservoir to the specified level. Clean the area, check for leaks and confirm that the pedal returns fully. Select gears only after the machine or vehicle is secure, stationary and safe to test.
If the pedal remains spongy, don't assume more pumping is the answer. Recheck the nipple position, reservoir feed, hose connections and the master and slave cylinders before repeating the procedure.
Common Mistakes and Troubleshooting Stubborn Air
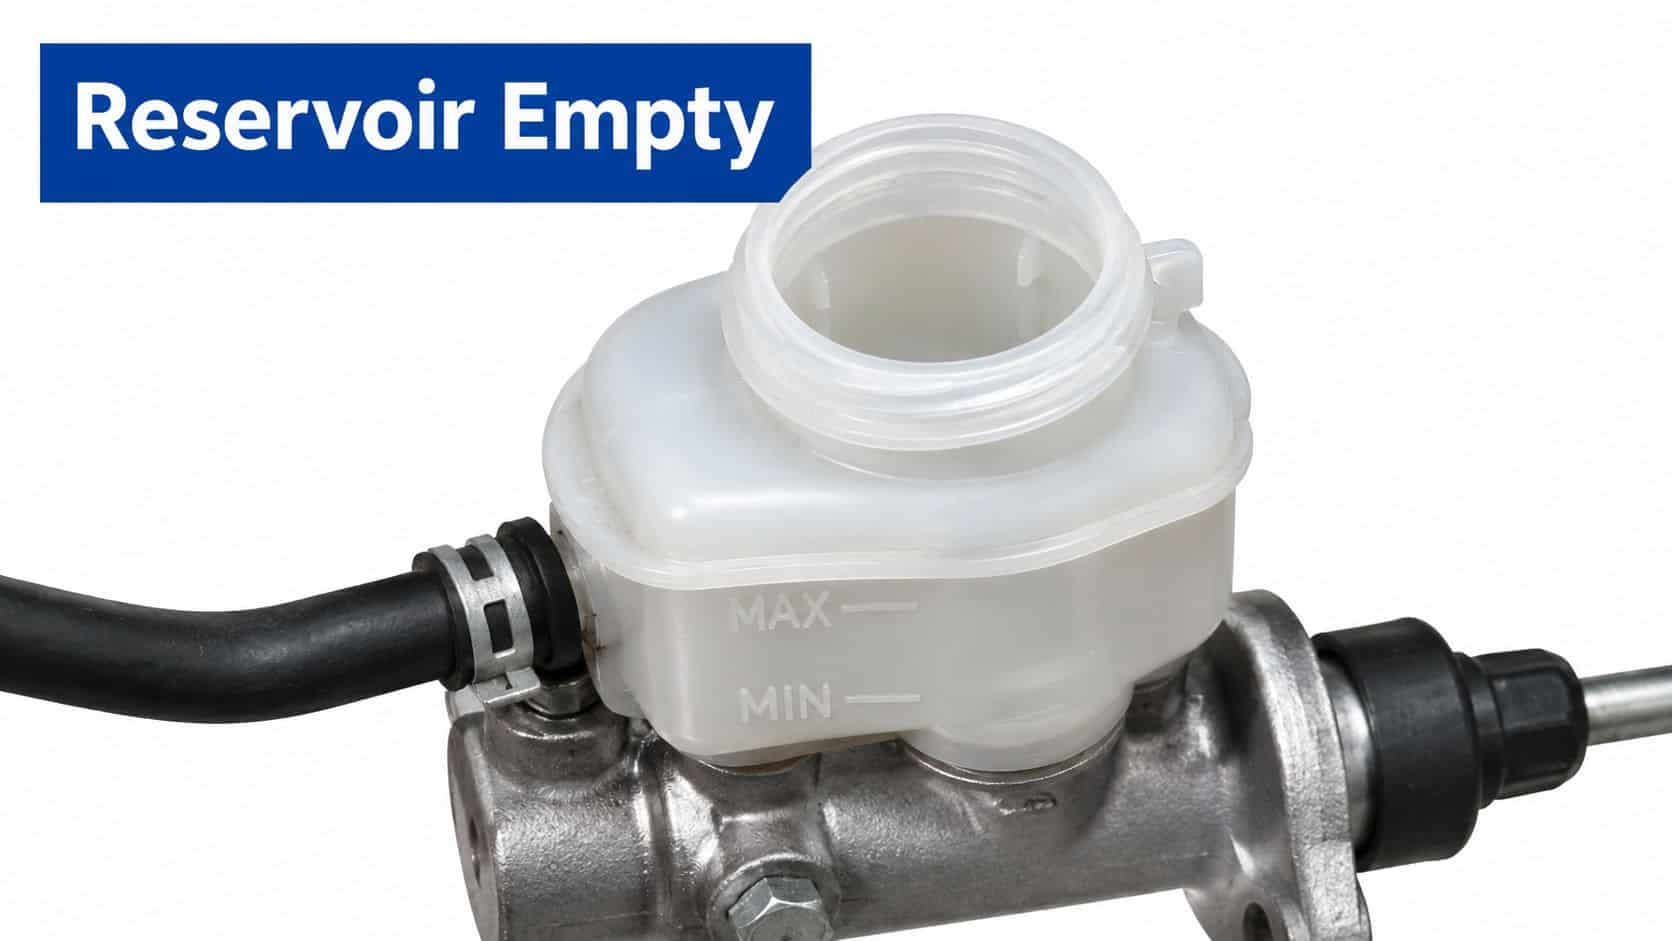
The most common failure is allowing the reservoir to fall below its safe level. The master cylinder then draws air, and the operator can spend another cycle removing the same air that entered during the bleed. A second error is treating bubbles in a vacuum hose as definite proof of air inside the clutch. Vacuum can draw air around loose nipple threads, so inspect the connection before dismantling the system.
Bleed-nipple orientation is just as important. Air can remain in a slave cylinder if the nipple isn't at the effective high point. UK guidance notes that the bleed screw should be at the top of the slave-cylinder body so trapped air can escape efficiently. If the pedal doesn't return fully, the reservoir port may not uncover, which prevents fresh fluid entering the master cylinder and makes bleeding ineffective.
Diagnose the pattern, not just the pedal
Continuous bubbles with no meaningful reservoir change suggest a connection problem, a blocked or low-flow feed path, or air being drawn around the nipple. A reservoir that doesn't respond to pedal movement deserves inspection before you increase pressure or continue pumping.
For a stubborn system, UK professional guidance recommends unbolting the slave cylinder so it hangs as the lowest point, manually stroking the pushrod at least 10 times, refitting the cylinder and pumping the pedal 30 times. If the pedal remains spongy, the process is repeated. Use that technique only where the cylinder and surrounding components can be supported safely and the service procedure permits it. The method is described in UK guidance on bleeding clutch master and slave cylinders.
Know when bleeding isn't the repair
A pedal that improves temporarily and then fades can indicate internal seal bypass. Fluid may not be escaping externally, yet the master or slave cylinder can fail to hold pressure. Repeated bleeding won't restore a worn seal.
Similarly, a firm pedal with continued clutch drag can point towards release-system, clutch or mechanical faults rather than trapped air. Use the clutch hydraulics symptoms guide to organise the diagnosis, then inspect the hydraulic components and release mechanism instead of masking the symptom with another fluid change.
Selecting the Right Hydraulic Clutch Bleeder and Next Steps
Choose the tool around the circuit, not the label on the box. A manual one-man kit may suit an accessible slave cylinder and occasional maintenance. A vacuum tool is convenient where the nipple seals reliably, while a controlled pressure or reverse system is more appropriate when the circuit contains high points, a concentric slave cylinder or a reservoir that is difficult to keep supplied.
For mobile and industrial teams, prioritise a secure adapter, controllable fluid movement, clean fluid storage and easy transport. Check compatibility with the specified hydraulic fluid and any ABS-linked or combined brake-and-clutch arrangement before purchase. Compare the total GBP cost of the kit, adapters, replacement seals and after-sales support rather than choosing on headline price alone.
Keep the service manual beside the equipment. It remains the authority for sequence, fluid specification and bleed-valve torque. If component replacement is the issue, a correctly matched hydraulic clutch kit may be more appropriate than repeatedly changing fluid.
Clear visual maintenance material can also help service teams explain correct hose routing and pedal technique to vehicle operators. Wideo's resource on animated videos for car dealers is relevant when you need concise automotive process visuals, but the actual repair must still follow the applicable service information.
For component matching, hydraulic circuit advice or a bespoke power-pack discussion, MA Hydraulics Ltd can help identify suitable hydraulic components for mobile and industrial applications.
Phone MA Hydraulics Ltd on 01724 279508 to discuss a hydraulic clutch bleeding problem, component match or bespoke power-pack requirement. Alternatively, send the team a message through MA Hydraulics Ltd and include the machine details, fluid specification and symptoms so the right solution can be identified efficiently.
