

You're halfway through a run of 10 mm tube, the bend is nearly right, and then the cheap hand bender starts to crush the wall. The mark is on the wrong side of the former, the tube has a slight twist, and suddenly a simple hydraulic line turns into scrap. That's the moment when tool choice, material, bend radius, and target angle stop being theory and start costing time.
A 10 mm tube bender is not just a lever with a groove in it. For small-bore work, especially on stainless and instrument lines, it's a precision forming tool that has to match the tube's outside diameter, wall thickness, and the bend you need. In UK manufacturing, that matters because tube-forming equipment sits inside a large industrial base, not a niche hobby market. The UK's manufacture of machinery and equipment n.e.c. sector generated £35.3 billion in turnover in 2022, employed about 216,000 people across 4,700 businesses, and recorded £19.7 billion in approximate gross value added, which tells you this is serious production territory for precision forming gear rather than casual one-off kit (The Fabricator).
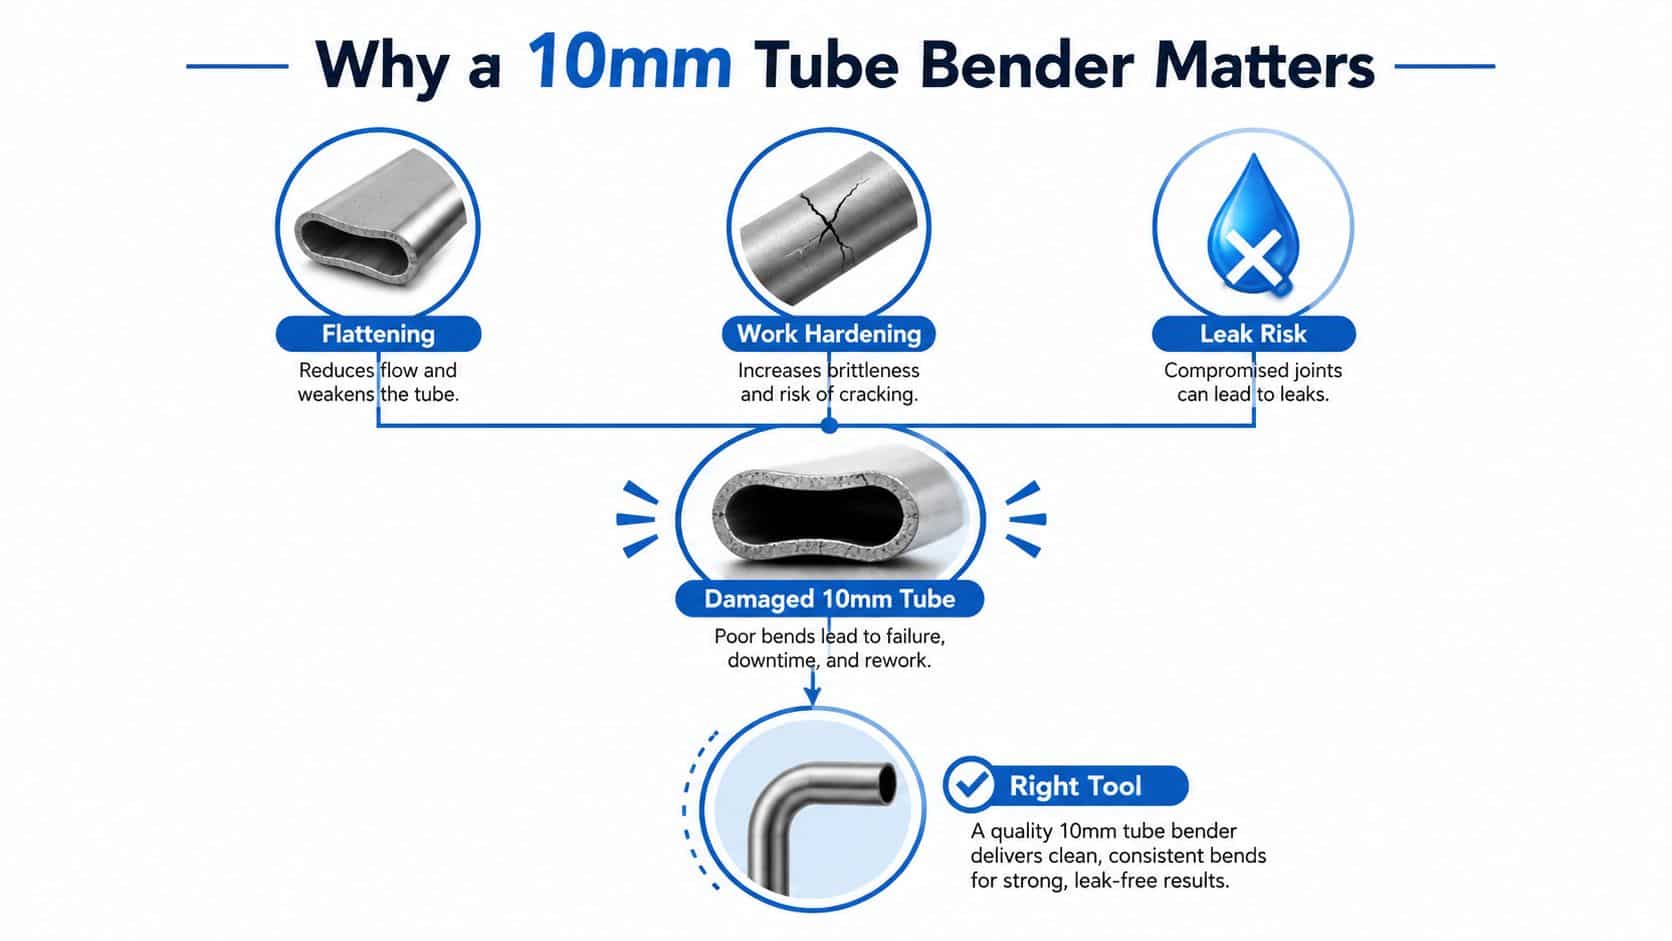
Why a 10mm Tube Bender Is Worth Thinking About Before You Pull the Lever
The first mistake on site is treating all small-bore bending like the same job. A one-off soft-copper run can tolerate a forgiving hand tool, but a stainless hydraulic or instrument line needs a far tighter grip on geometry, seating, and rebound. That difference is why a 10 mm tube bender belongs in the precision category, not in the “grab whatever's in the van” category.
The four decisions that decide the result
Before you bend anything, decide the tool class, the material, the bend radius, and the final angle. If any one of those is guessed, the bend usually tells on you straight away through flattening, springback, or a bend that misses the fitting point.
The benchmark that keeps showing up in real product data is a 24 mm bend radius for 10 mm tooling. RIDGID's 38058/610M instrument bender is specified for 10 mm O.D. tubing with a 24 mm bend radius and 0–180° travel, and Swagelok's hand tube bender also lists 24 mm for its 10 mm model (AAB Tools, Swagelok hand tube bender MS-HTB-10M). That gives you a real-world check point, not a vague promise of “easy bending”.
Practical rule: if the tool doesn't positively support 10 mm tube at the former, don't expect the bend to stay round.
A proper instrument bender also gives you a 0–180° range, which matters because a return bend or routing offset is not the same as a simple right angle. SATA's ST97323 10 mm bender states 0–180° capability, and that wider travel is what separates a serious tube tool from a basic pipe former that only behaves well around one angle (SATA ST97323).
If you're doing a single soft-copper bend, a manual lever tool may be enough. If you're doing repeatable stainless runs, the whole setup has to be chosen as a system, not as a gadget. For a useful way to think through the geometry and load path, the mechanical side of bending is worth comparing with the calculation approach used in other shop applications, including the guide on mechanical advantage calculations.
Matching the 10mm Tube Bender Type to the Job
A lot of bad bends come from using the wrong family of tool rather than poor hands. The distinction is simple once you strip away the marketing gloss. Manual lever benders, spring or internal former tools, mandrel rotary-draw machines, and hydraulic benders all work differently, and they're not interchangeable just because they all say “10 mm”.
Tool class versus job type
A manual lever bender is the fast, cheap option for soft copper and light one-off work. It's a good fit when speed matters more than repeatability, and when a small amount of flattening won't wreck the job. For single bends in service work, that often wins.
A spring or internal former tool sits in the middle. It can be useful for small-batch stainless or copper, especially where the route is simple and the tube is not being pushed into a very tight radius. It gives more support than a bare hand bend, but less control than a true former-based machine.
A mandrel rotary-draw bender is the answer when ovality and springback matter. If the line has to look right, fit right, and repeat right, that's where the extra tooling earns its keep. A hydraulic bender belongs on repeat production, thicker-wall tube, or tougher materials where hand force turns into inconsistency.
| Bender class | Typical radius range | Best for | Watch out for |
|---|---|---|---|
| Manual lever | Around the standard 24 mm benchmark, depending on the former | Soft copper, quick one-off bends | Flattening on hard tube, poor repeatability |
| Spring or internal former | Small to medium bends, material dependent | Light stainless, service work, short runs | Wrong wall thickness, springback drift |
| Mandrel rotary-draw | Tight, controlled bends | Stainless, low ovality, accurate routing | Higher cost, more setup time |
| Hydraulic | Variable, depends on die set | Production, thicker-wall tube, repeatable jobs | Overkill for simple field bends |
The key point is that tube dies are sized to outside diameter and wall thickness, not nominal pipe bore. That sounds obvious until you hear someone ask for a “10 mm pipe bender” and mean something that'll fit 10 mm tubing. The same confusion shows up in the field all the time, and the safer choice is to confirm tube size, wall, and material before the first pull.
Most 10 mm tools also have a clear angle scale, commonly 0–180°, which is useful but not magic. A marked scale doesn't guarantee a usable bend in every alloy or wall thickness. It only means the tool can physically travel that far.
Calculating Minimum Bend Radius and Springback for 10mm Tube
The scrap usually starts here, before the lever ever moves. On 10 mm tube, the first check is bend radius, because the radius you choose decides how much the wall has to stretch on the outside and compress on the inside. A 1D bend matches the tube diameter, 2D is twice the diameter, and 3D is three times the diameter.
What radius actually protects the tube
For a 10 mm tube, that gives you rough centreline radii of 10 mm, 20 mm, and 30 mm as the basic rule-of-thumb family. In the shop, a 10 mm tube usually needs at least a 20 to 30 mm centreline radius before wall thinning and cracking become a real risk. The commonly used 24 mm radius sits in the usable middle of that range, which is why it keeps appearing in tool specifications from RIDGID and Swagelok (Swagelok hand tube bender MS-HTB-10M).
That radius still does not tell the full story. Swagelok's manual makes the other half clear, 10 mm tubing is supported as a size, but the wall-thickness limits vary with bend radius and material, so 10 mm stainless should never be treated as automatically bendable until the wall chart is checked first (Swagelok manual). If the wall is too heavy for the former, the tube can resist the bend and then kink once the load finally overcomes it.
How springback changes the mark you set
Springback is the rebound after the load comes off. Copper usually opens up less than stainless, mild steel sits in the middle, and stainless tends to spring back hardest because it holds more elastic recovery in the bend. That is why a tool set to 90° rarely leaves a finished 90° in the hand.
The practical method is straightforward. Start with a small over-bend on an offcut, release it, measure the actual angle, then adjust the over-bend until the released bend lands on the drawing. Do not assume the same allowance will work across copper, steel, and stainless, because the tube, wall, and radius all change the result. Each material wants its own correction, and the safest setting is the one you have already proved on scrap.
Step-by-Step Procedure for a Clean 10mm Bend
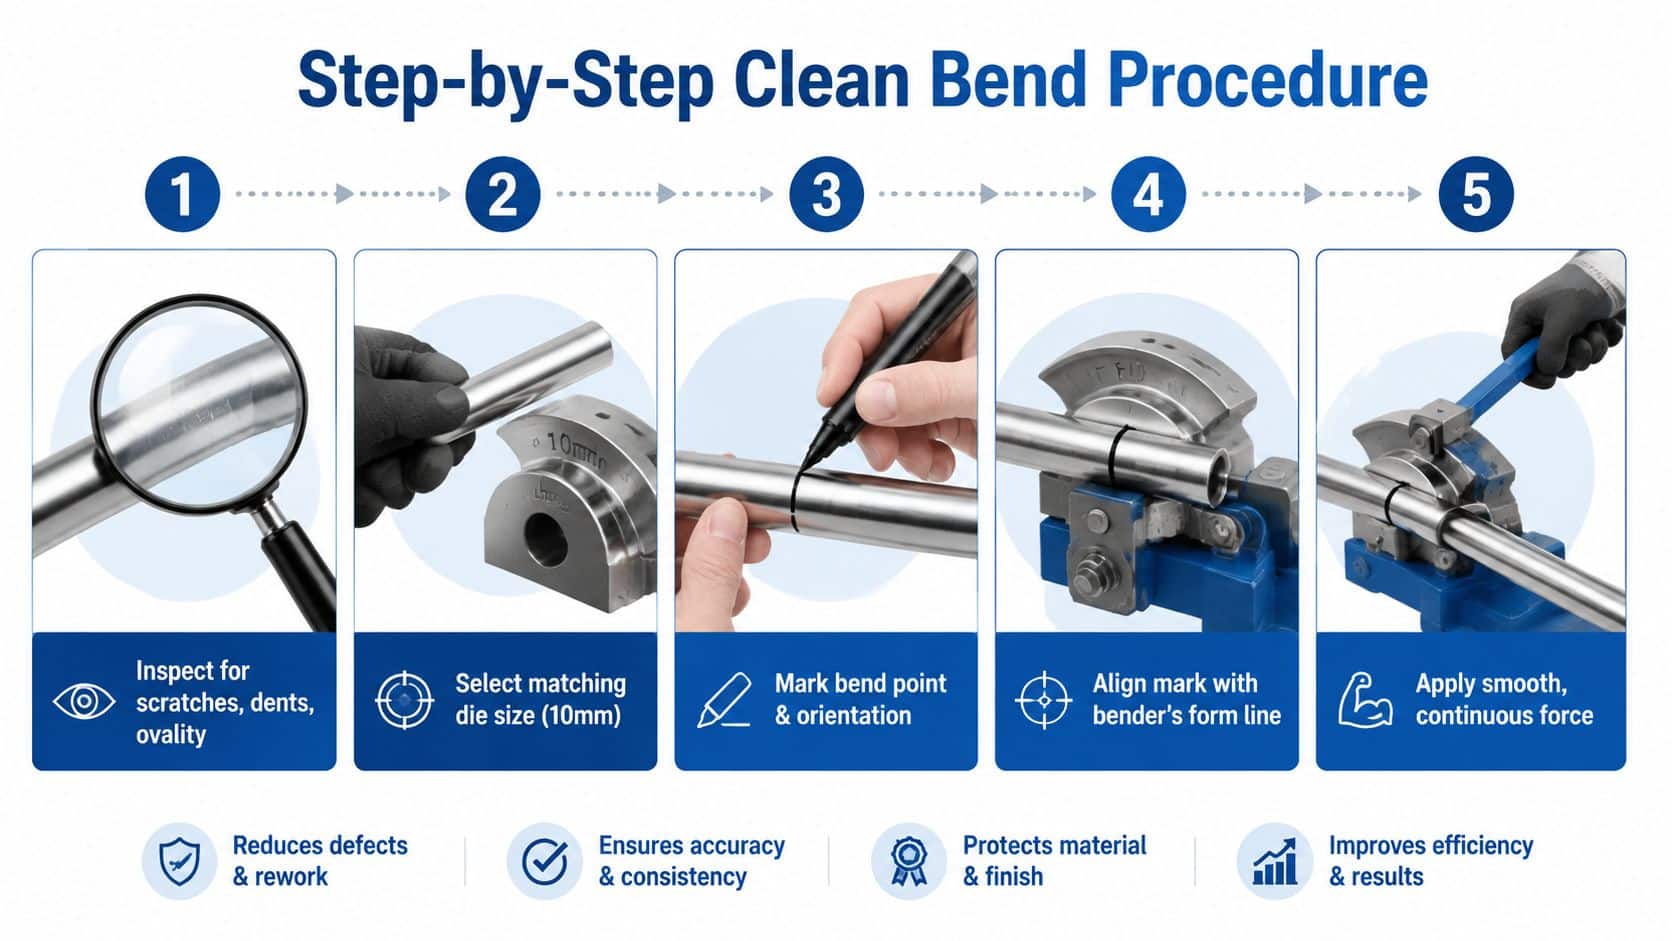
A clean bend starts before the lever moves. Check the tube first for scratches, dents, and any flattening from handling, because a damaged tube is already half-way to a bad result. If the tube isn't straight enough to sit properly in the shoe, the bend won't be either.
Getting the tube seated and marked correctly
Choose the correct groove or former for 10 mm tube, then make sure the tube sits fully in the bending shoe. RIDGID's guidance is blunt on this point, the tube must be fully seated, and the angle should be formed progressively to the target mark (AAB Tools). That's not a nicety, it's how you avoid a half-seated bend that throws the centreline out and leaves a flat patch.
Mark the start of the bend, then add your over-bend mark for springback. Keep the orientation visible as well, especially on tube that has to align with fittings or parallel runs. A surprising number of “wrong bend” jobs are really “wrong clocking” jobs.
During the pull, support the free leg of the tube so it doesn't whip. Keep the motion smooth and continuous, because feathering the lever usually makes the bend less controlled, not more. If the tool is right and the setup is right, the tube should form in one deliberate movement rather than in repeated nudges.
Once you release it, measure the angle against the target and inspect the bend for ovality or wrinkle lines. If it's off, adjust the over-bend on a scrap piece before committing to the production line. That's how you get a repeatable 90° instead of a promising-looking bend that misses by a few degrees every time.
Shop-floor habit: the best bends are usually the ones that looked boring while you were making them.
If the job is a repetitive one, build a small check routine into the process.
- Inspect the tube first: Reject dents, deep scratches, and obvious ovality before the bend starts.
- Confirm the former: Match the groove to 10 mm tube and seat it properly.
- Set the mark: Include both the bend start and the over-bend allowance.
- Pull once: Use one smooth movement instead of stop-start levering.
- Measure after release: Confirm the final angle before the tube goes into service.
Material-Specific Tips for Copper, Steel and Stainless 10mm Tube
A 10 mm tube looks the same on the rack, but it does not bend the same on the former. Copper gives you the widest margin for error, mild steel sits in the middle, and stainless is the one that punishes loose setup, poor support, and guesswork on springback.
Copper, mild steel and stainless are not interchangeable
Copper is the easiest material to start with on a basic lever bender. It pulls round cleanly, asks for less force, and usually forgives a small setup error. That forgiveness has limits. Tight radii and repeated correction work harden copper fast, so straightening and re-bending the same section is how a neat job turns into a cracked one.
Mild steel behaves more predictably, which makes it easier to judge on the bench. It still needs the right wall thickness and a radius that matches the tool, not the marketing line. For a compatibility check on fittings and tube sizing, the 10 mm push-fit guidance is worth keeping beside the bender, because a tube that bends well still has to fit the rest of the system. The practical point stays the same, nominal diameter alone never tells you enough.
Stainless, especially 304 and 316, is the difficult material in small-bore work. It springs back more than copper or mild steel, and if the bend radius is too tight for the grade and wall, the outside of the bend can crack instead of flowing. The shop-floor habit here is simple. Test the setting on scrap before you trust the first production bend.
For a wider materials mindset, the split is similar to a knife steel comparison for chefs. Two materials can look close on paper and behave very differently in service. Tube is the same, and the first question is always what the material will tolerate, not just what the OD says.
If the tube is stainless and the radius is tight, assume it will resist until a scrap bend proves the setup is right.
The tool choice follows the material. Use a simple hand bender for soft copper, use a better-supported former for light stainless and mixed workshop jobs, and move to rotary-draw or hydraulic tooling when repeatability, ovality control, or wall thickness retention starts to matter. That is the point where tube-vs-pipe confusion causes real trouble, because pipe tooling can leave a 10 mm tube looking bent on the surface while the wall has gone oval underneath. If the job has to fit first time, choose the tool for the material and the wall, not just the outside size.
Troubleshooting Common 10mm Tube Bending Problems
A bad bend on 10 mm tube usually shows up in three ways on the bench. The tube kinks at the inside of the radius, the section flattens, or the bend opens back up after the tool comes off. In shop terms, those faults usually point to the same handful of causes, poor seating, too tight a radius, weak wall support, or the wrong tool class for the material.
| Symptom | Likely cause | Fix |
|---|---|---|
| Kink at the bend | Radius too tight, tube not fully seated | Use a larger radius or a mandrel-supported tool |
| Flattening | Wrong tool class, poor wall support | Switch to a rotary-draw or better-supported former |
| Oval section | Excessive force or unsupported wall | Use internal support or a more suitable bender |
| Bend opens out too much | Springback allowance missing | Test on scrap and increase the over-bend |
| Cracking on stainless | Cold bend on too-tight radius | Redesign the route or anneal locally if appropriate |
Flattening is the fault that gets blamed on the tube too often. If the ovality is obvious, the first place to look is the tooling and the support under the wall. A cheap lever bender can still be fine for soft copper, but once the wall has to stay close to round, it is the wrong class of tool. That is where tube-vs-pipe confusion causes trouble, because pipe tooling can make a 10 mm tube look acceptable from the outside while the wall has already gone out of shape.
Springback errors are usually the result of a setting that was never checked. The bend comes off the former, then opens up more than expected. Stainless will do this more than copper, and heavier wall grades will still move less predictably than soft tube. Make a scrap bend first, measure the result, then adjust the over-bend until the finished angle lands where you need it.
A 24 mm radius is a useful benchmark because it sits in the working range many installers check against before they commit to production bends, including the guidance noted earlier from Swagelok. If your route needs a tighter line than that, the material and the tooling both deserve a second look before you force the bend.
Stainless cracking is the fault that should stop the job. Once the outside of the radius starts to split, the bend is already asking too much of the wall. Do not drive harder on the lever and hope the crack disappears. Change the geometry, open the radius, or move to a supported bend method that suits the grade.
Safety, Maintenance and Getting the Right Support for 10mm Bending
A small bend still carries enough force to hurt hands and eyes. Wear gloves and eye protection, secure the bender to the bench or hold it properly, and keep your hands out of the swing path. Don't use a cheater bar on a hand bender, because if the tool needs that much extra length, the wrong tool is already on the bench.
Tool care matters as much as technique. Clean the former after use, check roller pins and pivots for wear, and store springs and mandrels separately so they don't score each other. A damaged former doesn't announce itself loudly, it just starts making every next bend a little worse.
The other part of this job is sourcing. A 10 mm tube bender is often bought alongside clips, fittings, and line hardware, which is why the surrounding components matter too. For line support hardware, the matching 10 mm pipe clips are a good example of how the bend, the route, and the fixing points all need to work together.
If the application is hydraulic, pneumatic, or instrument tube, getting technical support before the bend kit arrives can save a lot of rework. That's especially true when the wall thickness, fitting style, or bend radius isn't a perfect match for the standard tool in the van. A specialist supplier can help with cross-references, component selection, and the awkward cases that don't fit the catalogue neatly.
MA Hydraulics Ltd supplies hydraulic components, bespoke power packs and practical application advice for engineers who need the right parts first time. If you're choosing a 10 mm tube bender for hydraulic, pneumatic or instrument work, visit MA Hydraulics Ltd or phone 01724 279508 today for help with tooling, cross-references and matched components.
