A machine starts the shift with a slight whine on cold start-up. By lunch, a cylinder hesitates halfway through its stroke. By the end of the day, the oil looks hazy and the filter indicator has moved again. In a busy workshop or on mobile plant, that sequence often gets blamed on age, load, or “one of those things”.
Quite often, it's water.
Water contamination detection matters because hydraulic systems rarely fail the moment water gets in. They fail after the oil loses lubricity, after corrosion starts on tight-clearance parts, after additives break down, and after the pump has already been running under conditions it was never meant to tolerate. Catch it early and you may be looking at a drain-down, dehydration, breather replacement, or seal repair. Catch it late and you're into pump damage, sticky valves, unplanned downtime, and a much bigger bill.
Why Water Is the Silent Killer of Hydraulic Systems
A hydraulic system can tolerate plenty of abuse for a while. Dirt, heat, poor sampling, rushed top-ups. Water is different because it changes the fluid itself. Once that happens, the damage reaches every lubricated and controlled surface the oil touches.
If you work on presses, power packs, agricultural kit, tipping gear, compact plant, or mobile attachments, you'll have seen the pattern. Machines stored outside breathe damp air through the reservoir. Washdown pushes moisture past poor seals. Coolers leak internally. Fresh oil arrives clean enough on paper but gets transferred through dirty containers and left uncapped. Good contamination control practice starts before the oil ever reaches the tank.
The three forms of water that matter
Water in hydraulic oil usually shows up in three forms:
- Dissolved water sits in the oil at a level you often can't see with the naked eye. The fluid may still look clear, but the oil is already carrying moisture.
- Emulsified water gives oil that cloudy or milky appearance. At this point, the oil and water have mixed enough to change how the fluid behaves.
- Free water separates out. You may find it at the bottom of the reservoir, in low points, or in drained samples.
Each form causes trouble in a different way. Dissolved water can still contribute to additive depletion and surface attack. Emulsified water strips away film strength and makes precision components work harder. Free water is the most obvious danger sign, but by the time you can see it pooling, the system has usually been contaminated for a while.
Why the damage accelerates so quickly
The biggest problem isn't just rust. It's loss of control.
A pump depends on a stable lubricating film. Servo and proportional valves depend on clean, predictable fluid. Bearings, gear teeth, spool lands, and piston surfaces depend on oil remaining oil. Add water and you increase the chances of wear, corrosion, varnish formation, sluggish operation, and blocked filters.
Practical rule: If a hydraulic fault appears alongside cloudy oil, rising temperature, or more pump noise than usual, assume water is part of the problem until a proper sample proves otherwise.
Outside hydraulics, regulated water systems use frequent surveillance because contamination problems are easier to contain when they're found early. In England and Wales, water companies carried out more than 3.9 million tests on drinking-water samples in 2023, with overall compliance remaining above 99.9%, showing how strongly detection relies on routine monitoring rather than occasional checks (UK water quality monitoring context). The same mindset works in hydraulics. You don't wait for visible failure. You look for drift, test early, and act before damage becomes expensive.
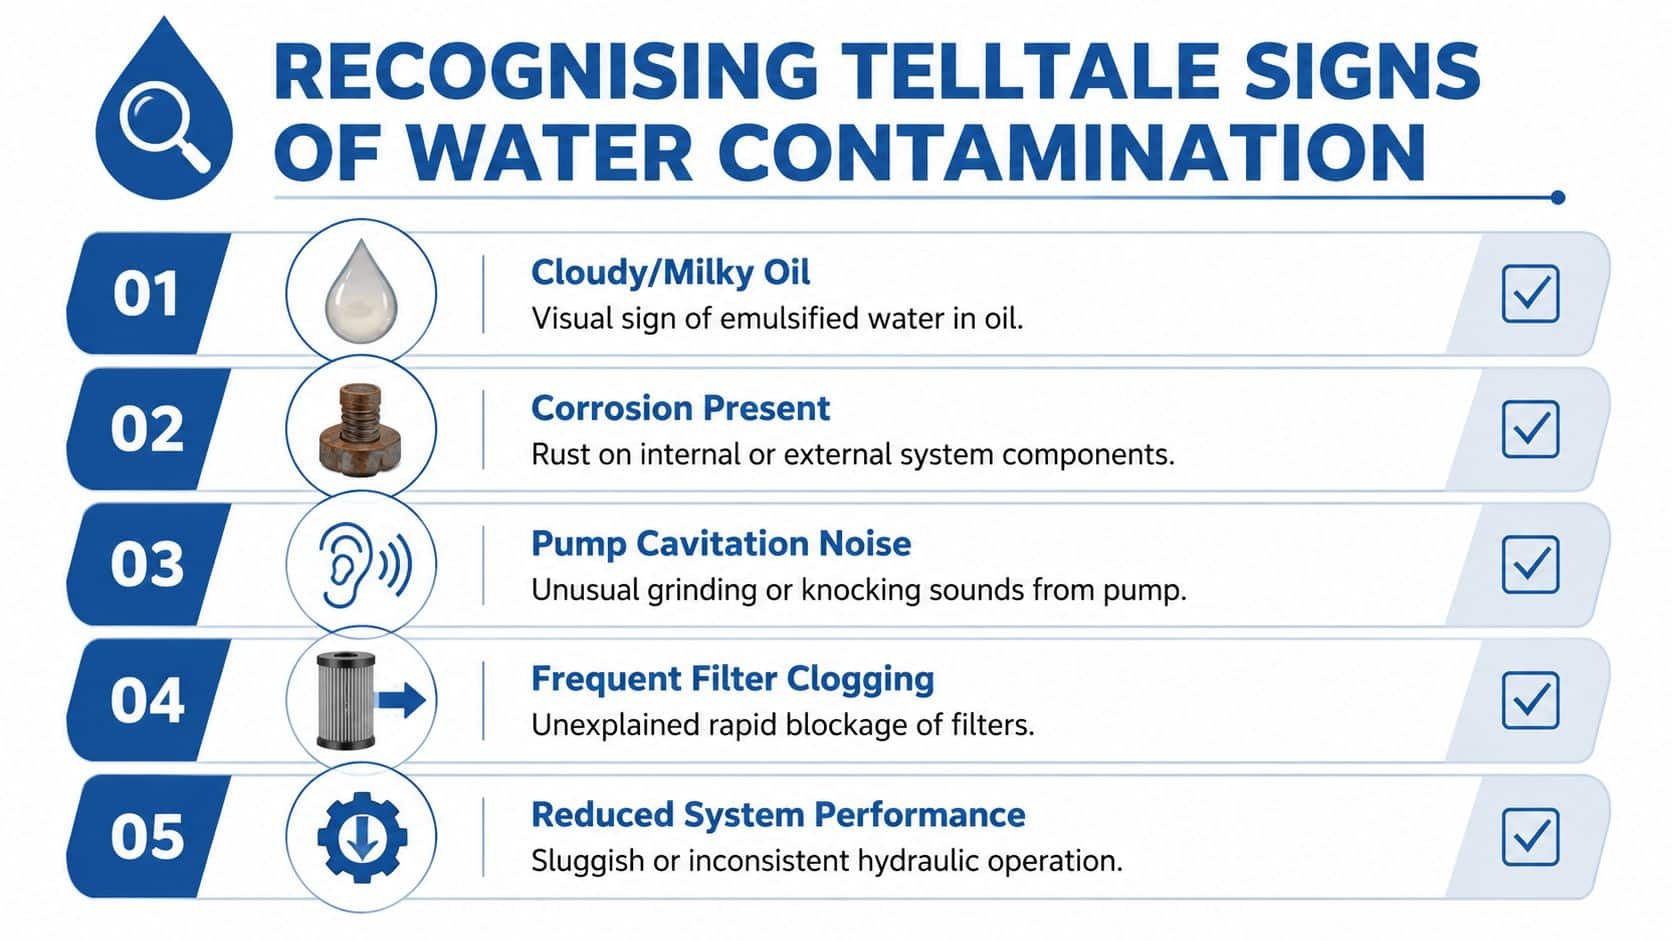
Recognising the Telltale Signs of Water Contamination
The first warning usually isn't a lab report. It's something an operator notices and mentions in passing. “It sounds rough today.” “The ram feels lazy.” “The oil doesn't look right.”
That's often enough to justify a closer look.
What you can see
Cloudy oil is the classic sign. It often looks like weak tea with milk in it, or a pale coffee colour. That usually points to emulsified water, especially after the machine has been running and the fluid has had time to churn.
You may also spot:
- Condensation on filler caps or inside the tank. This is common on machines that cool down overnight, then warm up quickly in use.
- Rust staining around breathers, dipsticks, exposed steel fittings, or internal steel surfaces visible through inspection covers.
- Water beads or separation in a sample bottle left to stand.
- Sludge or mayonnaise-like deposits in reservoir corners or under covers.
If you're used to looking for building moisture problems, some inspection habits carry across. The same observational discipline people use to identify water damage signs in walls and structures applies here. Look for staining, changes in appearance, and signs that moisture has been present longer than anyone realised.
What you can hear
Water contamination often changes the sound before it stops the machine.
A pump with compromised lubrication may develop a higher-pitched whine. On start-up, especially in colder conditions, the sound can be sharper and more ragged than usual. In more severe cases, the noise shifts towards cavitation-like knocking or gravelly chatter.
That doesn't mean every noisy pump has water in the oil. Air ingress, suction restrictions, wrong viscosity, and worn components can sound similar. But if the noise appears with cloudy oil or erratic movement, it's a strong clue.
Here's a useful demonstration to watch before the next inspection round:
What the machine starts doing differently
Performance symptoms are where many teams lose time, because they chase electrical or mechanical causes first.
Common examples include:
- Jerky cylinder travel where the actuator hesitates, then catches up.
- Slower response from clamps, lifts, or steering functions.
- More heat than normal in the tank or return line.
- Frequent filter attention without an obvious solids contamination event.
- Unstable proportional control where the motion is no longer smooth.
A machine doesn't need to be full of free water to behave badly. Quite a small moisture issue can upset a fine-control circuit long before anyone sees standing water in the tank.
Pay close attention to timing. If symptoms show up after washdown, after rain exposure, after a cooler replacement, or after a fluid top-up, that's not random. It usually points towards ingress, handling error, or a component fault that's allowing moisture in.
Best Practices for Taking a Reliable Oil Sample
Bad samples waste time. They send engineers down the wrong path, hide the underlying problem, or exaggerate a minor one. If you want meaningful water contamination detection, sampling method matters as much as the test itself.
Take the sample from the right place
The worst place to sample is usually the easiest one. A cold sample from the reservoir drain plug tells you what settled there, not what the working circuit is circulating.
A good sample should come from a live, turbulent zone. In practice, that means a dedicated sampling point on a pressure, return, or circulating line where the oil is representative of normal operation. If the system already has a minimess test point or proper sample valve, use it. If it doesn't, install one at the next maintenance opportunity.
Use this sequence:
- Run the machine to normal operating temperature. Warm oil gives a truer picture of what the system is carrying in service.
- Sample while the oil is circulating. Stagnant fluid can separate and distort the result.
- Avoid dead legs and tank bottoms for routine diagnosis. They're useful for finding settled water, but not for a representative condition check.
Keep the process clean
Sampling bottles should be new, clean, and sealed until use. Don't use old drinks bottles, washed-out containers, or anything that's been sitting open in a van.
Before filling the bottle:
- Wipe the port thoroughly so you don't drag dirt into the sample.
- Flush the valve first to remove stagnant oil sitting in the sampling point.
- Fill carefully without touching the inside of the cap or bottle.
- Cap immediately once you've collected enough.
Cross-contamination is easy to create. A technician handles oily gloves, touches the bottle rim, lays the cap on a dirty bench, then wonders why the lab result looks odd. Small handling mistakes can ruin a sample.
Label it before it gets mixed up
A bottle marked “machine 2” isn't much use three days later.
Write down the machine ID, oil type if known, sampling point, date, operating condition, and the reason for the sample. If you're investigating a specific issue, add that too. “Main pack running hot after cooler service” is far better than “check oil”.
Sampling rule: If the sample wasn't taken hot, live, and clean, treat the result with caution.
One more point that gets overlooked. Don't sample straight after topping up or just after the machine has sat unused for a long period. In both cases, the oil may not reflect actual running condition yet. Let the machine circulate properly first, then take the sample.
On-Site and Laboratory Water Test Methods Explained
A fitter pulls a sample from a telehandler that has started chattering on cold mornings. The oil looks clear in the bottle, so the machine goes back out. Two weeks later, the pump is noisy, the breather is wet, and the lab report shows water high enough to justify immediate action. That is the problem with moisture checks in hydraulics. The quickest method is rarely the most accurate, and the most accurate method is rarely the one you can use at the machine in five minutes.
The practical answer is to match the test to the risk. On a standard factory power pack, a fast screen may be enough to decide whether to keep running until planned maintenance. On a servo circuit, a high-pressure piston pump, or a mobile machine that cannot afford a roadside failure, uncertainty gets expensive very quickly.
Visual inspection and the crackle test
Start with the simple checks, but treat them as screening only.
A visual check can spot free water, haze, or a milky appearance. It is quick and costs almost nothing. It also misses dissolved moisture and can look normal even when water is already high enough to shorten component life.
The crackle test is still useful in a busy workshop. Put a small drop of oil on a hot plate and listen. If it spits or crackles, there is enough free or emulsified water to justify concern. It is a go or no-go method, not a measurement.
Best use:
- Workshop triage
- Confirming obvious free water
- Deciding whether a machine should be stood down pending further checks
Main limits:
- Poor sensitivity at lower moisture levels
- No reliable ppm figure
- Results depend on operator technique and temperature control
For UK mobile hydraulics, this test earns its place because it is cheap and fast. It does not earn trust for close tolerance systems.
Portable moisture meters and online sensors
Portable instruments sit in the middle ground on cost, speed, and accuracy. They are useful for route inspections, checking suspect machines after washdown or cooler failure, and building a trend on assets that live outside in British weather.
Most of these tools infer water content from a change in oil properties or report relative saturation rather than a direct absolute water figure. That distinction matters. Relative saturation can warn that the oil is approaching the point where free water will drop out, which is useful in the field, but it does not always give a lab-grade answer in ppm. Temperature, base oil, additive package, and soot or oxidation can all affect readings.
Used properly, they save time. Used without a baseline, they create false confidence.
They are particularly useful when paired with cleanliness checks, because wet oil and dirty oil usually arrive together. A route-based inspection that combines moisture screening with particle counting for hydraulic oil cleanliness gives a much better picture of whether the circuit is ageing or heading toward a wear event.
For broader background on screening approaches and water-risk thinking, this guide on water protection is a useful companion read.
Laboratory testing
Laboratory analysis is the method to use when the result needs to support a maintenance decision, a warranty discussion, or a root-cause investigation.
For hydraulic oil, Karl Fischer titration is the method maintenance teams usually trust most for water content because it measures moisture directly and gives a usable numerical result. That matters when the decision is whether to dehydrate the oil, change it, strip a reservoir, inspect a cooler, or keep operating and resample.
Send a sample to the lab when any of these apply:
- The system contains servo or proportional valves
- The machine uses high-pressure piston pumps
- Water ingress has happened before
- A field test shows abnormal moisture but the consequence of being wrong is high
- You need a defensible trend rather than a workshop opinion
Lab testing costs more per sample and takes longer than a field check. In return, you get accuracy good enough to set thresholds and justify the next job.
Comparison of Water Detection Methods
| Test Method | Best For | Speed | Approx. Cost (UK) | Precision |
|---|---|---|---|---|
| Visual inspection | Spotting free water, haze, or milky oil | Very fast | Low | Low |
| Crackle test | Fast workshop screening for obvious water | Very fast | Low | Low |
| Portable moisture sensor | Route inspections, trend checks, and field diagnosis | Fast | Moderate to higher equipment cost | Moderate |
| Laboratory Karl Fischer test | Confirming actual water content in oil | Slower | Per-sample lab cost | High |
The trade-off is straightforward. Cheap methods are good at finding obvious problems quickly. Expensive methods are good at confirming borderline cases before you spend money on the wrong fix.
A sensible workflow for most UK industrial and mobile fleets is simple. Use visual inspection and a crackle test for immediate triage. Use a portable meter when you need a faster field decision across multiple assets. Use the lab when the system is sensitive, the reading is borderline, or the repair bill for getting it wrong would hurt.
Interpreting Results and Setting Actionable Thresholds
A technician pulls a sample on Monday, gets a moisture result that looks tolerable, and puts the machine back to work. By Friday, the same unit is chattering, filters are loading up, and a proportional valve starts sticking. The first number was not useless. It was incomplete.
A water result only has value when it is tied to machine type, component sensitivity, oil temperature at test, and the recent trend. Trace moisture exists in most hydraulic oils. The maintenance decision turns on whether that moisture is within a safe range for that circuit and whether the level is climbing.
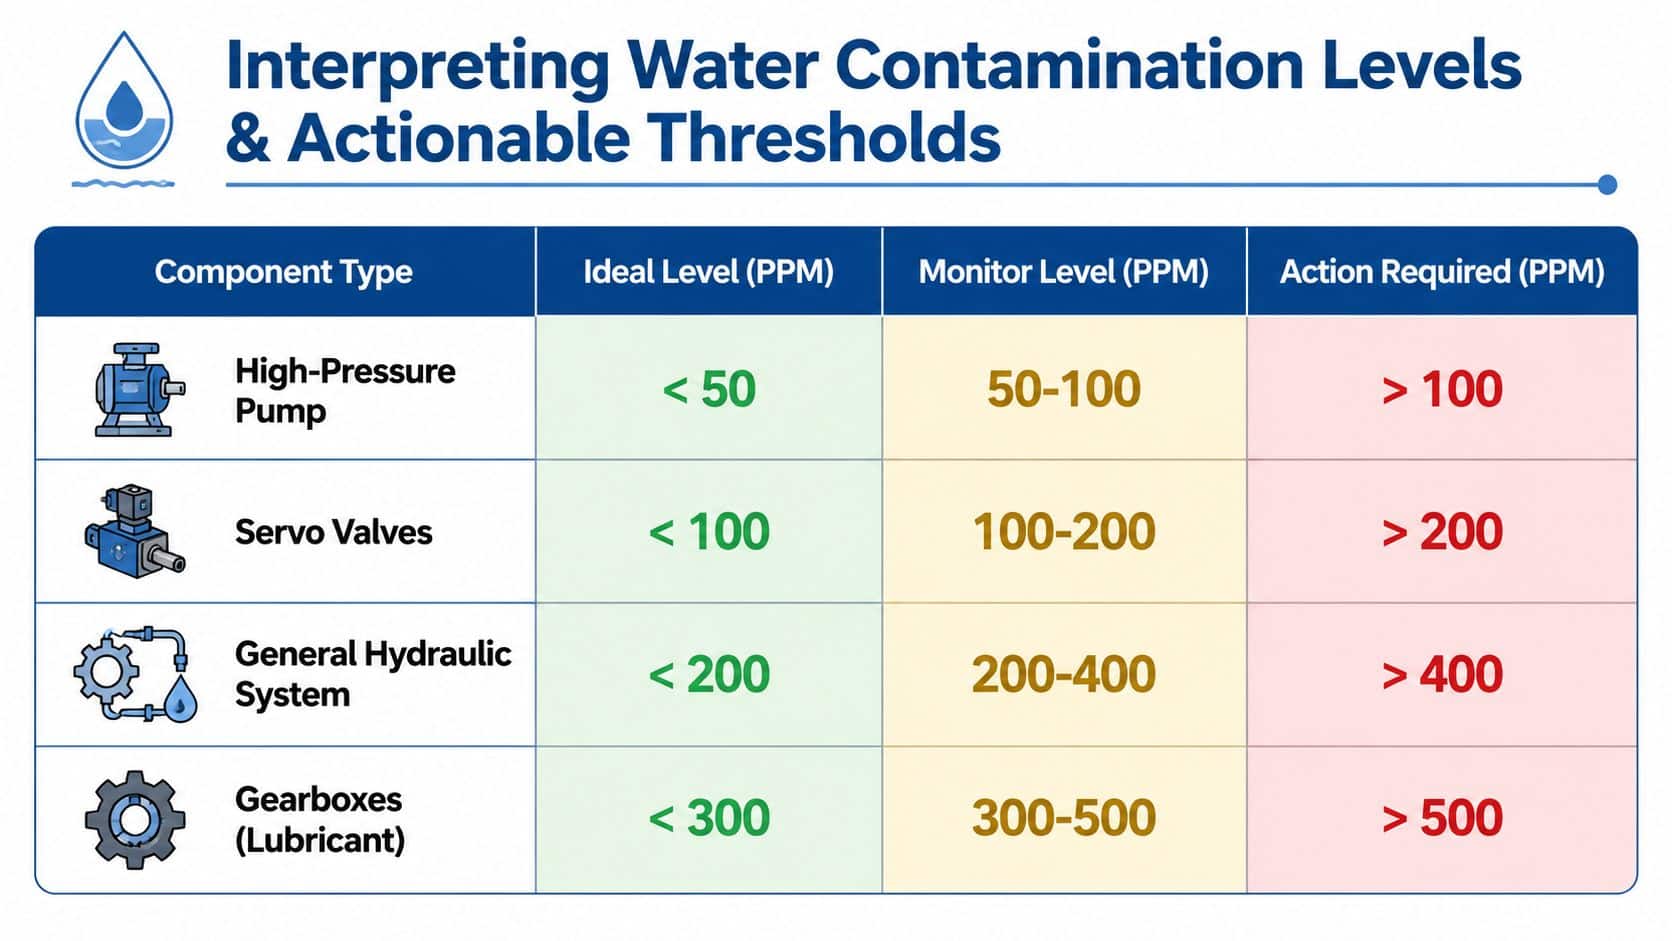
Practical thresholds for hydraulic systems
For UK industrial and mobile hydraulics, these are sensible working thresholds for routine maintenance decisions:
| Application | Preferable condition | Caution zone | Action zone |
|---|---|---|---|
| Servo valves and very fine-control systems | Below 200 ppm | 200 to 300 ppm | Above 300 ppm |
| Standard factory power packs | Below 500 ppm | 500 to 750 ppm | Above 750 ppm |
| Mobile machinery in harsher environments | Below 1000 ppm | 1000 to 1500 ppm | Above 1500 ppm |
These thresholds are starting points, not excuses to ignore context. A servo manifold on a plastics line has far less tolerance than a mobile power pack on plant that works outside in wet conditions. Even so, I would treat a sharp upward trend on mobile equipment seriously, especially if the machine has piston pumps, fine clearances, or a history of ingress after washing or outdoor storage.
Temperature matters too. Portable sensors often report relative saturation rather than direct ppm, so the same oil can read differently hot and cold. If the method changes, or the sample temperature changes, do not compare the numbers as if they were identical. Set your alarm points around one test method and use it consistently.
Read trend and severity together
Single results answer one question. Trends answer the expensive ones.
A machine sitting at 180 ppm for months is a different risk from one that jumps from 80 ppm to 180 ppm in two weeks. The second case suggests active ingress or a change in operating conditions. That is when maintenance teams should inspect breathers, cooler integrity, storage practice, rod seals, and recent washdown exposure, even if the system has not yet crossed the formal action line.
Moisture should also be read alongside cleanliness. Water often shows up before the wear metals and particle count move, but once varnish, corrosion, or additive damage starts, contamination rarely stays limited to water alone. Pairing moisture results with particle counting for condition monitoring gives a far clearer basis for deciding whether to keep running, shorten the interval, or intervene now.
Where online monitoring fits
Online moisture monitoring earns its keep on critical assets, but only if someone owns the response. It is good for catching change early and poor at settling every borderline call on its own.
The trade-off is simple. Fixed sensors give speed and trend visibility. Lab confirmation gives accuracy. On a press, injection moulding machine, offshore support unit, or any hydraulic system where an unplanned stop is expensive, continuous monitoring can justify its cost. On general mobile fleets, periodic field checks plus lab confirmation usually give better value.
Sensor readings also need discipline. Calibration drift, installation position, fluid temperature swings, and lack of periodic verification can all distort interpretation. Treat the online sensor as an early warning device. Use a confirmatory sample when the reading changes materially or when the consequence of a wrong call is high.
A workable decision rule
Use a rule set that fits the machine and the cost of failure:
- Low and stable. Keep the current inspection interval.
- Low but rising. Re-sample sooner and inspect likely ingress points.
- In the caution zone with an upward trend. Plan corrective work, confirm with a lab test if needed, and review whether the oil can stay in service.
- In the action zone. Treat it as an active reliability risk. Schedule remediation and fix the ingress path.
- Free water, milky oil, sticking valves, or abnormal pump noise. Stop normal operation until the cause and the fluid condition are addressed.
The point is not to chase perfect dryness at any cost. It is to stop a small moisture issue turning into corrosion, additive drop-out, filter distress, and component damage that costs far more than the test ever did.
Your Next Steps for Inspection and Remediation
Once testing confirms water, move in two directions at once. Find the source, and decide how far the contamination has progressed.
If you only dry the oil and ignore the ingress path, the problem comes back. If you only repair the ingress point and leave compromised oil in service, you keep the wear risk in the system.
Find where the water is getting in
Start with the places that fail most often in real service:
- Reservoir breathers and filler caps. Damaged, missing, or badly specified breathers let damp air cycle in and out.
- Cylinder rod seals and wipers. On outdoor and mobile equipment, these are common entry points for rain, wash water, and grime.
- Heat exchangers or oil coolers. Internal leakage can introduce water directly into the oil circuit.
- Poor storage and transfer practice. Open drums, dirty funnels, uncapped hoses, and reused containers cause a lot of avoidable trouble.
- Condensation cycles. Machines that sit idle, then cool and warm repeatedly, often build moisture even without an obvious external leak.
Check operating context as well. Has the machine recently been pressure-washed? Stored outside? Topped up from a part-used container? Rebuilt after a cooler or cylinder issue? Those clues usually narrow the search quickly.
Match the fix to the severity
Not every moisture issue needs the same response.
For a small increase with no free water and no active symptoms, increase sampling frequency and inspect ingress points immediately. You may be able to correct the source and verify that the trend falls back.
For moderate contamination, where the oil is turning cloudy or the readings are clearly high, use fluid remediation. Depending on the system, that may mean offline filtration with water-removal media, coalescing filtration, or vacuum dehydration.
For severe contamination, especially where free water is present, a drain, flush, and refill is often the sensible route. If the machine has been run in that condition, inspect filters, strainers, pump condition, and any precision valves before putting it back into normal service.
Protect the system after the repair
The final step is prevention. Once the oil is back under control, reduce the chance of repeat ingress.
That usually means:
- Upgrading breathing and filtration
- Improving storage and transfer discipline
- Adding a proper sample point if one doesn't exist
- Monitoring after repair to confirm the fix
- Reviewing return-line and inline protection where contamination sensitivity is high
If the application needs tighter oil control in service, an inline hydraulic oil filter can form part of the protection strategy, but it won't solve a water ingress fault by itself. Filtration is support, not an excuse to leave the root cause untouched.
The best results usually come from a simple sequence. Confirm the issue. Find the path in. Remove the water. Replace whatever allowed it in. Then trend the oil so you know the machine is back under control.
If you need practical advice on hydraulic contamination control, replacement components, filtration options, or a bespoke power solution, speak to MA Hydraulics Ltd. Phone 01724 279508 today, or send us a message.
