
A lot of hydraulic filter changes start the same way. The machine still runs, but it doesn't sound quite right. The pump note gets sharper. Functions feel slightly lazy. Oil temperature starts edging up. Nothing looks dramatic yet, so the filter gets left for another shift, then another week.
That's usually where expensive failures begin.
A hydraulic filter isn't just a service item you swap because the hours say so. It's the barrier between normal wear and abrasive contamination moving straight through pumps, valves and motors. In UK service work, that matters more than many operators realise. Contamination accounts for approximately 80% of hydraulic system failures, according to the BFPA UK Hydraulic Filtration Report 2018 & 2022 Survey. Once dirt gets past a loaded element or a filter goes into bypass, the damage is rarely confined to one part.
On smaller power packs, mobile plant and agricultural kit, the mistake is often thinking a filter change is a basic spin-off, spin-on job. It isn't. The way you isolate the machine, clean the area, inspect the seal, fit the new element and restart the circuit determines whether you've protected the system or introduced fresh contamination during the service itself.
That's the practical side of how to change hydraulic filter properly. It's not glamorous work, but it's precision work.
If you're newer to hydraulic maintenance, it helps to understand the circuit before touching anything. This overview of how hydraulics work gives useful background on pressure, flow and component roles. Once you understand what the filter is protecting, the process makes more sense.
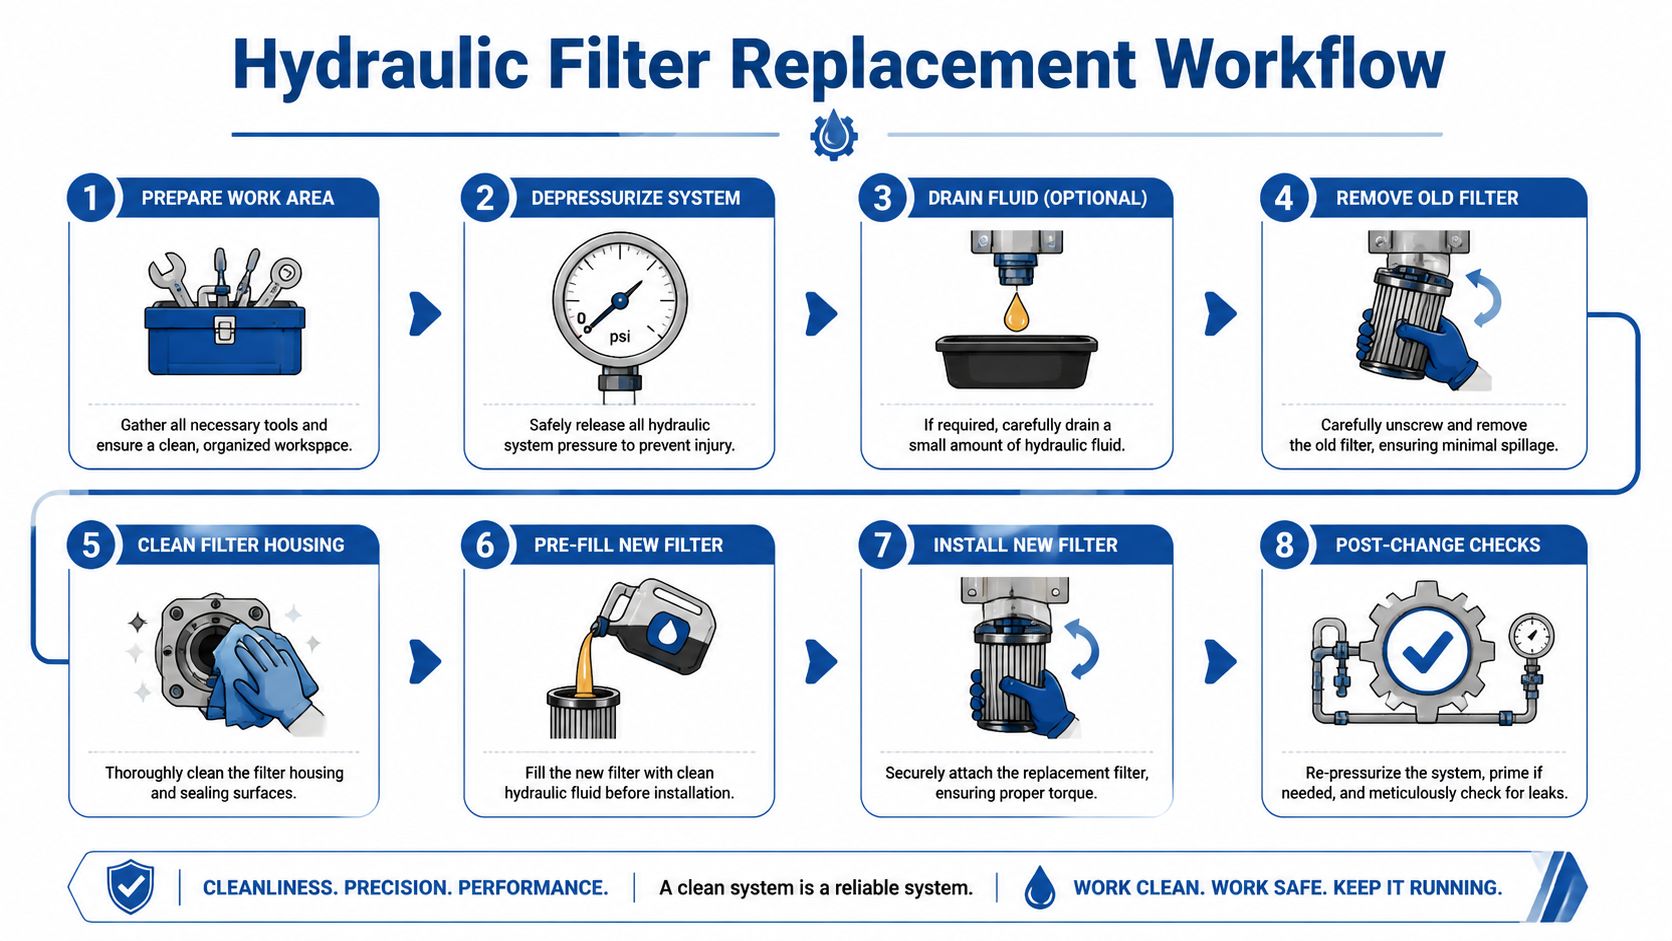
Introduction Why a Filter Change is More Than a Routine Swap
On site, the early warning signs are often subtle. A telehandler takes a fraction longer to lift. A compact power pack sounds harsher on cold start. A materials handling unit runs hotter by the end of a shift. People tend to chase the symptom first, but the root cause is often upstream in fluid cleanliness.
That's why experienced engineers treat filter changes as contamination-control work, not just scheduled maintenance. When a filter is left too long, the system may still move oil, but it may be doing so through a bypass path or through a heavily restricted element. Neither condition is healthy for the machine.
Practical rule: If the outside of the filter head is filthy, assume the inside of the service job will be too unless you slow down and clean properly first.
The hidden risk is what enters during the swap. I've seen otherwise competent maintenance teams fit the correct replacement element, then contaminate the mounting face with workshop debris, old gasket residue or fibres from a rag. The machine starts, runs, and comes back later with seal leakage or repeat filter trouble that gets blamed on the part.
What usually goes wrong
A poor filter change tends to come from one of four habits:
- Rushing isolation: Pressure is still trapped in the line or tank.
- Working dirty: Dust around the head drops straight into the open port.
- Reusing seals: The old O-ring looks acceptable, so it stays in place.
- Over-tightening: The fitter leans on the canister and distorts the seal.
Each one seems minor at the time. In practice, each one shortens component life.
Where the stakes are highest
This matters on all hydraulic systems, but especially on equipment that sees mixed duty. Agricultural machinery moves between yard, field and road. Industrial units see stop-start cycles, temperature variation and airborne dirt from the process around them. On those machines, a clean and disciplined filter change is one of the cheapest ways to preserve pumps, spool valves and actuators.
Preparation and Safety First Your Pre-Change Checklist
Before you put a strap wrench anywhere near the old filter, isolate the machine properly. In workshop terms, that means more than switching off the engine or dropping the electric motor starter. You need the machine in a zero-energy state, with stored hydraulic pressure released and no chance of accidental restart.
A lot of injuries happen because someone assumes the system is dead when an accumulator, trapped line pressure or suspended load says otherwise. Start with the manufacturer's shutdown procedure, apply lock-out and tag-out, and confirm that all motion has stopped. If the machine has residual pressure in auxiliary services, bleed that down in the approved sequence.

The non-negotiable checks
Use this checklist before the old filter comes off:
- Lock out the power source: Isolate electrical supply, engine ignition or PTO drive so nobody can restart the system mid-job.
- Depressurise the circuit: Move controls through their positions only if the manufacturer's procedure allows it. Confirm gauges return to zero where fitted.
- Stabilise the machine: Lower attachments, support any suspended mass and make sure nothing can drift.
- Protect yourself properly: Use gloves suitable for mineral oil handling, eye protection and clothing that won't snag on components.
- Control spills: Set drip trays and absorbent materials before loosening anything.
- Clean the job area first: Dirt around a filter head is contamination waiting for an opening.
The legal side matters as well as the practical side. A 2023 UK Health and Safety Executive analysis of 1,200 industrial incidents linked 42% of hydraulic machinery breakdowns to overdue filter changes, resulting in £2.7 million in annual direct costs for North Lincolnshire and Yorkshire regions alone. Optimal replacement occurs at 80% filter capacity, as per HSE-endorsed ISO 16889 standards, preventing bypass that unleashes contaminants eroding pumps at rates 7 times faster (HSE UK 2023 Incident Report & BFPA-ISO 16889 Guidelines).
PPE and fluid handling in real workshop conditions
Hydraulic oil may not look especially threatening, but hot oil under pressure, atomised leaks and contaminated fluid all change the risk profile. If you're dealing with a hot-running machine, let it cool to a safe handling temperature before starting work. A canister that's comfortable to touch is easier to remove and less likely to dump oil unexpectedly.
If you need a refresher on ignition risk around oils and workshop conditions, this guide on whether hydraulic fluid is flammable is worth reading.
Keep cardboard or a clean inspection sheet nearby for leak checks later. Never use bare fingers to hunt for a fine high-pressure leak.
Set the job up so cleanliness is easy
Good engineers don't rely on discipline alone. They set the work area up so the clean option is also the easiest option.
A sensible bench-side layout usually includes:
| Item | Why it matters |
|---|---|
| Clean replacement filter | Prevents fitting a part that’s already contaminated from storage |
| Correct wrench | Stops crushing or deforming the old canister |
| Drain pan or drip tray | Controls spill and keeps the floor safe |
| Lint-free cloths | Removes residue without shedding fibres |
| Fresh hydraulic oil | Needed for seal lubrication and topping up |
| New seals or O-rings | Old seals are a common source of repeat leaks |
If the machine is coated in mud, grain dust, metal fines or road dirt, clean the surrounding area before starting the service. That isn't housekeeping. It's part of the filter change.
Identifying and Sourcing the Correct Replacement Filter
Wrong filter selection causes plenty of avoidable hydraulic faults. In the workshop, I see the same pattern repeatedly. A replacement was chosen because the thread matched, the seal looked close enough, and the canister screwed on. The machine then comes back with cold-start restriction, repeated bypassing, slow functions, or a persistent weep at the head.
A hydraulic filter must match the circuit duty, the housing, and the protection level the OEM intended. That matters on common UK plant and farm equipment, where machines often work hard in dirty conditions and long service intervals punish any mistake in filtration. On systems built around OMT valves, Hydronit power packs, Vivoil pumps or Borelli gearboxes, a near match is still the wrong part if the bypass setting, micron rating or seal arrangement is off.

What to verify before ordering
Use the old filter as a starting point only. Confirm the replacement against the machine manual, parts book, or the hydraulic pack specification.
Check these points:
- Part number and manufacturer marking: Use the exact number where possible, then cross-reference it properly if it is obsolete.
- Filter type and position in the circuit: Spin-on, cartridge, suction strainer, pressure filter and return filter each do a different job.
- Micron rating and filtration efficiency: A finer element is not automatically better if the housing and circuit were not designed for it.
- Bypass valve specification: Bypass pressure must suit the housing and application. Guessing here can put dirty oil straight back into the system or create restriction where none should exist.
- Seal and gasket arrangement: Outer diameter, inner diameter, seal section and seating face all need to match.
- Pressure rating and collapse strength: This matters on pressure-side filters and on any machine that sees cold starts in winter.
- Fluid compatibility: The element and seals must suit the oil in use, especially where machines have been converted or topped up incorrectly in the past.
Cheap pattern parts often look fine on the bench. The problems show up later, usually as nuisance faults that waste hours because they resemble pump wear, sticky valves or aeration.
A slightly wrong filter usually does not fail dramatically. It shortens component life quietly.
Where engineers get caught out
Visual matching is the common trap. Another one is assuming a finer micron element gives better protection in every case. It can increase pressure drop, force the filter into bypass more often, or starve the inlet side on systems that were specified around a different element.
Modified machines need extra care. Many UK agricultural and industrial units have had replacement tanks, aftermarket heads, different return arrangements, or mixed-brand components fitted over the years. In those cases, machine make and model alone may not identify the correct filter. Check the actual installed head or housing, and record any markings on it.
For PUWER-minded maintenance, this is part of keeping equipment suitable for use and maintained in efficient working order. Fitting an unverified filter because it appears to fit is hard to defend if a failure follows.
When the old markings are unreadable
Do not order blind. Record the machine model, serial number, filter head markings, housing dimensions, seal sizes, and thread details before the old part is discarded. Clear photos help, especially on remote sites where stores and service teams are not standing next to the machine together.
If there is any doubt, hold the job until the part is confirmed. That delay is cheaper than flushing a contaminated system, changing a damaged pump, or chasing intermittent faults caused by a filter that spends its life in bypass.
When to stop guessing
Get the filter checked by a specialist if any of these apply:
- The old filter has no readable part number
- The machine has been modified or rebuilt
- The replacement offered is only a visual match
- The housing uses an unusual seal or bowl arrangement
- Previous filter changes have been followed by repeat alarms, leaks or poor hydraulic performance
On bespoke power packs and mixed-brand systems, filtration errors often look like a component fault somewhere else. The actual cause is usually simpler. The wrong element was fitted, and the system has been paying for it ever since.
The Core Procedure Removing and Installing the New Filter
The filter change itself should feel controlled and uneventful. If it becomes a fight, stop and ask why. Seized canisters, damaged housings and torn gaskets usually come from poor preparation or from forcing the wrong method.
Start by cleaning the area around the filter head, bowl or housing before you crack anything loose. That includes the canister, mounting base, nearby hoses and any flat surfaces where dirt has collected. You want the external area as clean as possible before there is an opening into the hydraulic circuit.
Removing the old filter cleanly
For a spin-on filter, use the correct filter wrench, not a punch through the canister and not grips on the body unless there's no other option and the filter is being scrapped anyway. Loosen it steadily, then finish by hand while keeping a drain pan underneath. Hold it upright as it comes away to reduce spillage.
For cartridge housings, support the bowl or cover evenly and watch for trapped oil. Some housings release fluid the moment the seal unloads. That's normal if you've planned for it.
A sound working sequence looks like this:
- Clean the exterior thoroughly
- Position drain equipment
- Loosen with the right tool
- Remove slowly and keep the old filter upright
- Check whether the old gasket has come away with the filter
- Inspect the mounting face before anything new goes on
One of the easiest mistakes to make is missing the old gasket stuck to the head. Fitting a new filter against an old seal often creates a double-gasket leak on start-up.
Cleaning and seal preparation
Careful fitters separate themselves from rushed ones in this process. Expert hydraulic maintenance practice emphasises that proper cleanliness during filter replacement is critical. The multi-step sealing process requires: inspecting and replacing O-rings and seals as standard procedure, lightly coating new seals with clean hydraulic oil before installation to ensure proper gasket seating without pinching, and using only lint-free cloths to remove residue from filter housings and mounting bases (CAT hydraulic filter replacement guidance).
Use a lint-free cloth only. Standard workshop rags leave fibres behind, and those fibres end up in the oil. Wipe the head, recess and sealing face until they're clean and dry. Inspect for corrosion, scoring or distortion.
Workshop habit worth keeping: Lay the old seal beside the new one before fitting. It's a quick visual check that stops a surprising number of mistakes.
For O-rings and bowl seals, replace them as routine practice. Lightly coat the new seal with clean hydraulic oil. Don't soak it, and don't fit it dry. The thin oil film helps the seal seat correctly without grabbing, twisting or tearing as the filter is tightened.
A visual walkthrough can help if you're training someone on the task:
Fitting the new filter properly
Spin the new filter on by hand only. It should thread smoothly. If it doesn't, stop immediately and recheck alignment. Cross-threading a filter head is an avoidable workshop disaster.
Once the gasket contacts the mounting face, tighten to the manufacturer's instruction. Where no specific torque or angle is stated on the filter or in the machine manual, the safe practical approach is hand-tight plus a modest additional turn. The key point is this: don't over-tighten. Over-tight filters can distort the gasket, damage the housing and make the next service needlessly difficult.
For cartridge types, make sure the element seats fully, the spring or retainer is correctly located where applicable, and the cover or bowl is tightened evenly. Uneven loading on the seal is a common cause of weeping leaks.
Pre-filling and application judgement
Some filters can be pre-filled with clean hydraulic oil before fitting, and some shouldn't be because of mounting orientation or circuit sensitivity. If the filter mounts vertically and the manufacturer allows it, pre-filling can help reduce air entering the circuit during restart. If the orientation makes spillage likely, keep the internals clean and let the system prime through the approved startup method.
What works is application judgement. What doesn't work is treating every machine the same.
Post-Change Checks Priming, Bleeding, and Leak Testing
A filter that's fitted correctly can still cause trouble if the restart is careless. The first few minutes matter because that's when trapped air, low oil level, poor sealing and installation mistakes show themselves.
Check the reservoir level before startup and top up with the correct hydraulic fluid if needed. If the machine design allows pre-filling and you've done that, you've reduced the amount of air the pump has to move. If not, give the system the best chance of a calm restart by keeping loads off the circuit initially.
Startup without abusing the pump
Start the machine at idle or the lowest practical speed. Don't rev it and don't command full function immediately. Let oil circulate, then stroke the controls gently if the equipment procedure allows, so air can return to tank rather than being driven hard through working components.
Listen to the pump. A healthy system usually settles quickly. If it sounds sharp, rattly or as though it's drawing aerated oil, stop and reassess. That may mean low reservoir level, poor priming, a suction-side issue or a seal problem around the filter service point.
A sensible restart order is:
- Check oil level before start
- Run at low speed first
- Operate functions gently
- Pause and inspect
- Recheck level once air has purged
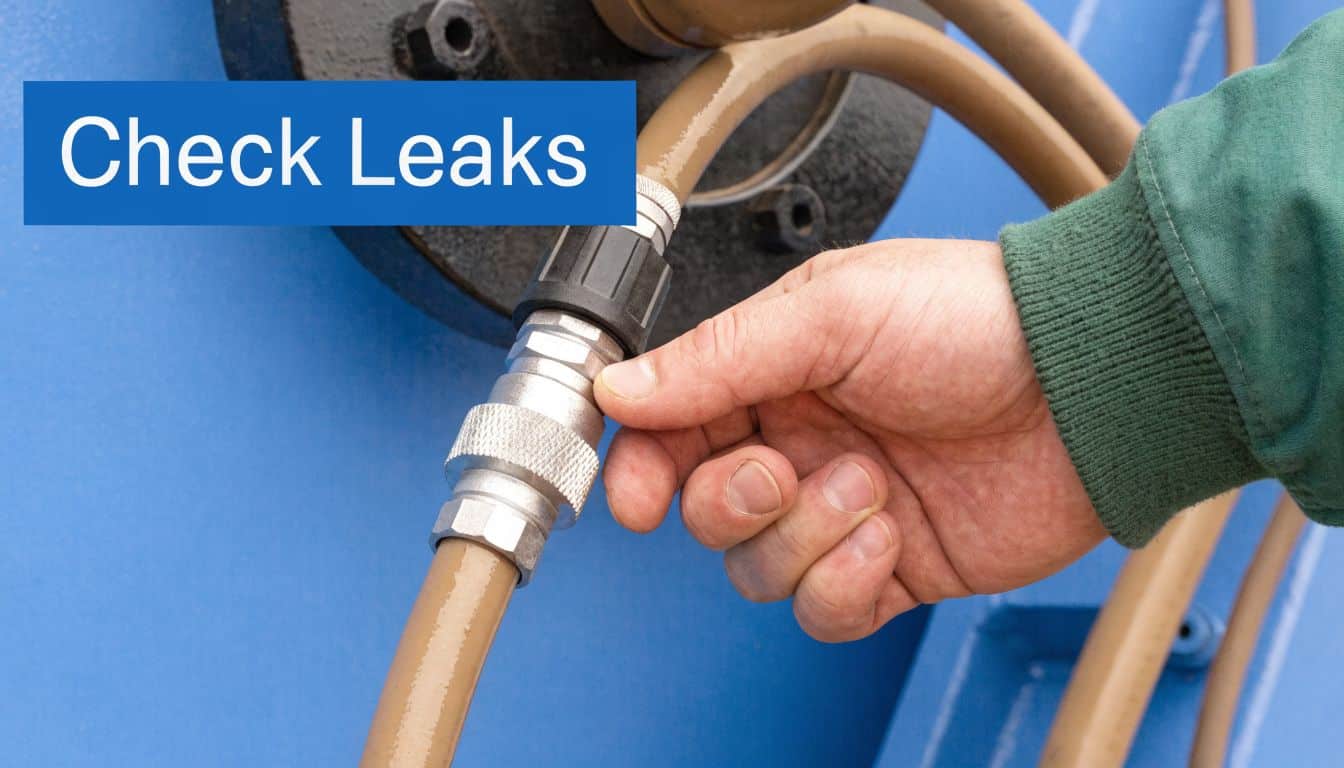
Leak testing the right way
Your first leak check should be visual. Look around the gasket line, housing joint and any disturbed fittings. Then use a clean cloth or a piece of cardboard to confirm whether the area is staying dry.
Never use your hand to trace a suspected fine leak on a pressurised hydraulic system. Fluid injection injuries are serious and can happen through leaks that look minor.
If a filter weeps immediately after startup, don't keep tightening it in hope. Shut down, depressurise and find the cause. It's usually a twisted seal, damaged seating face, wrong element or old gasket left behind.
Confirming the system is stable
Once the machine has run briefly, inspect:
| Check | What you’re looking for |
|---|---|
| Filter seal area | No sweating, drip formation or spray |
| Housing joint | Even seal compression, no local wet patch |
| Reservoir level | Stable after air has bled out |
| System sound | No cavitation or erratic pump noise |
| Pressure indication | Normal reading for the circuit |
If you need to verify pressures properly after a service or during fault-finding, a suitable hydraulic pressure tester kit makes diagnosis far more reliable than guesswork.
After the initial run, shut down and inspect again. Some leaks only appear once pressure has cycled and the seal has warmed slightly.
Maintenance Schedules and When to Call the Experts
The best filter change is the one done before the machine starts complaining. Planned maintenance gives you time to source the right parts, service the machine cleanly and catch early warning signs before they become system damage.
The data supports that approach. In the UK hydraulic industry, contamination accounts for approximately 80% of hydraulic system failures. For new equipment, BFPA guidelines mandate an initial filter change after just 50 hours of operation to flush break-in contaminants, followed by intervals of 250-500 hours or every 6 months, whichever comes first (BFPA UK Hydraulic Filtration Report 2018 & 2022 Survey).
Build a maintenance record, not just a memory
If you look after more than one machine, start logging filter changes properly. Record the date, machine hours, filter part number, oil added, condition of the old filter, and anything unusual during restart. Over time, that tells you whether a machine is running normally or repeatedly loading filters faster than expected.
That kind of discipline isn't only for hydraulics. The same maintenance mindset applies across plant, buildings and support equipment. A structured seasonal home maintenance guide is a good reminder that reliability usually comes from routine checks done on time, not from reacting after something fails.
Signs the job is no longer a simple filter swap
Most filter changes are straightforward. Some aren't. Bring in extra technical support if you see any of the following:
- Persistent leakage after refitting: Usually points to a sealing face, housing or part-specification issue.
- Repeated clogging: Suggests deeper contamination in the system, not just an overdue service.
- Pump noise that doesn't clear: Could indicate air ingress, suction restriction or component wear.
- Pressure anomalies after the change: That may be a filter selection problem, bypass issue or unrelated circuit fault.
- Metallic debris in the old filter: Treat that as a warning sign and investigate the source before putting the machine back into normal duty.
The trade-off is simple. You can spend a little more time on planned filtration maintenance, or a lot more time on pump, valve and cylinder repairs later. In practice, clean servicing, correct parts and decent records save the most grief.
If you need help identifying the right filter, cross-referencing a hard-to-read part number, or sorting a hydraulic issue that's gone beyond routine servicing, contact MA Hydraulics Ltd. Phone 01724 279508 today, or send us a message.
