
You pull a bearing during a routine strip, wipe the shaft, and see that fine reddish-brown dust around the seat. Most fitters know the look. It’s the start of trouble. The bearing hasn’t fully let go yet, but it’s been moving just enough to fret, polish the metal, and slowly ruin the fit.
That’s usually the point where people say the housing was “a bit worn” or the shaft was “still usable”. In a hydraulic system, that kind of optimism gets expensive. A loose bearing in a gear pump, motor, PTO gearbox or power pack doesn’t stay merely loose. It starts vibrating, the fit opens further, corrosion gets in, and then you’re choosing between a rushed repair, machining work, or a full replacement.
A bearing loctite retainer isn’t workshop magic. It’s a controlled way to stop micro-movement between cylindrical parts and turn a doubtful fit into a stable assembly, provided you choose the right grade, prepare the surfaces properly, and let it cure under the right conditions. That last part matters more than often realized.
Beyond Press-Fits The Case for Bearing Retainers
You pull a motor apart on a cold Tuesday morning, the replacement bearing is on the bench, and the shaft journal looks only slightly polished. That is the point where a rushed decision costs money. Refit it dry and the machine may be back on the wagon within weeks, this time with a spun inner ring, a damaged housing, and more downtime than the original job.
Press-fits still belong in good engineering practice. If the shaft size is right, the housing is round, the load is predictable, and the machine is kept within temperature, a straight interference fit can serve well. The trouble in real hydraulic service is that bearings rarely live in clean, steady conditions. They see shock loads, stop-start duty, oil mist, washdown, outdoor storage, and the usual British damp that creeps into everything from farm kit to steelworks auxiliaries.
A retaining compound earns its keep by dealing with what the drawing does not show. It fills the small voids left by surface finish and wear, supports the full contact area instead of a few high spots, and blocks moisture at the joint line. In practice that means less fretting, less creep, and less chance of finding red dust around the seat at the next stripdown.
That matters over the whole life of the repair, not just on assembly day.
What actually changes when you use a retainer
A dry press-fit depends on metal-to-metal grip at the tightest points. Once vibration and thermal cycling start working on it, those points wear, the grip drops, and the bearing begins to move by microns. Microns are enough. Given time, they polish the journal, open the fit, and start the chain of failures fitters know too well.
A proper bearing retainer cures between the parts and turns that imperfect contact into a supported joint. The gain is practical:
- Higher resistance to micro-movement under vibration and reversing loads
- Better sealing of the interface against moisture and process contamination
- More tolerance of slight wear where the fit is no longer ideal but still repairable
- A chance to avoid machining or metal spraying on assemblies that are marginal rather than scrap
The same principle is used across other threaded and cylindrical assemblies. If you need the broader difference between retainers and threadlockers, this guide to thread locking adhesive for industrial maintenance sets out where each product fits.
Why workshop conditions in the UK change the decision
Manufacturer datasheets are useful, but they do not stand beside you in an unheated workshop in January. Temperature, oil contamination, and damp surfaces all affect cure and final performance. Aluminium housings also behave differently from steel once heat gets into the job. A fit that feels acceptable at the bench can loosen in service after a few thermal cycles.
That is why the decision should not be based on catalogue strength alone. Check the actual clearance, the substrate, the running temperature, future strip requirements, and the environment the machine works in. If the unit lives outdoors, gets washed down, or sits idle between shifts, corrosion control becomes part of the bearing retention decision, not an afterthought.
Under COSHH, the product still needs assessing, handled with the right gloves, and used with sensible ventilation. Retainers are common workshop consumables, but common does not mean casual.
Signs a dry reassembly is the wrong call
Fitters usually get a warning before the assembly fails outright. The common clues are easy to miss when production wants the machine back:
- Red-brown fretting dust at the bearing seat or housing bore
- Bright polished bands where the ring has been creeping
- Black staining or oxide marks around the fit
- A bearing that pushes on by hand when it should need controlled force
- Heat and noise after startup with no clear lubrication fault
One more point from experience. If a shaft or housing has already shown movement, fitting the next bearing dry because "it went together nicely" is usually false economy.
Even small assemblies show the same rule. A pre-treated fastener such as this Spirit treadmill hex screw relies on the correct locking method being matched to the joint. Bearings deserve the same level of thought, because the cost of getting it wrong is far higher.
A bearing retainer will not rescue a badly oval housing or a journal that is worn beyond limit. It will, however, turn many borderline fits into serviceable repairs if the engineer measures properly, prepares the surfaces properly, and chooses the grade for the intended job rather than the bottle that happens to be nearest the press.
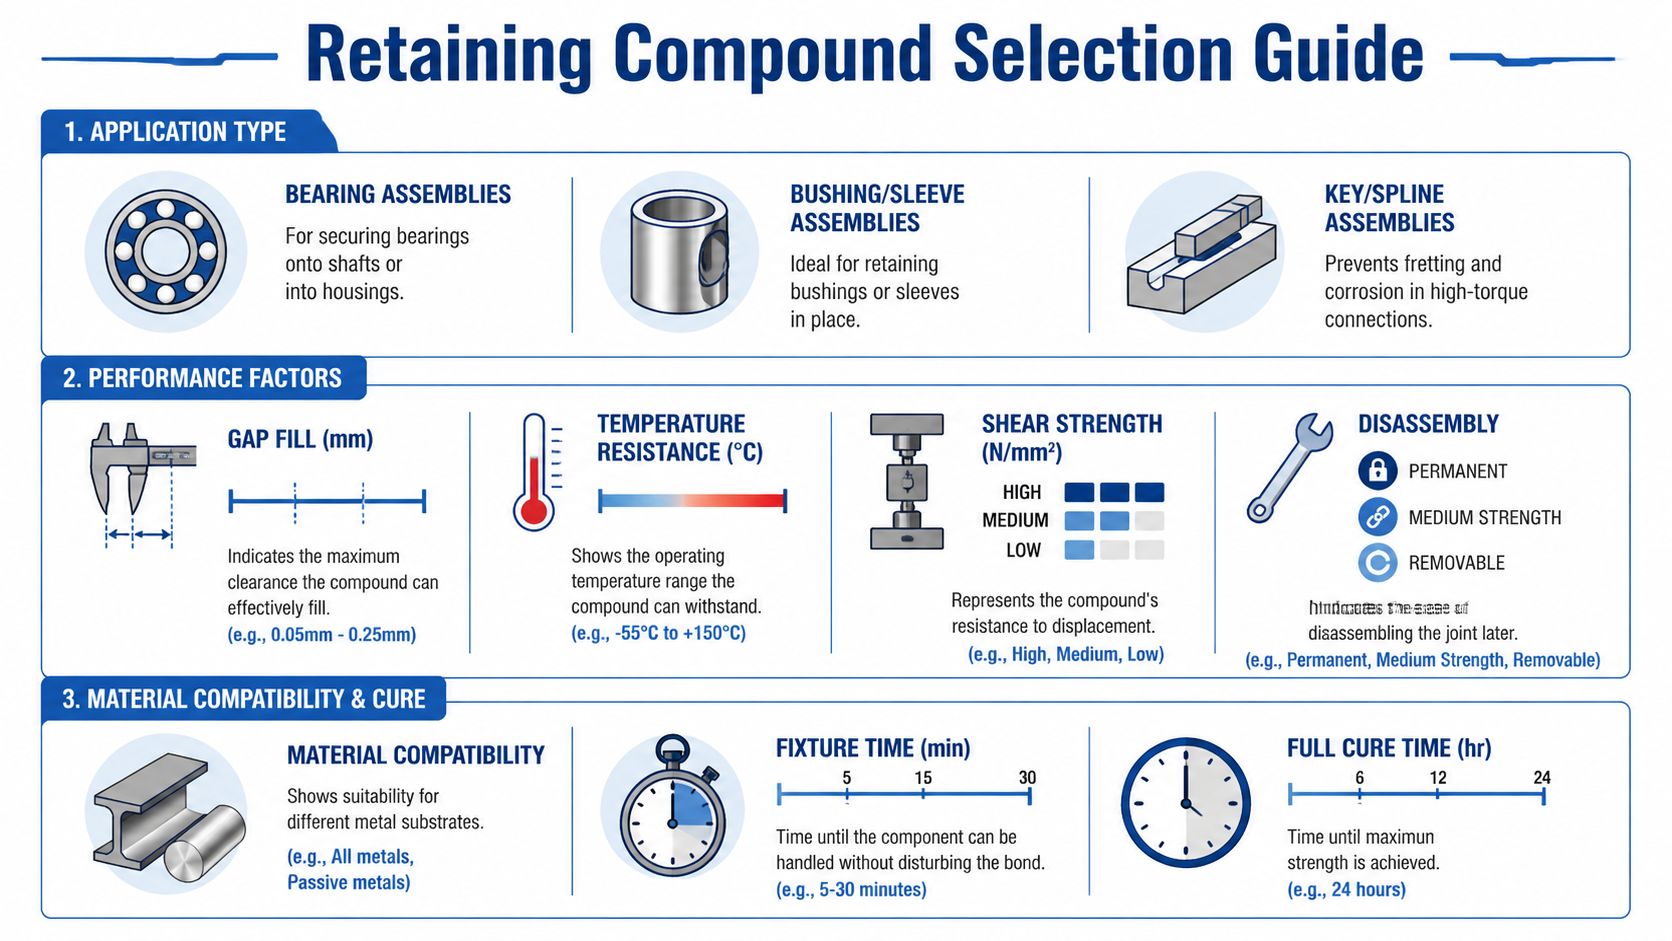
Selecting the Right Retaining Compound for the Job
Choosing the wrong grade causes as many problems as poor preparation. The label might say “retaining compound”, but the products are built for different fits, temperatures, service requirements, and substrate conditions. If you treat them as interchangeable, you’ll either struggle to assemble the parts, fail to hold the joint, or make future removal harder than it needs to be.
Start with the fit, not the brand name
The first question isn’t “Which Loctite do we normally use?” It’s this: what condition is the joint in?
If the parts are close-fitting and there’s still good geometry, a retaining compound for standard assembly is usually enough. If the housing is worn, the shaft has polished down, or there’s visible clearance, you need a product designed to fill that gap and hold its position during assembly.
A few common workshop choices tend to fall into clear use cases:
| Product | Best use | Practical note |
|---|---|---|
| Loctite 641 | Removable bearing fits | Good when future disassembly matters |
| Loctite 603 | Close fits, including oily environments | Often useful on bearings in aluminium housings |
| Loctite 638 | High-strength retention for narrow gaps | Strong option where vibration is severe |
| Loctite 680 | Worn seats and slightly contaminated surfaces | Useful where machining is avoidable |
| Loctite 620 | High-temperature applications | Chosen where heat would challenge standard grades |
| Loctite 660 | Repairing worn bearing seats, splines and keyways | Best for larger wear conditions within its gap limit |
Match the product to serviceability
A junior fitter’s common mistake is assuming stronger is always better. It isn’t. If the bearing needs to come out during normal service, a removable grade is usually the right call. If the machine is a long-run production unit where the cost of movement is high and strip frequency is low, a higher-strength grade makes more sense.
The trade-off is simple:
- Removable grades help planned maintenance
- High-strength grades suit difficult vibration and load cases
- Gap-filling repair grades are for wear, not fresh precision assembly
According to Henkel retaining compound guidance, using the correct retaining compound, including Loctite 641 for removable fits, can mitigate 25% of bearing-related failures in mobile hydraulic applications, and correct selection can boost axial strength by up to 75% compared with press-fits alone.
Temperature and substrate matter more than people admit
Heat changes everything. A compound that behaves perfectly on a cool workshop bench can struggle badly near engines, hot hydraulic circuits, or enclosed power pack assemblies. If the application sees sustained heat, don’t pick by habit. Pick by operating condition.
Material matters too. Steel on steel usually gives predictable cure behaviour. Aluminium housings, plated surfaces, and passive metals can slow cure or change how the compound behaves in practice. Loctite 603 is often chosen where bearings are retained in aluminium housings under vibration, especially in mobile plant work.
If the bearing seat is worn and the housing is aluminium, don’t try to rescue it with a product meant for a close, fresh fit. That’s asking the wrong chemistry to solve the wrong problem.
A simple workshop decision route
Use this as a first-pass check:
-
Will the bearing need routine removal?
If yes, start by considering Loctite 641. -
Is the joint in good condition but exposed to oil or vibration?
Loctite 603 or 638 may be more suitable depending on fit and severity. -
Is the seat worn or oversized?
Move towards a repair grade such as 660 or, where appropriate, 680. -
Is operating heat a major issue?
Loctite 620 belongs on the shortlist. -
Are you trying to save a component without machining?
That points you firmly towards the gap-filling products, not standard retainers.
For engineers who also deal with smaller fastener assemblies outside bearing work, it’s useful to keep clear in your mind where retaining compounds stop and threadlocking begins. A small example is this Spirit treadmill hex screw, which shows the sort of pre-applied threadlocking you’d expect on a fastener. That’s a different job from retaining a cylindrical bearing fit.
If you’re comparing retention with fastening compounds in your own stores, a technical overview of thread locking adhesive applications helps draw the line between the two. In a busy stores area, mixing them up is more common than anyone likes to admit.
The Critical Surface Preparation Process
You see this on site after a shutdown. The bearing was fitted on Friday, the machine is back in on Monday, and by Thursday there is fretting dust round the housing. Nine times out of ten, the compound gets blamed first. In the workshop, the cause is usually poor preparation, contaminated metal, or moisture on the joint faces.
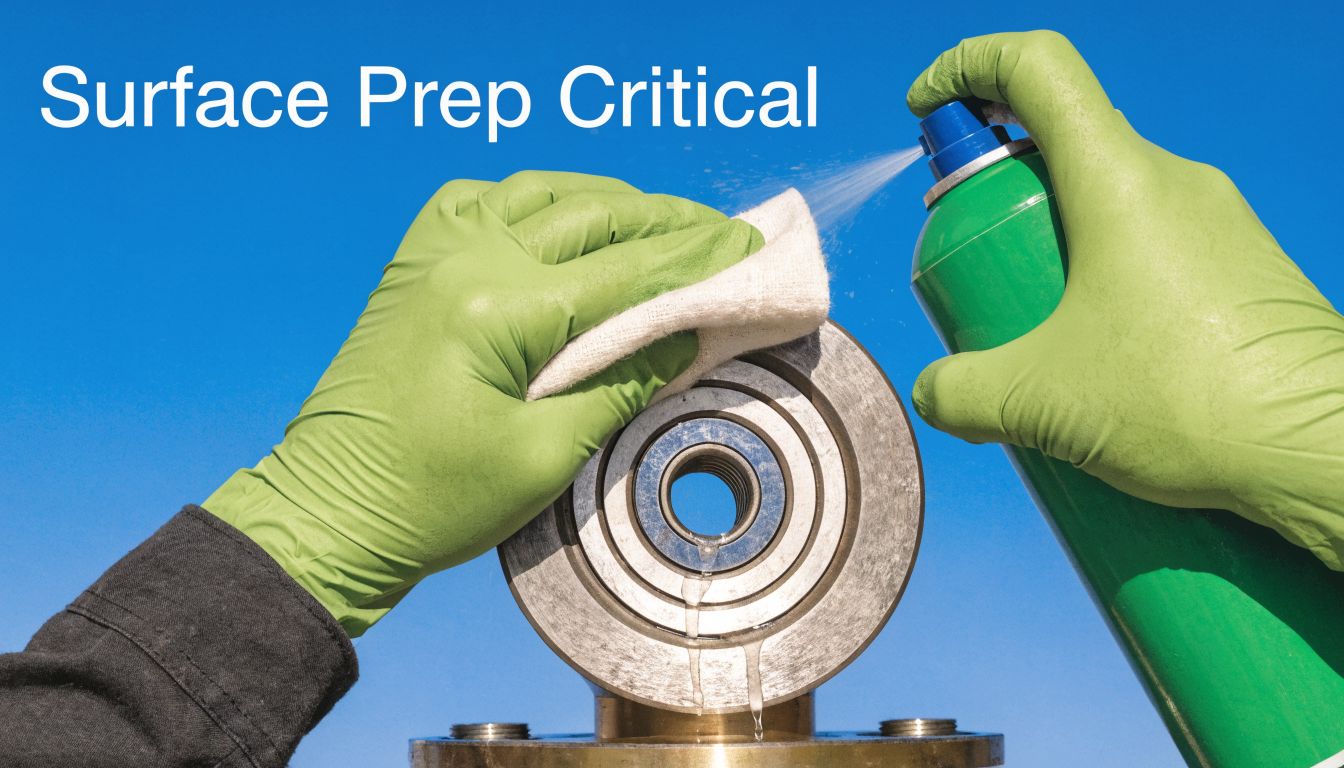
Surface preparation decides whether the retainer cures properly and whether it keeps doing its job months later. A clean-looking shaft is not enough. Oil film, old adhesive, corrosion staining, polishing residue, coolant, and fingerprints all interfere with bond strength. In a busy maintenance shop, one careless hand on a cleaned journal can waste the whole job.
Use a repeatable method.
Cleaning means metal-to-metal clean
Start by stripping off every trace of old compound and corrosion product. If the previous bearing has spun, check for smeared metal and raised spots, because adhesive will not hide mechanical damage. Dress high points carefully, then clean again.
For degreasing, use a proper workshop cleaner rather than whatever aerosol happens to be nearest. Products such as LOCTITE SF 7070 are commonly used for final cleaning, and residue removers such as LOCTITE SF 790 help where old material is stubborn. Spray, wipe with a lint-free cloth, inspect, and repeat until the cloth comes away clean.
Then let the parts dry fully. Trapped solvent causes problems, especially on close fits where there is nowhere for it to escape.
A bench routine that avoids expensive mistakes
This sequence works in real maintenance conditions:
-
Remove old adhesive and debris fully
Clean out the shaft, bore, and any oil grooves or reliefs where contamination sits. -
Inspect the surfaces under good light
Look for scoring, fretting, pitting, and burrs. If the fit is damaged beyond what a retainer grade can manage, stop and reassess before assembly. -
Degrease both mating parts properly
Use clean cloths. Keep wiping until there is no visible residue and no transfer onto the cloth. -
Dry and protect the cleaned parts
Put them on clean paper or a covered tray, not straight onto a dirty bench or the top of the press. -
Handle with clean gloves
Workshop gloves pick up oil quickly. Change them if you have touched chains, tools, grease nipples, or used bearings.
That discipline matters just as much as the product choice. The same mindset shows up in other trades as well. Good epoxy floor coating techniques also depend on dry, contaminant-free surfaces and controlled preparation.
Damp, cold, and passive metals
UK workshop conditions catch people out. An unheated bay in winter, a housing brought in from outside, or a plant room with constant washdown can leave condensation on the metal even after cleaning. If there is visible moisture, or if the part feels colder than the room and starts to sweat, do not apply retainer yet. Warm the component to a stable temperature, dry it properly, and check again.
Passive metals and plated surfaces can also slow cure. So can low ambient temperature. In those cases, an activator such as LOCTITE 7649 can help fixture speed and cure reliability, but it is not a rescue for dirty parts or a poor fit. It only helps a sound process.
Do the safety side properly
Cleaners, primers, and retaining compounds all need handling under COSHH controls. Keep the current safety data available, use the specified gloves and eye protection, and make sure the bench area has suitable ventilation. Decanting solvents into unlabelled bottles is the sort of shortcut that causes trouble during an audit and even more trouble after a splash injury.
One final check saves a lot of rework. Before adhesive goes anywhere near the assembly, make sure the fit still makes mechanical sense. Retaining compound improves a sound repair. It does not turn a badly worn housing into a reliable one by wishful thinking.
Application Techniques for a Perfect Fit
A bearing job usually goes wrong at the bench, not in the catalogue. The fitter has cleaned the parts, the press is ready, and someone rushes the adhesive because the line is waiting. Ten minutes later the bearing is in, but half the compound has been pushed to the front face, a dry patch is buried inside the housing, and the rework starts tomorrow.
Once prep is done properly, application is about control. Put the compound where the joint will carry load after assembly, not where it merely looks tidy before the parts go together.
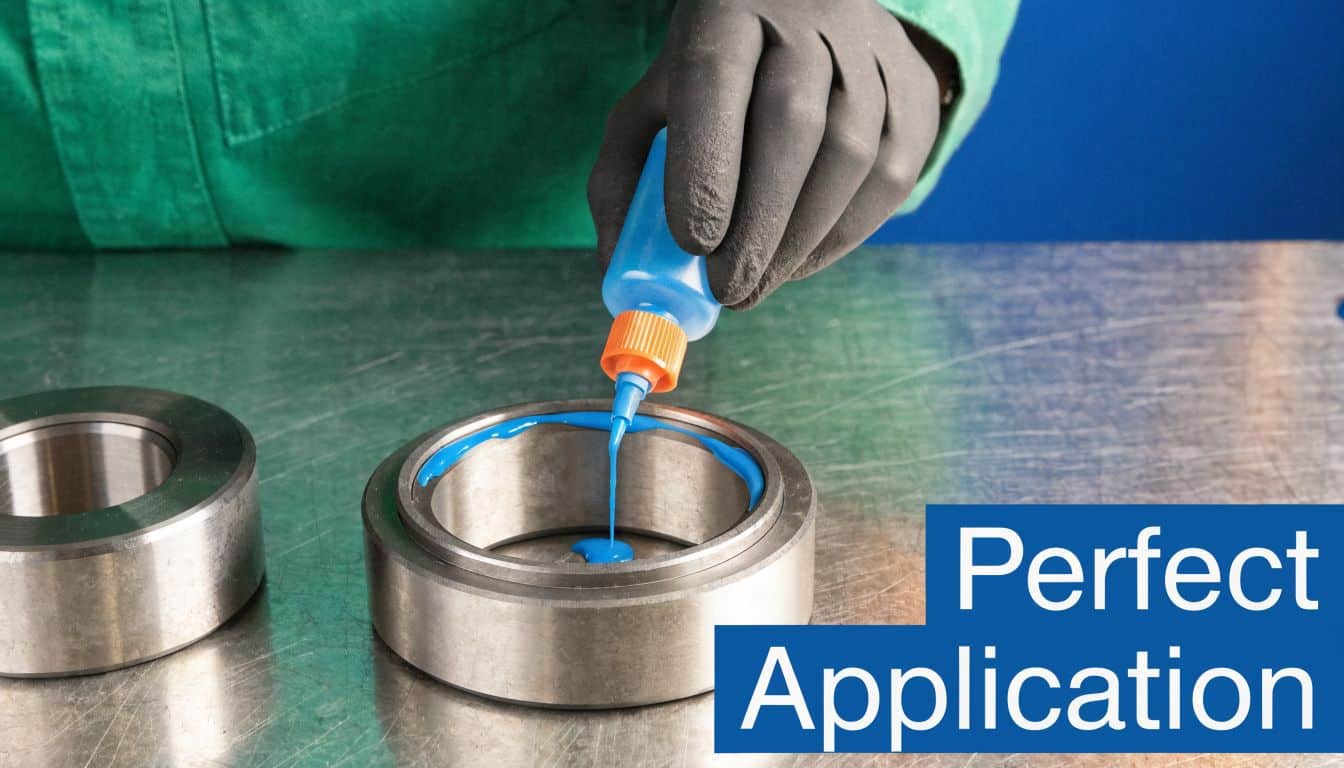
Slip-fit assemblies
On a slip fit, run a continuous bead around the leading edge of the shaft or outer ring. If access is good, add a light film inside the bore as well. The aim is full circumferential coverage once the parts are home.
Assemble straight away. Do not leave the coated part on the bench while you hunt for a mandrel or answer the radio.
A slight turning movement during assembly often helps spread the material and prevent one-sided coverage, but only where the component design allows it. On shielded or sealed bearings, keep adhesive away from the seals and away from any route into the rolling elements. If there is any chance of migration into lubricated areas, reduce the bead and control placement properly.
Metering matters on repeat work. A hand pump or other controlled dispenser gives more consistent bead size than squeezing from the bottle by feel. In a busy workshop, consistency saves more time than speed.
Press-fit assemblies
Press fits need a different approach because insertion pressure can wipe the product off if it has only been applied to one side. Coat both mating surfaces lightly, then press the parts together in one controlled movement.
A stop-start press stroke is asking for trouble. It drags adhesive, marks the fit, and can cock the bearing over before it reaches its seat.
Use enough compound to wet the full joint, but not so much that it pools at the shoulder or runs into adjacent features. On assemblies close to brakes, couplings, or hydraulic equipment, good housekeeping matters as much as bond quality. Stray product on the bench or floor creates contamination and slip hazards, and any workshop storing oils and solvents should already be alert to related fire risks around fluids and cleaners, especially where people misunderstand whether hydraulic fluid is flammable.
Repairing worn seats with Loctite 660
Worn shafts and housings need a gap-filling grade, not the same liquid used on a sound fit. Loctite 660 is useful here because it stays where it is applied. That makes it suitable for local wear, shallow scoring, splines, and keyways where a thinner product would run away before assembly.
It still has limits. If the seat is badly bell-mouthed, cracked, or worn beyond what the compound can bridge, the proper repair is metal spraying, sleeving, machining, or replacement. Retainer is for recovering serviceable parts, not disguising scrap.
A method worth following is simple:
- Check the actual wear, not just the nominal shaft size on the drawing.
- Apply the paste into the worn area first, then coat the mating surface lightly.
- Assemble squarely so the paste stays in the void instead of being scraped to the edge.
- Clamp or support the part so it cannot creep out of position before cure.
- Leave the joint alone once it is seated.
That last point is where younger fitters lose jobs. They push the assembly together, then twist it back to “line it up” or pull it part-way out to check coverage. Once you do that, you risk creating channels, voids, or air pockets right where the load is highest.
For awkward shapes, a sponge-roll method can help spread product evenly without dumping too much into one spot. The same principle shows up in practical epoxy floor coating techniques. Control the film build, cover the whole area, and avoid missed sections.
This short demonstration is useful if you want to see application movement and part handling in context:
Common application mistakes on site
The failures seen most often on plant work are predictable:
- Applying to one surface only on a tight or awkward fit
- Waiting too long between coating and assembly
- Using a standard grade on a visibly worn seat
- Overfilling the joint and contaminating nearby components
- Twisting, checking, or disturbing the assembly after seating
- Ignoring part orientation and trapping air in a blind housing
UK site conditions make these mistakes worse. A cold housing in an unheated bay thickens the product and shortens your working patience. Damp conditions encourage rushed handling because people want the job shut up quickly. The answer is not more adhesive. It is better control, correct product choice, and assembling the joint once, properly.
Curing Inspection and UK Safety Compliance
The bearing is in, the housing is warm from the press, and someone wants the unit back on the machine before tea break. That is the point where good repairs get spoiled. A retaining compound joint can look tidy and still be nowhere near ready for service.
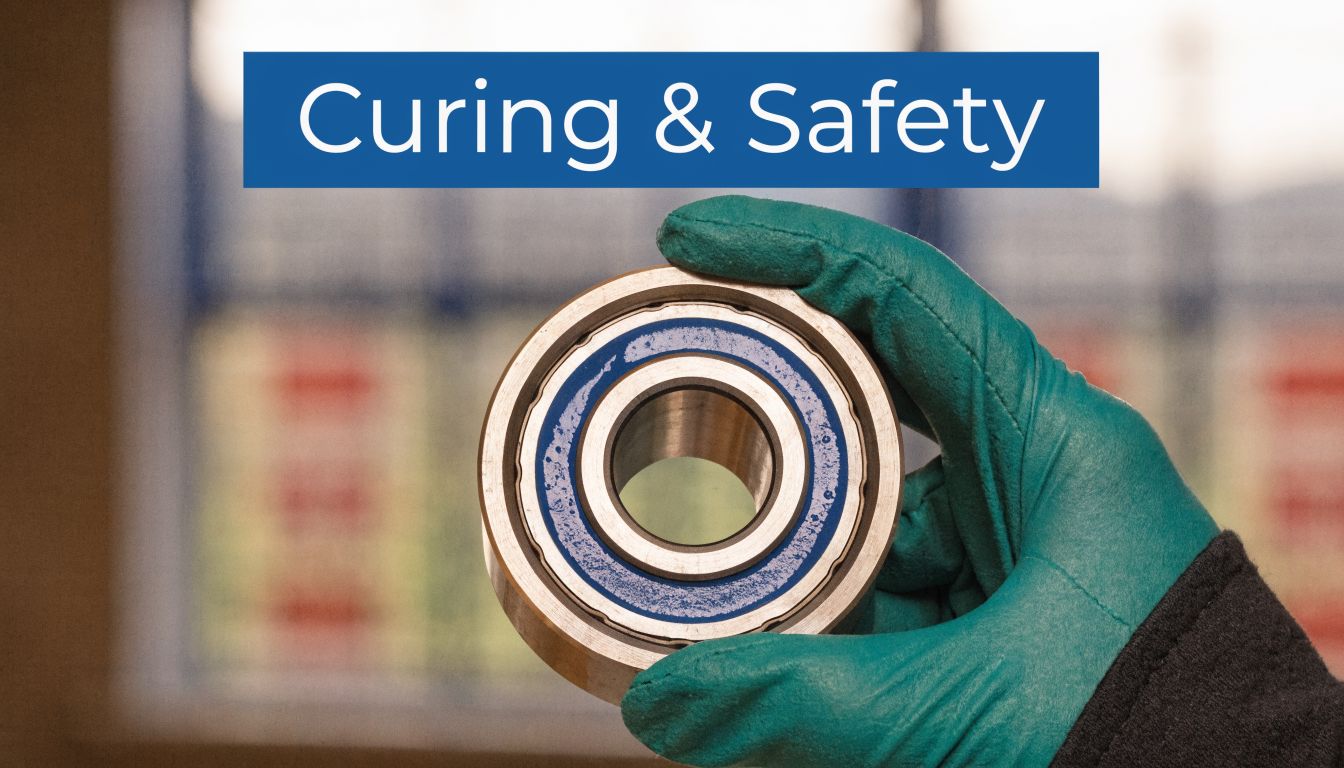
Fixture time isn’t full cure
On site, this is one of the most expensive misunderstandings. Fixture time only means the parts have stabilised enough for cautious handling. Full cure is what gives the joint its proper resistance to load, vibration, and heat.
As noted earlier, some grades will fixture in around an hour at room temperature, while full cure can still take a full day. Serviceable grades can also tempt people into pushing the job out too early. In a cold bay in January, or on passive metals, expect the cure to drag. If the parts came in from a damp van, allow for that as well. Moisture on the surface and low temperature both steal time from you.
In practical terms:
- Move the assembly only if the job demands it
- Do not put it into full load before cure is complete
- Record actual workshop temperature if cure time matters to handover
- Be more conservative with stainless parts, plated parts, and marginally oily repairs
I would rather hold a machine for a few extra hours than send it out and see the bearing spin by the next shift.
What to inspect before release
Inspection after cure should be simple and methodical. No guessing. No “it’ll probably be fine.”
Check the unit for:
- Bearing fully home against its shoulder, stop, or spacer
- A light, consistent witness of squeeze-out where visible
- No compound pushed into seals, rolling paths, grease routes, or drain holes
- No movement under a controlled manual check after the stated cure window
- Repair record, batch traceability, and technician sign-off where your system requires it
A joint that has cured properly is usually uneventful. That is what you want.
If you have any doubt, leave it on the bench and inspect again later. That decision is cheaper than stripping a seized housing or recovering a failed asset from site.
COSHH belongs on the bench, not just in a folder
Retaining compounds are workshop chemicals, so they sit under the same discipline as cleaners, oils, and paints. In the UK, that means COSHH has to be part of the repair, especially where products are used in enclosed housings, near warm equipment, or in bays with poor air movement.
The practical controls are straightforward. Keep the current SDS available. Match gloves to the product, not whatever is lying in the stores bin. Use eye protection when cleaning and assembling. Make sure ventilation is adequate, especially if several jobs are being cleaned and bonded in the same area. Dispose of contaminated wipes properly instead of leaving them on the bench top or in an open tray.
If you supervise fitters or run toolbox talks, a plain-language guide for training managers helps turn policy into habits people will adhere to.
Workshop checks that keep the job compliant
| Check | Why it matters |
|---|---|
| Current SDS at point of use | Gives the team the right handling, first-aid, and storage information |
| COSHH assessment completed | Identifies exposure routes and control measures for the product used |
| Suitable gloves and eye protection | Reduces skin contact and splash risk during cleaning and assembly |
| Ventilation checked | Helps control vapour build-up in enclosed or busy work areas |
| Product stored correctly | Avoids degraded material and poor cure performance |
| Waste route in place | Stops contaminated wipes and containers being left around the bench |
Look beyond the adhesive itself. If the repair is being done near hot work, pumps, or power packs, the wider fire risk matters as well. A basic understanding of whether hydraulic fluid is flammable belongs in the same risk conversation.
Troubleshooting Common Issues and Removal Strategies
It is 6:30 on a wet January morning, the line is waiting, and a retained bearing has started creeping in the housing after only a short run. That is usually blamed on the bottle. In the workshop, the cause is far more often a poor fit assessment, damp contamination, cold cure conditions, or a seat that was already past saving.
Start with the joint itself. Check what the bearing was fitted into, what load it sees in service, how long the compound had before the machine was put back under load, and what the workshop conditions were on the day. In UK plants, cold metal and condensation catch people out all the time. If a shaft or housing has come in from an unheated stores area, moisture can sit on the surface even when it looks clean.
If the bearing spun in the housing
A spun outer ring usually comes back to four practical faults:
- The actual gap was outside the grade's working range
- Oil, moisture, or old compound remained on the mating faces
- The assembly was disturbed or loaded before cure had developed
- The housing was worn, bell-mouthed, or oval before the job even started
Do not keep trying stronger grades on a damaged seat. If the housing is visibly hammered or measures out of tolerance, the adhesive is no longer the main repair. It becomes a salvage decision. Re-machine it, sleeve it, metal spray it, or replace the part.
If the compound stayed wet or cured patchy
Look at site conditions before anything else. Cold workshops slow cure. Stainless, plated parts, and other passive metals slow it further. Solvent trapped in the joint does the same, and a faint oil film is enough to spoil the result.
Check these points in order:
- Was the cleaner fully evaporated before assembly?
- Were the parts dry and above the minimum application temperature?
- Was the chosen grade suitable for the metals and fit?
- Should an activator have been specified for passive surfaces or low temperature work?
- Was the product in date and stored properly?
If there is any doubt, strip it and do it again. Sending it out half cured costs more than another hour on the bench.
If vibration is still there after fitting
A retainer only secures the fit. It does not correct a bent shaft, a bruised shoulder, poor alignment, imbalance, or a damaged bearing. I have seen plenty of assemblies hold perfectly while the machine still shook itself to bits because the underlying fault sat one level up in the train.
Work through the basics:
- Confirm the bearing is fully seated against its register
- Measure shaft and housing condition
- Check adjacent components for wear or looseness
- Review whether the original fit and bearing type were right for the duty
The same logic applies across repair work. A proper hydraulic cylinder repair process starts by finding the failed component and the reason it failed, not by swapping the most obvious part and hoping for the best.
Removal without damaging the surrounding parts
Removal starts with knowing what grade was used. A serviceable fit assembled with Loctite 641 will often come apart with normal pullers and controlled force. High-strength retaining grades may need local heat to break the bond cleanly.
Use a controlled method:
- Support the housing correctly before pressing or pulling
- Apply local heat carefully and only where needed
- Protect seals, paint, sensors, and grease from heat damage
- Use proper pullers, drifts, and presses
- Wear gloves and eye protection, and follow the SDS and local COSHH controls during heated removal and clean-up
Poor removals create the next failure. Distorted housings, bruised shafts, cracked castings, and damaged seal lands usually come from hitting harder instead of reducing the bond first.
If repeat maintenance is expected, plan for that at selection stage. Service life, ease of strip-down, workshop temperature, exposure to damp, and the actual condition of the fit all matter more than a datasheet headline.
Frequently Asked Questions and Final Checklist
Some questions always crop up after the first few jobs. Usually they come from the gap between the data sheet and real workshop practice. That’s normal. A bearing loctite retainer works best when the fitter knows both the chemistry and the realities of the plant.
Common questions from the bench
| Question | Answer |
|---|---|
| Can I use threadlocker instead of a bearing retainer? | No. Threadlockers are made for threaded fasteners. Bearing retainers are designed for cylindrical fits such as shafts, housings, bushes and sleeves. |
| Which grade should I use if I’ll need to remove the bearing later? | A removable retaining grade such as Loctite 641 is usually the better starting point where planned maintenance matters. |
| Can I rescue a badly worn seat with ordinary retainer? | Not reliably. If the gap is in repair territory, use a proper gap-filling product such as Loctite 660, and only within its specified limits. |
| How do I know I’ve used too much compound? | Excess squeeze-out, migration risk, and mess around seals are the usual clues. You want full coverage in the joint, not flooding outside it. |
| How do I know I’ve used too little? | Dry patches, uneven wetting during assembly, or visible areas that never received coverage. A thin continuous bond line is the target. |
| Will it cure in a cold workshop? | It can, but cure may slow significantly. Cold conditions, passive metals, and contamination all make success less predictable. |
| Can I use retaining compound on plastic housings? | Be cautious. These products are intended for metal cylindrical assemblies. If plastic is involved, check the product compatibility data before doing anything. |
| What if the bearing still feels loose before cure? | Don’t keep disturbing it. Confirm the fit is within the product’s intended range. If it isn’t, strip it and choose the correct repair route. |
Final workshop checklist
Keep the process simple and repeatable. The best shops don’t rely on memory when the bench is busy.
- Select the right grade based on fit condition, service temperature, and future removal needs
- Measure the wear properly before deciding whether you’re retaining or repairing
- Clean both surfaces thoroughly with the correct degreasing products
- Use activator when conditions demand it rather than hoping the cold won’t matter
- Apply the compound where the bond needs to be, not just where it’s easiest to reach
- Assemble promptly and squarely so you don’t wipe the product out of the joint
- Respect fixture and cure times before loading the assembly
- Inspect the finished joint for seating, squeeze-out, and contamination risk
- Follow COSHH controls with SDS, PPE, ventilation, and safe storage
- Plan removal at selection stage if the unit is meant to be serviceable
Good retaining work is quiet work. The machine runs, the bearing stays put, and nobody has to talk about it again for a long time.
Contact Us
If you need help choosing the right retaining compound for a hydraulic bearing application, or you’re trying to match pumps, motors, clutches, bellhousings or a complete power pack assembly, the technical team at MA Hydraulics Ltd can help. They support component selection, cross-referencing, and practical specification advice for mobile and industrial systems across the UK. For straightforward guidance and dependable supply, contact the team directly through the MA Hydraulics contact page.
For expert support with retaining compounds, hydraulic components, and bespoke power solutions, speak to MA Hydraulics Ltd. Phone 01724 279508 today, or send us a message through the contact form.
