When a hydraulic piston starts to fail, it’s not always a dramatic, system-halting event. More often, it’s a slow decline—a gradual loss of power or a bit of hesitation that can be easy to dismiss until it’s too late. The key is catching these early warning signs to avoid major downtime and costly damage. Think of it less as a sudden breakdown and more as a machine telling you it needs attention.
A proper repair, from diagnosis to reassembly, can be a far more sensible and cost-effective solution than a full replacement, breathing new life into your critical equipment.
Recognising the Telltale Signs of Piston Failure
If you’re managing or maintaining heavy machinery, you know that spotting a problem early can save you a world of headaches. A failing hydraulic piston gives off plenty of clues long before it completely gives up. Learning to read these signals means you can schedule a proactive hydraulic piston repair instead of dealing with an emergency shutdown.
The signs often start small and get progressively worse, slowly chipping away at your machine’s efficiency and safety. If you ignore them, a simple seal replacement can quickly escalate into a much bigger job, like re-chroming a damaged rod or even replacing the entire cylinder barrel.
How Performance Starts to Suffer
One of the first things you’ll likely notice is a drop in power or speed. A loader that used to lift a full bucket without any trouble might now feel sluggish or struggle under the same load. This is often caused by what’s known as “internal bypass” or “drift,” where high-pressure fluid seeps past a worn piston seal to the low-pressure side of the cylinder. The power is literally leaking away internally.
Another classic symptom is jerky, erratic movement. Instead of a smooth, controlled action, the cylinder might shudder or stutter as it extends and retracts. This can point to a few culprits, from contaminated fluid and air in the system to seals that are failing to hold consistent pressure.
These little performance hiccups have a real impact on productivity. An agricultural harvester with a weak cylinder on its header lift, for example, won’t operate at peak efficiency. The whole process slows down, and you end up burning more fuel to get the same job done.
What to Look and Listen For
Your own eyes and ears are some of the best diagnostic tools you have. Get in the habit of listening to your machinery during operation. Any unusual whining or knocking sounds from the hydraulic system should be investigated immediately. These noises often signal aeration or cavitation—when air bubbles in the hydraulic fluid collapse violently under pressure—which can eat away at internal components surprisingly quickly.
A quick visual inspection can also tell you a lot. Keep an eye out for:
- External oil leaks: Any fluid weeping from the rod seal at the end of the cylinder is a dead giveaway that your seals have had enough.
- A damaged piston rod: Look closely at the chrome surface of the rod for any scores, pits, or dents. Even a tiny imperfection can act like a razor, shredding a brand-new set of seals in no time.
- Cloudy or milky fluid: This is a classic sign of water contamination. Water ruins the lubricating properties of the oil and encourages rust and corrosion from the inside out.
Putting these things off is a risky game. A minor seal leak today can become a catastrophic failure tomorrow, potentially causing a high-pressure burst of fluid that poses a serious safety hazard and causes widespread equipment damage.
In complex industrial or mobile hydraulic systems, finding the root cause isn’t always straightforward. That’s where expert help comes in. Specialists like MA Hydraulics can provide a thorough diagnosis, making sure you fix the underlying problem, not just the symptom you can see.
Don’t let a failing piston bring your operations to a standstill. Give us a call on 01724 279508 today, or send us a message.
Getting to the Root of Piston Problems
Before you even think about picking up a spanner, you need to play detective. Rushing to dismantle a hydraulic cylinder without a clear idea of what’s wrong is a classic rookie mistake, and it’s one that costs time and money. A proper, methodical inspection lets your team get straight to the heart of the issue, making sure the repair you do is the right one.
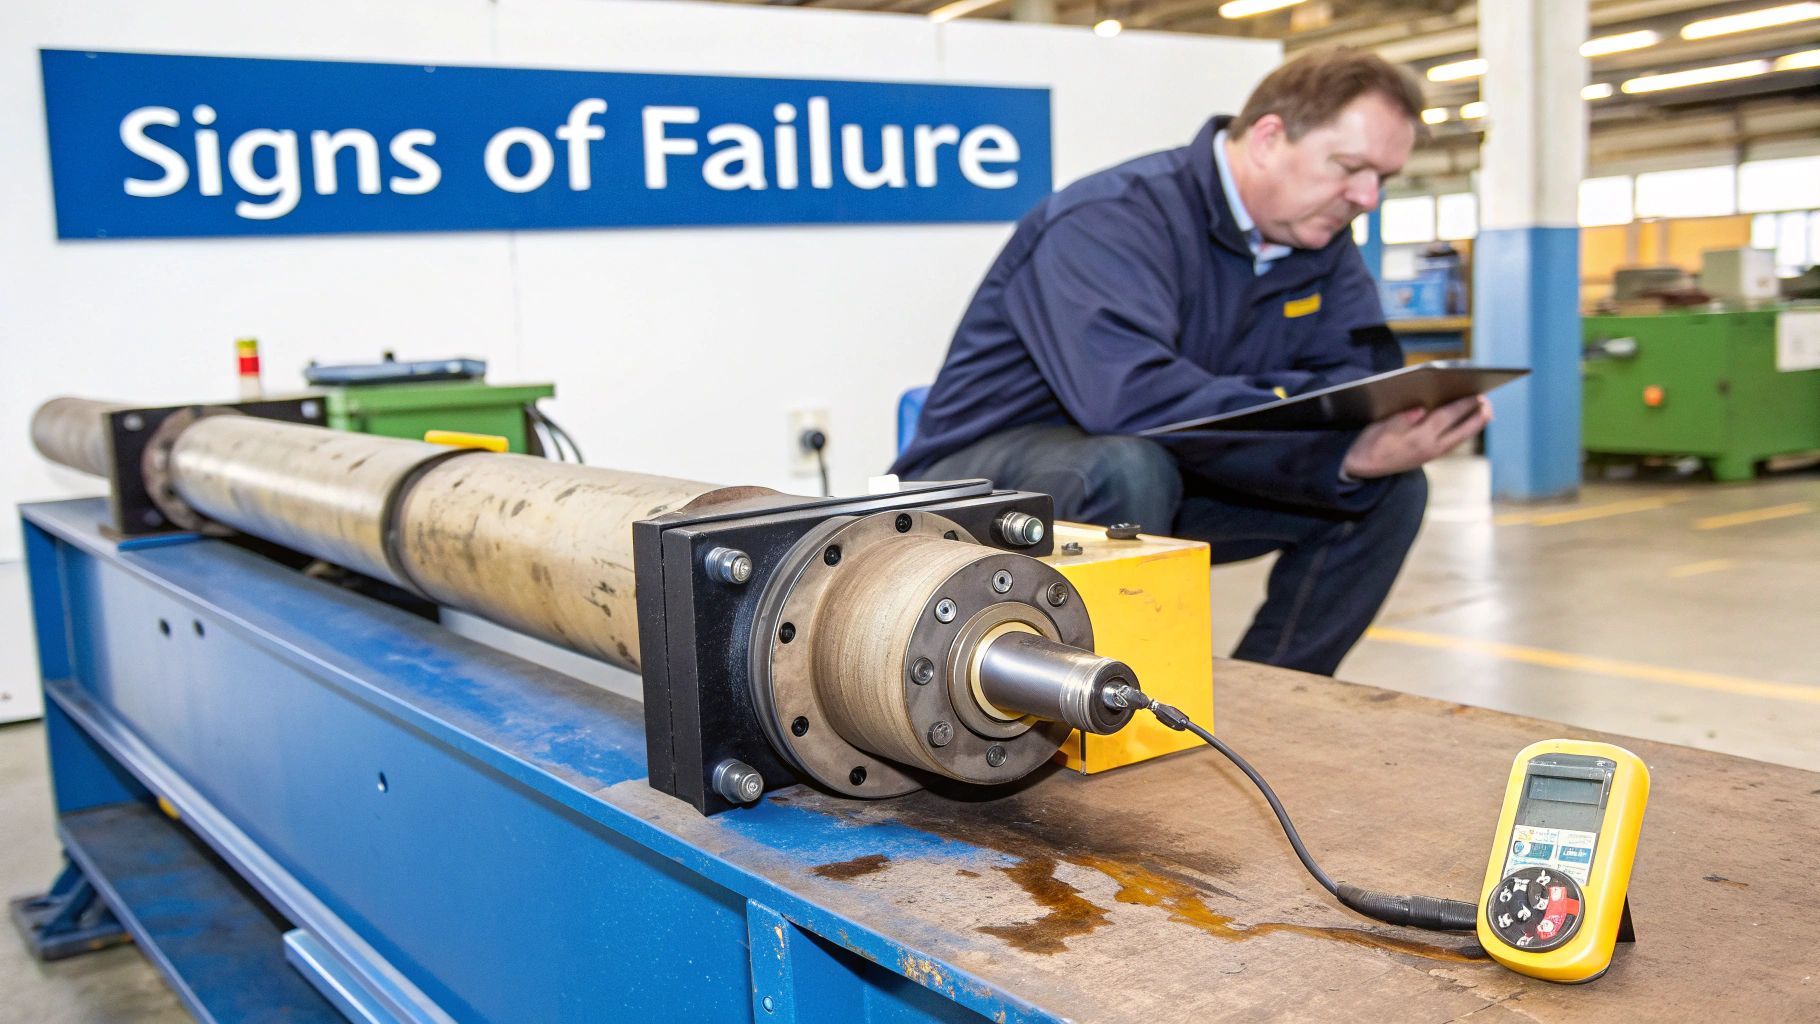
Believe it or not, the diagnostic process starts with the basics: your own eyes. A good walk-around and visual check will often give the game away, highlighting the most obvious culprits behind a cylinder’s poor performance.
Start with What You Can See and Hear
With the machine shut down and safely isolated, start by giving the cylinder a thorough once-over. Check the gland nut where the piston rod emerges from the barrel. Is there any oil weeping out? That’s a textbook sign of a failed rod seal.
Next, run a gloved hand carefully along the entire length of the piston rod. You’re feeling for any scores, deep scratches, or rust spots. Any imperfection on that chrome surface will chew through a new set of seals in no time. Also, look at the cylinder barrel itself for dents or, worse, a slight bulge or “ballooning”—a dead giveaway it’s been hit with pressure far beyond its limits. Don’t forget to check for bent rods or damaged mounts; these point to bigger problems like misalignment or external impact.
If it’s safe, fire up the machine and watch the cylinder in action. Does it drift when it’s holding a load? Picture an excavator arm: if you raise it and hold the controls steady, does it slowly creep down? This is a tell-tale sign of an internal leak where high-pressure oil is bypassing the main piston seal.
A simple “drift test” is one of the most powerful diagnostic tools you have, and it doesn’t require any special equipment. By isolating a cylinder under load and watching for any creep, you can quickly confirm an internal piston seal leak—a problem that’s completely invisible from the outside.
Digging a Little Deeper
When the obvious visual checks don’t tell the whole story, it’s time to bring in the gauges. Hooking a pressure gauge into the hydraulic circuit can tell you a huge amount about what’s going on inside. If the pressure readings are all over the place or the system just can’t build up to its normal operating pressure, you’ve likely confirmed an internal leak.
Think about a hydraulic press on a factory floor that can’t maintain consistent tonnage. An engineer could place a gauge on the line feeding the cylinder and watch the pressure drop away when it should be holding rock-solid. That confirms the fault is inside the cylinder, not somewhere else in the system.
From experience, we see the same patterns time and again:
- Scored Piston Rod: This is almost always caused by dirt getting past a worn-out wiper seal or abrasive grit circulating in the hydraulic oil.
- Brittle or ‘Cooked’ Seals: Usually a sign of excessive heat, using the wrong type of hydraulic fluid, or simply old age.
- Ballooned Cylinder Tube: This only happens from serious over-pressurisation. The first thing you should check is the system’s main relief valve.
Understanding these cause-and-effect relationships is crucial. The UK’s fluid power sector, with its 194 businesses and £1.3 billion in revenue, is built on reliable machinery. When you consider that the market for hydraulic pumps alone is worth £239.9 million, you realise how much is at stake. It’s a widely accepted fact in the industry that fluid contamination is the direct cause of up to 70% of all hydraulic system failures. You can see more data on the UK’s fluid power manufacturing sector on the IBISWorld website.
By taking a structured approach—starting with your eyes and moving on to pressure tests— you can confidently pinpoint the problem. This ensures that when you start the hydraulic piston repair, you’re fixing the real cause, not just patching up a symptom.
For expert help give us a call on 01724 279508 or send a message through our contact page.
The Complete Piston Disassembly and Rebuild Process
Getting a hydraulic cylinder apart and back together properly is all about a methodical approach. It’s a job where being clean and safe is every bit as important as having the right spanner in your hand. This is a real-world guide to a professional-level hydraulic piston repair, walking you through everything from setting up your workshop to the final, precise reassembly.
Before you even think about touching a spanner, safety has to be your top priority. The entire hydraulic system must be fully depressurised. Just shutting off the power isn’t good enough—pressure can easily be trapped inside the cylinder, waiting to cause serious injury. Always cycle the controls with the power off and check the machine’s service manual for the correct lockout and depressurisation steps.
A good repair always follows a logical path. You start with a visual check for obvious external problems, move on to a pressure test to confirm any internal leaks, and only then do you commit to a full strip-down for a detailed internal inspection.
This sequence saves you a world of trouble, ensuring you’ve correctly diagnosed the fault before you have a cylinder in a hundred pieces on your bench.
Workshop Setup and Essential Tooling
Your workspace has to be spotlessly clean. Seriously. A single speck of grit introduced during the rebuild can shred new seals and score finely machined surfaces, causing the cylinder to fail all over again. I always lay down clean rags or a dedicated mat before I even think about taking a part off.
Having the right tools is non-negotiable. Trying to make do with the wrong kit is a sure fire way to damage expensive parts or, worse, hurt yourself.
Before you start, make sure your toolkit is up to the task. Here’s a rundown of the absolute essentials you’ll need to have within arm’s reach.
Essential Tools for Hydraulic Piston Repair
| Tool Category | Specific Tools | Purpose |
|---|---|---|
| Specialist Wrenches | Gland Nut Spanner (‘C’ spanner) | Safely removes and tightens the cylinder end gland without damaging the component. |
| Precision Tightening | Calibrated Torque Wrench | Essential for reassembly to meet manufacturer’s torque specifications, preventing leaks or distortion. |
| Seal Handling | Non-metallic Seal Picks, Seal Installation Tools | Prevents scratching, cutting, or damaging delicate new seals during removal and fitting. |
| Work Holding | Bench Vice with Soft Jaws (aluminium/brass) | Securely holds the cylinder barrel and rod without marring or crushing critical surfaces. |
| Measurement & Inspection | Vernier Calipers, Micrometres, Bore Gauge | Measures component wear and rod straightness to check against manufacturer tolerances. |
Having these tools prepared and organised isn’t just about professionalism; it’s about ensuring the repair is done right the first time and that the cylinder will perform reliably once it’s back in service.
Pro Tip: Always use the correct tool for the job. A gland nut that’s been beaten with a hammer and chisel is the classic sign of an amateur bodge-job. It not only looks terrible but can make the next service almost impossible.
A Practical Guide to Disassembly
With the cylinder safely off the machine and on your bench, it’s time to begin the strip-down. The first thing you’ll do is drain any leftover hydraulic fluid into a clean container.
Get the cylinder barrel secured firmly in your vice. Now, using the gland nut spanner, loosen and unscrew the end gland. These can be incredibly tight, so be ready to apply some controlled force. Once the gland is free, the whole piston and rod assembly should slide cleanly out of the barrel.
The moment the assembly is out, grab a light and inspect the inside of the cylinder bore. You’re looking for any scoring, pitting, or damage. Run your fingernail along the surface—if it catches on a scratch, you’ve got a serious problem that may require machining.
Next, clamp the rod end in the vice (using those soft jaws, of course) so you can get to the piston. You’ll find a locking nut or bolt holding the piston onto the rod’s threaded end. Once you remove that, the piston itself will slide off. This gives you full access to all the seals on the piston and in the gland. I find it helps to lay every single component out on the bench in the exact order you removed it; it makes reassembly a breeze.
Rebuilding With Precision and Care
The rebuild is essentially the disassembly in reverse, but with an obsessive focus on cleanliness and proper technique. Start by cleaning every single component with a good quality solvent, then blow it dry with compressed air to remove any residue.
When you’re fitting new seals, lubrication is absolutely your best friend. Use fresh, clean hydraulic fluid or a dedicated seal assembly lubricant. This helps them glide into their grooves without getting nicked, twisted, or damaged. Never, ever install a seal dry.
For the rod seals and wipers inside the gland, a proper seal installation tool will let you gently work them into place without any force. When it comes to the piston seals, be careful not to overstretch them as you fit them. To get a better look at all the individual parts, check out our detailed guide on the hydraulic cylinder piston.
With the new seals in place, rebuild the piston onto the rod. Apply the correct thread-locking compound to the retaining nut, then use your torque wrench to tighten it to the exact value specified by the manufacturer. This number is critical—don’t guess it.
Finally, give the piston seals a good coat of lubricant and carefully guide the whole assembly back into the cylinder barrel. Go slow and be extremely gentle to avoid catching and ruining your brand-new seals as they enter the bore. Re-install the gland, torque it to spec, and the job is done. Now, it’s ready for testing.
For expert advice or to source high-quality replacement seals and components, phone 01724 279508 today, or send us a message.
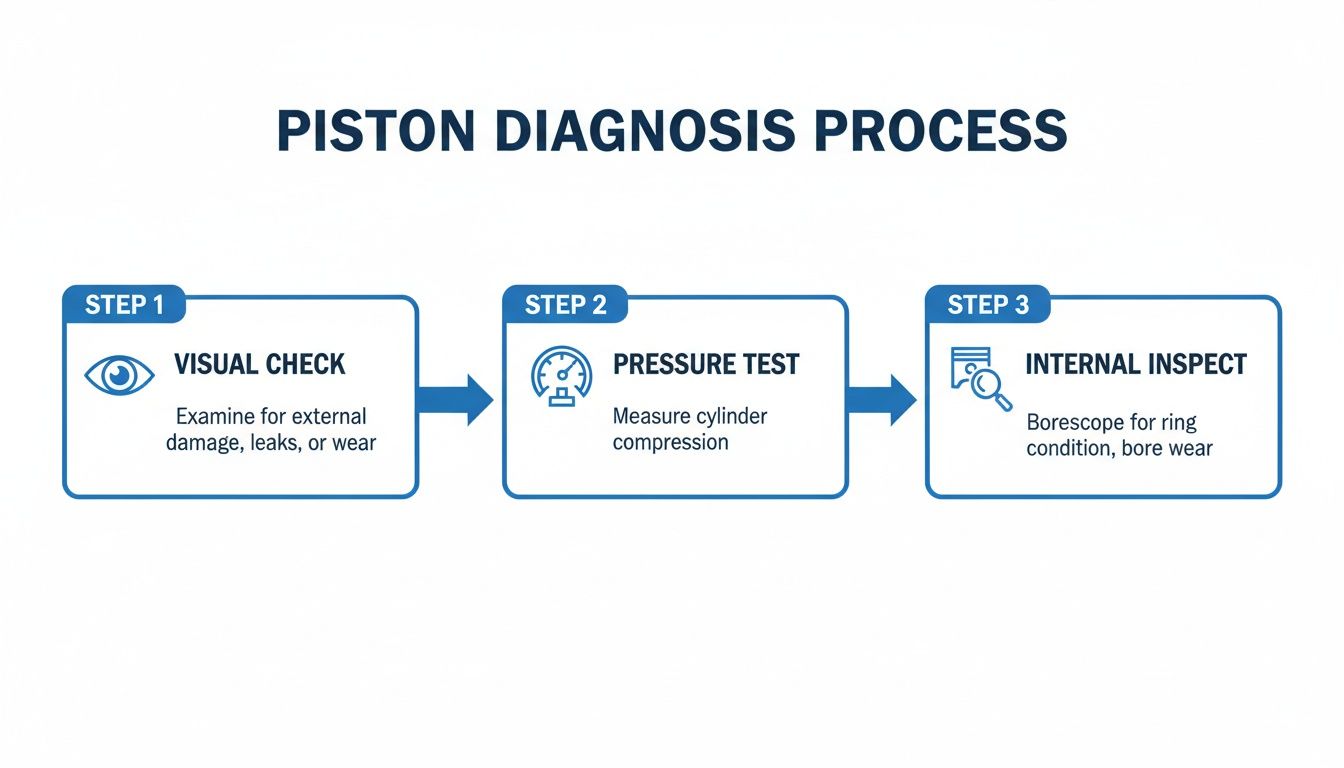
Inspecting Components and Making the Repair or Replace Decision
Once the cylinder is disassembled and every part is laid out on the bench, the real work begins. This is where a methodical, hands-on inspection separates a lasting repair from one that’s going to fail again in a few months. Every component tells a story, and figuring out why it failed is the key to deciding whether to repair or replace.
This decision isn’t just about the initial cost; it’s about reliability. A botched repair on a critical part will lead to another failure, more downtime, and a much bigger bill down the line. Let’s break down what to look for, piece by piece.
Assessing the Piston Rod
The piston rod is often where you’ll find the most obvious signs of trouble. That mirror-smooth, hard chrome surface is absolutely vital for a good seal. Start by giving the rod a thorough clean and get it under a bright light.
Here’s what you’re looking for:
- Scoring: Long scratches running down the rod are a dead giveaway that dirt got past a worn wiper seal. You might be able to polish out very light scoring, but anything deep means it’s time for grinding and re-chroming.
- Pitting: Tiny craters or rust spots on the chrome are a classic sign of water contamination in the hydraulic fluid. A pitted surface will shred new rod seals in no time.
- Chrome Flaking: If the chrome plating is peeling away, there’s no saving it. The rod needs to be replaced.
Next, get the micrometer out and measure the rod’s diameter along its length to check for consistency. Use a straight edge or a dial indicator to check for any bends. Even a bend of a few millimetres can put immense side-loading on the gland seals and cause them to leak prematurely.
A good rule of thumb I always use: if your fingernail catches in a scratch, it’s deep enough to ruin a new seal. At that point, you’re looking at a professional re-chroming service, which is often a great choice for expensive or hard-to-find rods.
Examining the Cylinder Bore
Now, let’s look inside the cylinder barrel. The bore’s surface needs to be perfect for the piston seal to function correctly. Grab a torch and light up the entire inner surface, checking for the same issues as the rod—scoring, pitting, and any signs of corrosion.
Deep scratches that run the length of the bore are bad news. They create a path for high-pressure fluid to bypass the piston, making the cylinder weak or completely useless. For very minor damage, a light honing might save it. But for anything serious, the cylinder needs to be machined and honed oversized, which also means you’ll need a new oversized piston and seal kit. Frankly, for most standard cylinders, it’s often cheaper and faster to just replace the whole barrel. You can get more detail on this process in our guide to hydraulic cylinder repair.
The Critical Role of Seals
Seals are the cheapest components in the cylinder, but they are arguably the most important. You will always replace them during a rebuild, but don’t just throw the old ones away. Inspecting them gives you vital clues about the failure.
Are the old seals hard, brittle, or cracked? That points to either overheating or the wrong type of hydraulic fluid being used. If a seal looks like it’s been chewed up, it’s a sign of sharp metal edges inside the cylinder or a previous bad installation. Remember, the piston seal stops internal leaks, the rod seal prevents external ones, and the wiper seal keeps contamination out. Seeing which one failed tells you where the root of the problem lies.
Here in the UK, with new infrastructure work hitting £5,628 million in 2023, keeping heavy plant machinery operational is non-negotiable. This drives a huge demand for quality piston repairs in sectors where every hour of uptime counts. The growing focus on predictive maintenance, which can slash downtime by 20-30%, really underlines why making these informed repair decisions is so important.
By carefully checking each part against its proper tolerances, you can build a complete picture of what’s needed for a hydraulic piston repair. This ensures you’re providing a proper, long-term solution, not just a quick patch-up.
For expert advice on component assessment or to source the right parts for your repair, phone 01724 279508 today, or send us a message at https://www.mahydraulics.co.uk/contact-us/.
Post-Repair Testing: Proving the Repair
A successful hydraulic piston repair isn’t finished just because you’ve tightened the last bolt. The real proof of a good job comes when you put it under pressure. This final verification stage is absolutely critical; it’s what separates a reliable, long-lasting repair from a job that will come back to haunt you. Skipping these final checks is like building an engine and never starting it – you simply have no idea if it actually works.
The only way to do this properly is methodically. Start with low-pressure checks and then, and only then, ramp things up to the full operational load. This approach lets you spot potential issues safely, stopping a minor seal seating problem from turning into a major, high-pressure fluid leak. It’s all about making sure every new seal is perfectly seated and the whole assembly is ready for the tough demands of the real world.
Initial Low-Pressure Leak Checks
Before you even think about full power, the first job is a gentle, low-pressure test. Once the cylinder is re-installed, connect the hydraulic lines but run the system at a much lower pressure than usual. You only need just enough flow to cycle the cylinder slowly and deliberately.
As the piston rod extends and retracts, get your eyes on every single connection point. Look for any sign of a leak. Pay extra close attention to the gland where the rod exits the barrel and the main hydraulic port fittings. This simple check will instantly show you if a seal was pinched or installed incorrectly during reassembly, giving you a chance to fix it before it becomes a dangerous, high-pressure problem.
Think of this as a pre-flight check for your hydraulics. It’s far better to spot a slow weep at 35 bar (around 500 PSI) than to discover a high-pressure spray at 210 bar (around 3000 PSI). Safety has to be your number one priority here.
Full Pressure and Load Testing
Confident there are no low-pressure leaks? Good. Now it’s time to put the repair to the ultimate test.
Gradually bring the system up to its normal operating pressure. With the cylinder under a typical working load—like lifting a digger bucket or clamping a part in an industrial press—cycle it through its full range of motion, not just once, but multiple times.
While it’s working, you need to be using your eyes and ears.
- Listen for unusual noises: Any hissing is a dead giveaway for a leak, while knocking or banging could mean there’s still air trapped in the system.
- Watch for smooth operation: The cylinder should move without any of the jerky or stuttering movements that likely prompted the repair in the first place.
- Check for external leaks again: Re-inspect the gland and ports under full pressure. You’re looking for bone-dry connections.
The final, crucial check is to repeat the drift test you performed during the initial diagnosis. Hold the cylinder under load in a fixed position and watch for any creep. If those new piston seals are doing their job, it should hold rock-solid. Any movement at all tells you there’s still an internal bypass issue that needs sorting.
With the UK hydraulic pumps market hitting around £190 million and projected to reach £208 million by 2030, the reliability of this machinery is more important than ever. For service engineers, ensuring a repair is properly tested is non-negotiable, as piston failures cause massive downtime. In the agricultural sector, which we frequently serve, we’ve seen effective piston maintenance improve equipment uptime by as much as 25%.
Bleeding the System for Flawless Operation
The very last step after re-installation is to purge, or “bleed,” all the air from the cylinder and the lines connected to it. Air trapped in a hydraulic system is the enemy; it’s highly compressible, leading to spongy, erratic cylinder movement and even potential damage from cavitation.
To bleed the system, cycle the cylinder back and forth several times. If it has bleed ports, open them until only pure, bubble-free oil comes out. If not, you can slightly crack the main hose fittings at the cylinder to achieve the same result. Getting the system completely free of air is vital for the performance and longevity of your repair and the health of the entire hydraulic system. It also ensures the hydraulic power unit can deliver the smooth, consistent force it was designed for.
For expert help give us a call on 01724 279508 today, or send us a message.
Frequently Asked Questions About Hydraulic Repairs
Even with a detailed guide, a few practical questions always pop up when you’re staring down a hydraulic piston repair. Getting straight answers is key for maintenance teams and plant managers trying to make the right call, both financially and operationally.
Let’s dive into some of the most common queries we get from the field, with practical advice drawn from years of hands-on experience.
What’s the Average Repair Cost Versus a New Cylinder in the UK?
This is the big one, and the honest answer is: it depends entirely on the damage. A simple reseal is a no-brainer—it’s always going to be cheaper than buying new. On the flip side, a cylinder that’s suffered a catastrophic failure is often destined for the scrap pile.
A standard reseal, where you’re just swapping out old seals on a fundamentally sound cylinder, will likely set you back £150 to £400. The final figure depends on the cylinder’s size and how complex the seals are. If the piston rod needs grinding and re-chroming, you can expect to add another £200 to £600 on top of that.
Compare that to a brand-new, medium-sized cylinder for something like a digger or telehandler, which could easily cost between £800 and £2,000. For larger, more specialised units, that price can climb significantly higher.
As a rule of thumb, if the repair quote comes in at less than 60% of the replacement cost, fixing it is almost always the smart financial move.
The real trick is to weigh the immediate cost against the promise of long-term reliability. A professional repair on a high-quality cylinder is a sound investment. Pouring money into a cheap, badly damaged unit, however, is just a false economy. Always get a detailed quote before you commit one way or the other.
Below is a quick table to help put these costs into perspective.
Repair vs Replace Cost Comparison (GBP)
| Repair Type | Estimated Repair Cost (£) | Estimated New Cylinder Cost (£) | Key Considerations |
|---|---|---|---|
| Standard Reseal | £150 – £400 | £800 – £2,000+ | Almost always cost-effective. Quick turnaround. |
| Rod Re-chrome | £350 – £1,000 (inc. reseal) | £800 – £2,000+ | Excellent value for salvaging a quality component. |
| Honing Barrel | £400 – £1,200 (inc. reseal) | £800 – £2,000+ | Depends on the depth of scoring; cost can rise quickly. |
| Catastrophic Failure | Not Recommended | £800 – £2,000+ | Repair is rarely viable; safety and reliability are compromised. |
This table shows that for most common faults, a professional repair offers substantial savings and extends the life of your original equipment.
Can a Scored Piston Rod Be Repaired?
Absolutely. In most cases, a scored piston rod can be professionally repaired, and it’s a brilliant, cost-effective solution. The process is quite involved: we precision-grind the rod’s surface to meticulously remove every scratch and imperfection, then re-plate it with a fresh layer of industrial hard chrome.
The real decision comes down to the depth of the scoring. You might be able to polish out very light surface marks, but if you can catch a scratch with your fingernail, it needs the full grind and re-chrome treatment. It's a specialist job, but it restores the rod to its original factory dimensions and smooth finish, giving your new seals the best possible chance of a long life.
However, there are limits. If the rod is bent, severely pitted from corrosion, or the chrome is flaking off in large chunks, replacement is the only safe and reliable option. Trying to patch up that level of damage just isn't practical and won't give you a lasting result.
How Can I Prevent Premature Piston Seal Failure?
Stopping seals from failing early is all about proactive maintenance and good operating habits. Seals rarely just give up on their own; they're usually the first casualty of a bigger problem in the hydraulic system.
If you want to make a real difference, focus on these three areas:
- Fluid Cleanliness: Dirty oil is the number one killer of hydraulic seals. Tiny particles of grit and metal act like liquid sandpaper, constantly grinding away at seals and other precision surfaces. Don't skip your filter changes—stick to a strict schedule.
- Temperature Control: Overheating is a massive problem. Excessive heat breaks down the seal material, making it hard and brittle until it eventually cracks and fails. Make sure the system’s coolers are clean and working as they should, and always use hydraulic fluid with the correct viscosity for your operating temperatures.
- Correct Operation: Avoid shock loads and running the system at pressures beyond its design limits. When operators use machinery smoothly, it dramatically extends the life of every single component, especially the seals.
By focusing on keeping your hydraulic fluid clean, cool, and free of debris, you'll see a huge reduction in unplanned downtime and get far more service life out of your cylinders.
For expert advice on your specific repair needs or to talk through a cost-benefit analysis for your equipment, MA Hydraulics Ltd is here to help.
Phone 01724 279508 today, or send us a message.
