Good hydraulic cylinder repair doesn’t start when you pick up a spanner. It starts much earlier, with spotting the tell-tale signs that a failure is on the horizon. These early warnings are your system’s way of shouting for help, and catching them early can be the difference between a quick fix and a catastrophic breakdown.
It’s about looking beyond the obvious, like a massive puddle of oil, and tuning into the performance and sounds of your machinery.
Spotting the Early Warning Signs of Cylinder Failure
Hydraulic cylinders are the muscles behind everything from construction site excavators to farm balers. When they start to go wrong, the signs can be subtle if you don’t know what you’re looking for. But ignoring them is a recipe for disaster. A weeping seal that might cost £50 to replace can quickly score a piston rod, turning a simple job into a major machining operation costing hundreds, if not thousands.
Learning to read the signs is one of the most valuable skills for any operator or maintenance engineer. It’s about connecting a slight change in how the machine behaves to a potential internal fault. This mindset shifts you from just reacting to breakdowns to proactively keeping your equipment healthy.
Performance Problems You Can’t Ignore
Often, the most reliable clues are found in how the machine actually performs. A healthy cylinder should deliver smooth, consistent power every single time. As soon as that changes, it’s time to investigate.
Keep an eye out for these classic performance issues:
- Cylinder Drift: This is where a cylinder just can’t hold its position. Think of a digger arm slowly sinking under its own weight or a tipper trailer that won’t stay up. It’s a dead giveaway for an internal leak, where fluid is bypassing the main piston seal. The seal is no longer providing a perfect barrier, letting pressurised fluid bleed to the other side of the piston and causing that loss of holding power.
- Slow or Weak Operation: Has a hydraulic function become sluggish? Does it struggle to lift a load it used to handle easily? This points directly to a loss of efficiency. The pump is having to work overtime because fluid is slipping past worn seals instead of putting all its force into moving the piston.
- Jerky and Erratic Movement: Smooth, controlled action is the gold standard for hydraulics. If a cylinder starts to judder or move erratically, it often means there’s air in the system (aeration) or you’re getting ‘stick-slip’ friction from a failing seal or contaminated oil. The seal might be grabbing and letting go of the cylinder wall instead of gliding smoothly as it should.
What to Look and Listen For
Sometimes, the first hint of trouble is a sound, not a sight. New or unusual noises coming from your hydraulic system should ring alarm bells immediately.
A sudden change in the sound of your hydraulic system is one of the clearest indicators that something has gone wrong. A high-pitched whine can suggest aeration or cavitation, where air bubbles are forming and collapsing under pressure, while a harsh knocking sound might point to worn pins, loose components, or even mechanical impact inside the cylinder.
Of course, visual checks are just as crucial. While a complete failure leaves an unmissable oil spill, the initial signs are often much quieter. Look closely at the piston rod as it extends. Can you see a fine film of oil? We call this “wet rodding,” and it means the rod seal is starting to wear out and can’t wipe the rod clean on its way back in. Likewise, check around all the fittings and ports for small seeps that will only get worse.
By combining these three skills—monitoring performance, listening for odd sounds, and doing regular visual checks—you’ll get a real feel for the health of your hydraulic cylinders. This proactive approach is the cornerstone of effective hydraulic cylinder repair and maintenance, saving you a fortune in time, money, and unexpected downtime.
If you’ve spotted any of these signs, don’t wait for things to get worse. Give us a call on 01724 279508 to speak with one of our specialists, or send us a message to discuss your repair needs.
Getting Ready for a Safe and Methodical Strip-Down
When you’ve pinpointed a fault, the first instinct is often to dive in with the spanners. But with hydraulics, that’s a recipe for disaster. A proper hydraulic cylinder repair isn’t just about fixing the problem; it’s about doing it safely and methodically. You have to respect the immense stored energy you’re dealing with.
Before a single tool touches a fitting, the absolute first step is to completely depressurise the system. This means more than just switching off the engine. You need to work the controls back and forth to bleed off any trapped pressure in the lines feeding the cylinder. If you miss this step, you risk a high-pressure jet of oil that can—and will—pierce skin, causing horrific injuries.
Once you’re certain the pressure is gone, isolate the machine. A proper lock-out, tag-out (LOTO) procedure is non-negotiable. It ensures no one can accidentally fire up the equipment while you’re in the middle of a job. It’s standard practice in any professional workshop for a very good reason.
Setting Up a Clean and Safe Workspace
With the machine safely locked out, your attention turns to the immediate work area. Hydraulic oil gets everywhere and is a major slip hazard. Get some drip trays or absorbent mats under the cylinder and its connections to catch any fluid that will inevitably escape when you crack the hoses open.
Always have the right personal protective equipment (PPE) on:
- Impact-resistant safety glasses are a must to shield your eyes from any unexpected spray.
- Oil-resistant gloves protect your skin from irritation and, more importantly, fluid injection.
- Steel-toed boots will save your feet from heavy, dropped components.
A clean, organised workspace is a safe one. It also stops dirt from getting into the open ports of your hydraulic system, which would just cause more damage later. As soon as you disconnect hoses, cap them and the cylinder ports immediately. For future maintenance, knowing about the different types of quick release hydraulic couplers can make these jobs much faster and cleaner.
Always remember: contamination is the number one enemy of any hydraulic system. One tiny grain of grit introduced during the strip-down can score seals and surfaces, completely undoing all your hard work.
Using the Right Tools for the Job
Now, you can get to the mechanical side of things. Trying to bodge this with the wrong tools is the fastest way to wreck expensive parts. The gland nut, in particular, is often incredibly tight and demands a specialist gland nut wrench. These are designed to get a solid grip without slipping and rounding off the flats.
The symptoms that lead you to this point often follow a predictable pattern, starting with minor issues and escalating.

As the diagram shows, a simple internal seal bypass might first appear as cylinder drift. Left unchecked, this can lead to strange noises and eventually a noticeable drop in performance, forcing a full repair.
If you find parts are seized solid, don’t just reach for a bigger hammer. A bit of controlled heat from a propane torch can sometimes expand the gland just enough to break the bond of corrosion, but you have to be incredibly careful. Once the gland nut is free, you can gently pull the entire rod and piston assembly out of the barrel. Be ready for the weight—it can be heavy and awkward. Get a second pair of hands to help if you need it, as dropping it could easily damage the finely polished rod surface.
Throughout this whole process, your phone’s camera is your best friend. Take pictures at every stage and lay the parts out on a clean bench in the exact order you removed them. Pay close attention to how seals and wear bands are facing—putting one in backwards is a classic mistake that guarantees it will fail immediately. This simple, methodical approach is what separates a successful repair from a frustrating failure.
A Technician’s Checklist for Component Inspection
With the cylinder safely on the workbench and its components laid out, the real detective work begins. This inspection is arguably the most critical stage of any hydraulic cylinder repair. If you rush this part, you’re just setting yourself up for another failure down the line. A proper repair isn’t just about fixing the obvious problem; it’s about finding out why it failed in the first place.
You need to be methodical. Go through each component one by one, looking for the tell-tale signs of wear, stress, and damage. It’s a process of sorting parts into three piles: good, repairable, or scrap.
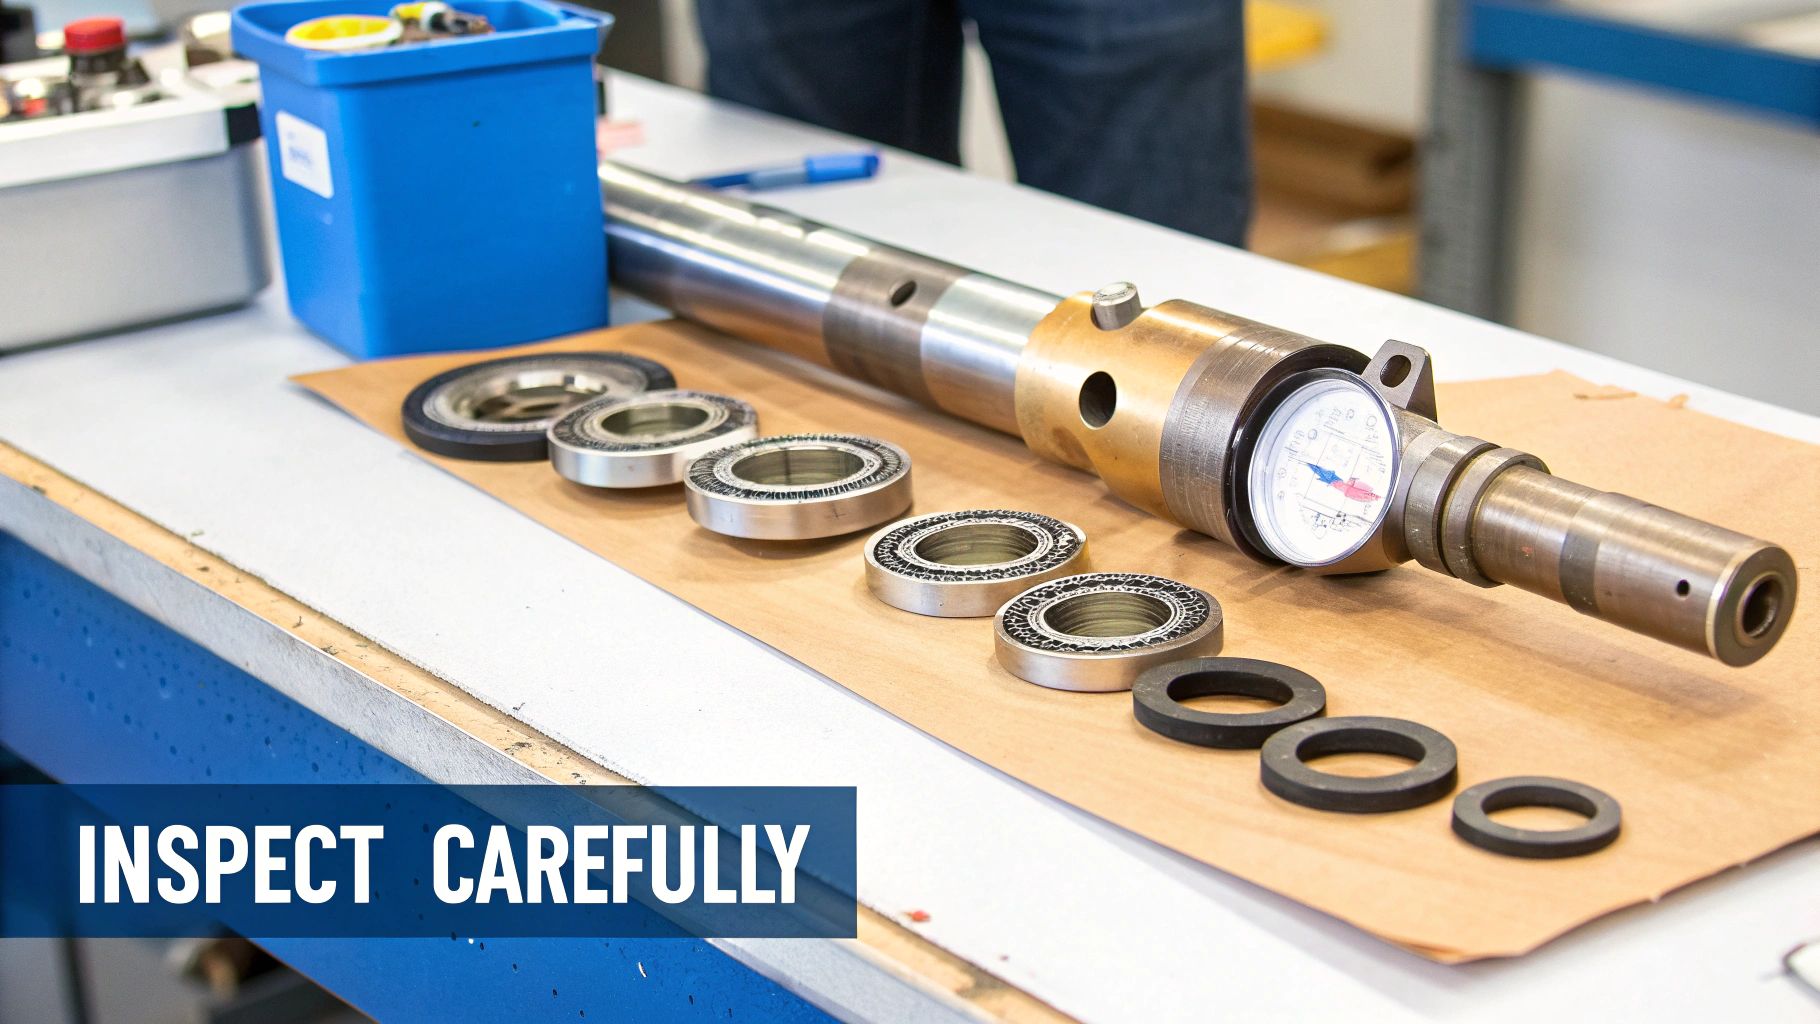
Assessing the Piston Rod Condition
The piston rod is your first port of call. It’s the only major part that travels outside the cylinder barrel, so it takes a beating from the environment. Give it a thorough clean and get it under a bright light.
Here’s what you’re hunting for:
- Scoring: These are scratches running the length of the rod. Run your fingernail over them – if you can feel a groove, no matter how fine, it will chew through new seals in a heartbeat.
- Pitting and Corrosion: Look for tiny pits or rust spots on the chrome surface. These act like sandpaper against the wiper and rod seals, causing them to wear out incredibly fast.
- Bending or Dents: Is it straight? Roll the rod on a perfectly flat surface to check. Even a slight bend creates uneven pressure on the gland bearing and seals, leading to a quick and messy failure.
Once the visual check is done, grab a calibrated micrometer. Measure the rod’s diameter at several points along its length and at different angles. You need to compare these numbers to the manufacturer’s specs. Any significant deviation, often just a few hundredths of a millimetre, points to excessive wear. The rod will need re-chroming or replacing.
Scrutinising the Cylinder Bore
Next, move on to the cylinder barrel’s inner surface, the bore. This is where the piston seal has to maintain a perfect seal against immense pressure. Like the rod, it needs to be spotlessly clean before you can properly assess it.
Your fingertips are one of your best tools here. Run your hand along the entire length of the bore. You can often feel subtle ripples, scores, or rough patches that the eye might miss. Any longitudinal scoring is just as bad here as it is on the rod.
A serious and often terminal problem we see is “ballooning.” This happens when the cylinder has been over-pressurised, causing the middle of the tube to expand slightly. This bulge creates a gap where the piston seal loses contact, allowing fluid to bypass. A ballooned cylinder has lost its structural integrity and almost always needs a new barrel.
Evaluating the Piston and Gland
Finally, inspect the piston and the gland. These components house the seals and guide bearings, and the grooves they contain are machined to incredibly tight tolerances.
On the piston, check the seal grooves for burrs, corrosion, or any distortion. A damaged groove means a new seal won’t sit right, and it will fail. For a closer look at what this part does, have a read of our guide on the hydraulic cylinder piston. Do the same for the gland, paying close attention to the rod seal grooves and any internal bearing surfaces.
Wear in these areas often points to a bigger problem, like side-loading or dirty hydraulic fluid. If you find a worn gland bearing but only replace the seals, you’re wasting your time. The new seals will fail quickly because the rod will be allowed to move off-centre. This is why a detailed checklist is so important—it builds a complete picture so your repair is thorough and built to last.
If this level of inspection seems daunting, or if you don’t have the right measuring tools for the job, it’s a good sign that it’s time to call in a specialist. For expert advice or to book a repair, give us a call on 01724 279508 or send a message through our contact page.
From Diagnosis to Action: Honing Rods and Replacing Seals
Once you’ve pinpointed the problem, it’s time to get your hands dirty. This is where the real craft comes in – turning a diagnosis into a durable solution. It involves a bit of machining to bring damaged parts back to life and, most importantly, replacing the seals that are the heart and soul of any hydraulic ram.
One of the first big decisions you’ll face is whether to repair or replace a major component like the piston rod or cylinder barrel. It’s a classic cost-benefit calculation. For example, a lightly scored piston rod might be successfully ground and re-chromed for a few hundred pounds. On the other hand, a brand-new rod for a large excavator could easily set you back thousands. Getting this call right comes down to experience and a realistic look at the extent of the damage.
Breathing New Life into Metal Parts
When your inspection uncovers damage on the cylinder barrel or piston rod, you don’t always have to jump straight to ordering a new one. Minor scoring or light wear can often be expertly fixed, which can save you a significant amount of money and downtime.
Honing the Cylinder Bore
If you find light scratches or scoring inside the cylinder barrel, honing is the go-to fix. This process uses abrasive stones to smooth out the internal surface, removing just a tiny amount of material.
The goal is to create a perfectly round, straight bore with a distinct cross-hatch pattern on its surface. That pattern is crucial – it holds a thin film of hydraulic oil to lubricate the piston seals, ensuring they last. Honing can rescue a barrel that might otherwise be destined for the scrap pile, but it’s only a solution for shallow imperfections.
Re-Chroming a Damaged Piston Rod
A piston rod suffering from scoring, pitting, or worn chrome can often be saved with re-chroming. It’s a specialist process, but it’s a very common and effective repair. It generally involves:
- Stripping off the old, damaged chrome layer.
- Grinding the base metal down just below the deepest point of the damage.
- Welding to build up any heavily gouged areas if needed.
- Grinding the rod again to a precise, uniform diameter.
- Applying a fresh layer of hard industrial chrome plating.
- Finally, polishing the new chrome surface until it’s perfectly smooth.
While this isn’t a DIY job, it’s often far more cost-effective than buying a new rod, especially for large or custom-made cylinders.
Choosing the Right Replacement Seals
This is the most common part of any cylinder repair, and getting it right is everything. Fitting the wrong type or size of seal is a surefire way to have the cylinder fail again in short order. The material you choose has to be right for the machine’s specific operating conditions.
Don’t be fooled by the price alone. A basic seal kit for a small agricultural ram might only cost £25 – £40, but a high-performance kit for an industrial press running at high pressure could be £200 or more. That price difference comes from the material’s ability to handle extreme pressure, temperature, and different types of fluid.
Here are the most common materials you’ll come across:
- Nitrile (NBR): A fantastic general-purpose material for standard hydraulic oils and moderate temperatures. It’s affordable but doesn’t do well with high heat or some synthetic fluids.
- Polyurethane (PU): Known for being incredibly tough and resistant to abrasion. This makes it a top choice for high-pressure rod seals and wiper seals that take a real beating.
- Viton (FKM): This is what you need for high-temperature jobs or when you’re dealing with aggressive chemical fluids. It costs more, but it’s essential for survival in harsh environments.
A crucial tip: When you order a seal kit, always try to have the cylinder’s make, model, and serial number handy. If it’s a generic or unbranded cylinder, you’ll have to very carefully measure the old seals and the grooves they sit in. A seal that is even a fraction of a millimetre off will leak under pressure.
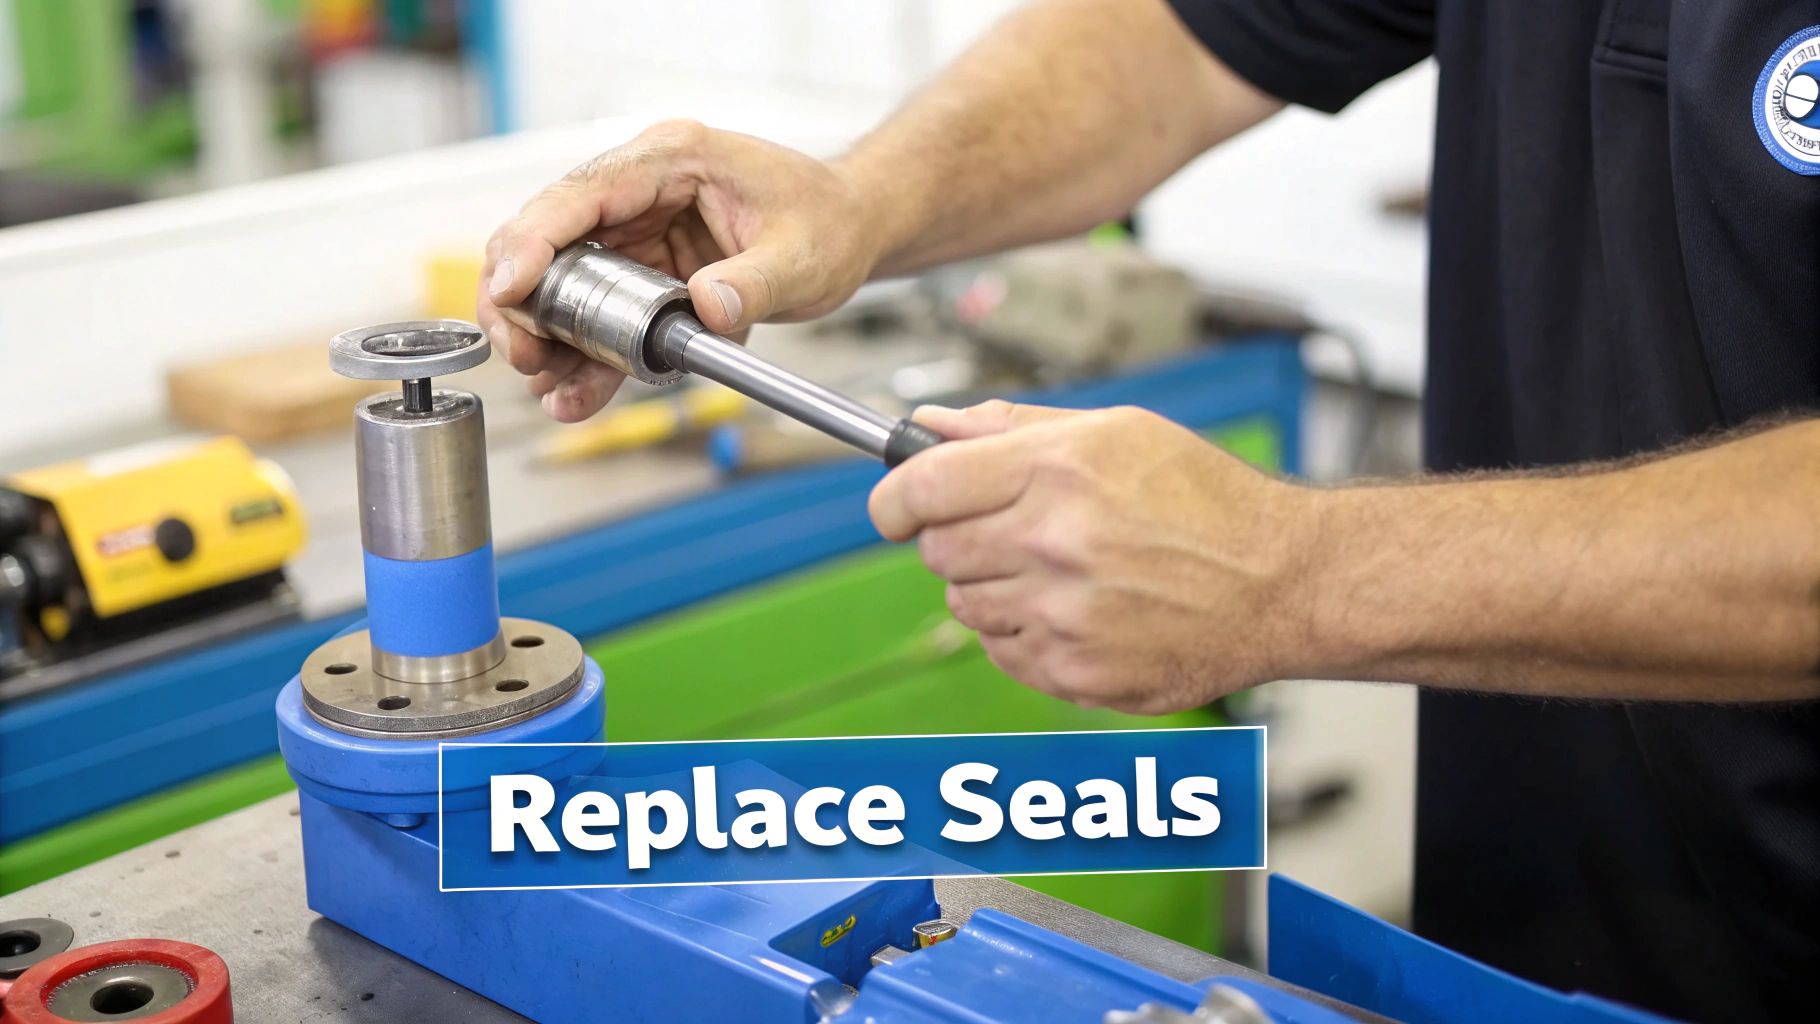
Best Practices for Installing New Seals
With the right seal kit in hand, the final step requires care and a gentle touch. A tiny nick or tear in a new seal during installation will make it completely useless.
First things first, clean every single component and groove meticulously. Any bit of dirt or grit left behind can shred a new seal or, worse, contaminate the entire hydraulic system.
Next, lubrication is your best friend. Always lubricate the new seals and the grooves with clean hydraulic fluid or a compatible assembly lubricant. This helps them slip into place without twisting or catching. Whatever you do, avoid using grease – it can clog small pilot holes in the system and is often incompatible with the hydraulic oil.
Investing in a proper set of seal installation tools is a very smart move. These tools are typically made of soft materials like plastic or brass and are designed to gently work seals into tight grooves without any sharp edges. Never, ever use a screwdriver or a steel pick. You’ll almost certainly damage either the new seal or the machined groove it sits in.
Following these steps ensures your repair isn’t just a temporary patch-up, but a lasting solution that gets your cylinder back to peak performance.
If you need a hand choosing the right seals or would rather have an expert take care of the entire repair, our team is here to help. Give us a call on 01724 279508 to discuss what you need, or send us a message through our contact form.
Final Reassembly and System Testing
With your new seals laid out and any machining work complete, it’s time for the final push: reassembly. This is where patience and precision really pay off. All the careful work you’ve done can be undone in a heartbeat by a stray bit of grit or a poorly tightened nut, so stay focused.
Before a single part goes back together, everything needs one last, meticulous clean. Grab a lint-free cloth and a good solvent. Even a tiny piece of debris can act like sandpaper on those brand-new seals, and you’ll be back to square one before you know it. Contamination is the number one enemy of hydraulics.
The Art of Careful Reassembly
Start by fitting the new seals to the piston and gland. Remember to use plenty of the right lubricant and the same careful techniques you used during inspection. Once the seals are snug, you can get to the main event. Give the inside of the cylinder barrel a generous coating of clean hydraulic fluid, and do the same for the piston seals.
Now, gently guide the piston and rod assembly back into the barrel. Be incredibly careful not to let the rod threads knock against the inside of the tube—it’s an easy way to raise a burr and score the bore on the way in. If your cylinder has wear bands, double-check they’re properly seated, and push the piston in squarely to prevent the main seal from rolling or getting pinched.
With the rod assembly fully home, you can screw the gland back into place. Always start it by hand to make sure you haven’t cross-threaded it.
One of the most common mistakes I see is getting the torque wrong. If a gland nut or tie rod is too loose, it’s guaranteed to leak under pressure. But go too far the other way, and you risk distorting the cylinder barrel or stripping the threads, which is a far bigger problem to solve.
Always hunt down the manufacturer’s torque specs. They are your best friend here. If you absolutely can’t find them, a standard torque chart for the thread size is your next best bet, but the official numbers are always the gold standard.
Bench Testing for Peace of Mind
Before that cylinder goes anywhere near a machine, it needs to be bench-tested. This is non-negotiable. It’s a simple quality control step where you hook the cylinder up to a low-pressure power source, like a bespoke hydraulic power unit, on a test rig.
The goal here is twofold:
- Leak hunting: Pressurise each side of the cylinder one at a time. You’ll want to meticulously check the gland seal, port connections, and look for any internal bypass past the piston seal.
- Smooth operation check: Cycle the cylinder back and forth a few times. You’re looking for smooth, consistent movement. Any binding or juddering is a red flag pointing to an assembly problem.
Catching a small weep on the test bench is a minor fix. Discovering it after you’ve wrestled the cylinder back onto a 20-tonne excavator? That’s a whole different kind of headache.
Recommissioning and Bleeding the System
Once it passes the bench test, you can get the cylinder reinstalled. After connecting the hoses, there’s one final, crucial job: bleeding the air out of the system. Trapped air is a big problem; it compresses under load, making the cylinder’s movement spongy, erratic, and sometimes downright dangerous.
The process is straightforward. With the reservoir cap loose, extend and retract the cylinder several times at low pressure and low speed. You’ll likely hear the air gurgling its way back to the tank. When the movement is silky smooth, you can tighten the cap, slowly bring the system up to its normal operating pressure, and do one last walk-around to check for leaks.
This final step ensures your repair is truly finished, returning the machine to safe, reliable, and powerful service.
If you’ve gone through all these steps and are still hitting a wall, or if you’d rather have an expert handle it from the start, we’re here to help. Give us a call on 01724 279508 or send us a message to talk it through.
Your Hydraulic Cylinder Repair Questions Answered
We get a lot of questions from maintenance crews and operators about the real ins-and-outs of hydraulic cylinder repair. Drawing on decades of workshop experience, here are some straight answers to the queries that land on our desk most often.
How Much Does a Typical Cylinder Repair Cost?
This is the big one, isn’t it? The truth is, the cost can be all over the map. A simple re-seal on a small agricultural ram might set you back between £150 and £300. On the other hand, a major overhaul of a large excavator cylinder—think rod re-chroming and barrel honing—could easily climb past £2,000.
Ultimately, the final invoice boils down to three key factors:
- The cylinder’s size and complexity.
- The extent of the damage we find once it’s stripped down.
- The price of the specific parts needed.
A basic seal kit is cheap, but if the piston rod, barrel, or gland are shot, the cost will naturally jump up.
Can I Just Replace the One Leaking Seal?
It’s a tempting shortcut, but in my experience, this is nearly always a bad move. Think about it: the seals in a cylinder all work in the same environment, under the same pressure. They wear out at a similar pace. If your main rod seal has packed it in, you can bet the piston seal and wiper seal aren’t far behind.
Just replacing the one failed seal is a false economy. You might save a few quid on parts today, but you’ll almost certainly be stripping the whole thing down again in a few months to fix the next leak. That costs you far more in downtime and labour. Do the job properly and fit a complete, high-quality seal kit from the start.
What Is the Most Common Cause of Cylinder Failure?
By a country mile, the single biggest killer of hydraulic cylinders is contaminated fluid. It’s a shocking statistic, but it’s estimated that dirty oil is the root cause of up to 80% of all hydraulic system faults. Tiny particles of grit, dirt, and metal act like a liquid sandpaper, scouring seals and scoring finely polished surfaces, which absolutely wrecks components in no time.
Your best defence is simple but effective: regular oil analysis and a strict filter replacement schedule. It’s the most powerful way to extend the life of your cylinders and protect your entire hydraulic system.
It’s crucial to remember that maintenance and repair are significant ownership costs for any hydraulic machinery. UK industry data shows that ongoing expenses for fluid monitoring, seal replacement, and inspections have a real impact on operational budgets. You can explore more insights into the hydraulic cylinder market to get a better handle on these costs.
When Should I Repair vs Replace a Cylinder?
Deciding whether to repair or replace really comes down to a cost-benefit calculation. A solid rule of thumb we use is this: if the repair quote is heading towards 60-70% of the cost of a brand-new cylinder, buying new is probably the smarter financial decision.
But, as with everything, there are exceptions. If you’re dealing with an obsolete or highly specialised cylinder where a like-for-like replacement simply isn’t on the shelf, repair might be your only feasible route, whatever the cost. A thorough inspection is the only way to make the right call.
At MA Hydraulics Ltd, we’ve built our reputation on providing expert advice and top-quality components to get the job done right. Whether you need a full repair service or just a bit of guidance on finding the correct parts, our team is here to help.
Phone 01724 279508 today, or send us a message.
